Navigating HRM System Setup
The setup of the HRM system involves customizing and adjusting the Human Resource Management module in the ERP system to align with the organization's specific requirements. This process ensures that the ERP system is optimized to effectively handle employee data, HR workflows, and various workforce-related tasks, thus enabling efficient management of HR processes based on the organization's unique needs.
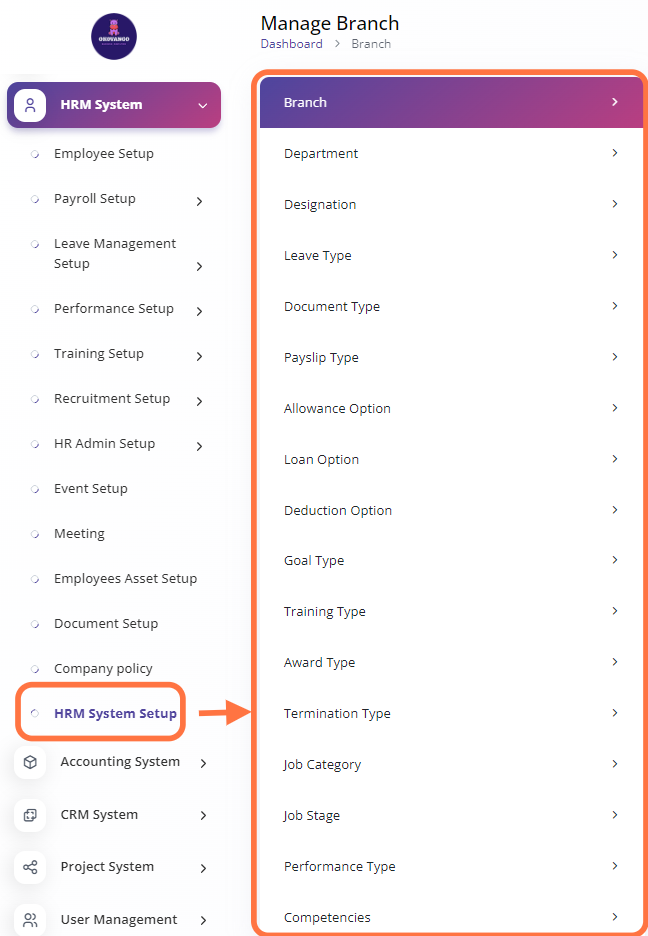
Branch
As part of the HRM system setup, you have the capability to manage your organization's branches. This feature allows you to input and maintain information related to your organization's different branches. By managing branches within the HRM system, you can effectively organize and track HR-related activities, employee assignments, and other branch-specific operations within your organization.
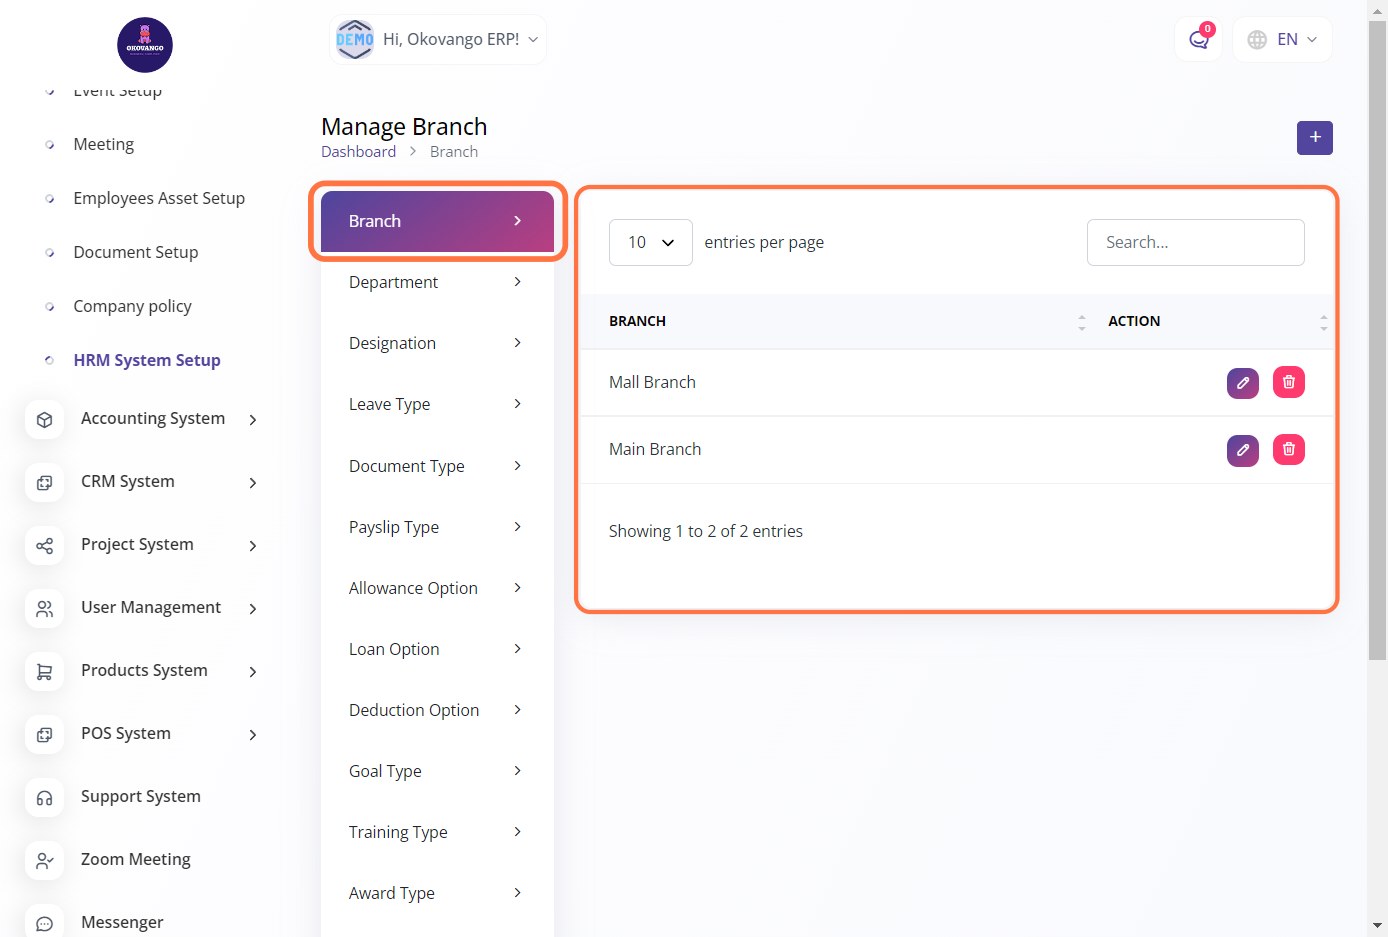
STEP 1: Click on "Create" Button

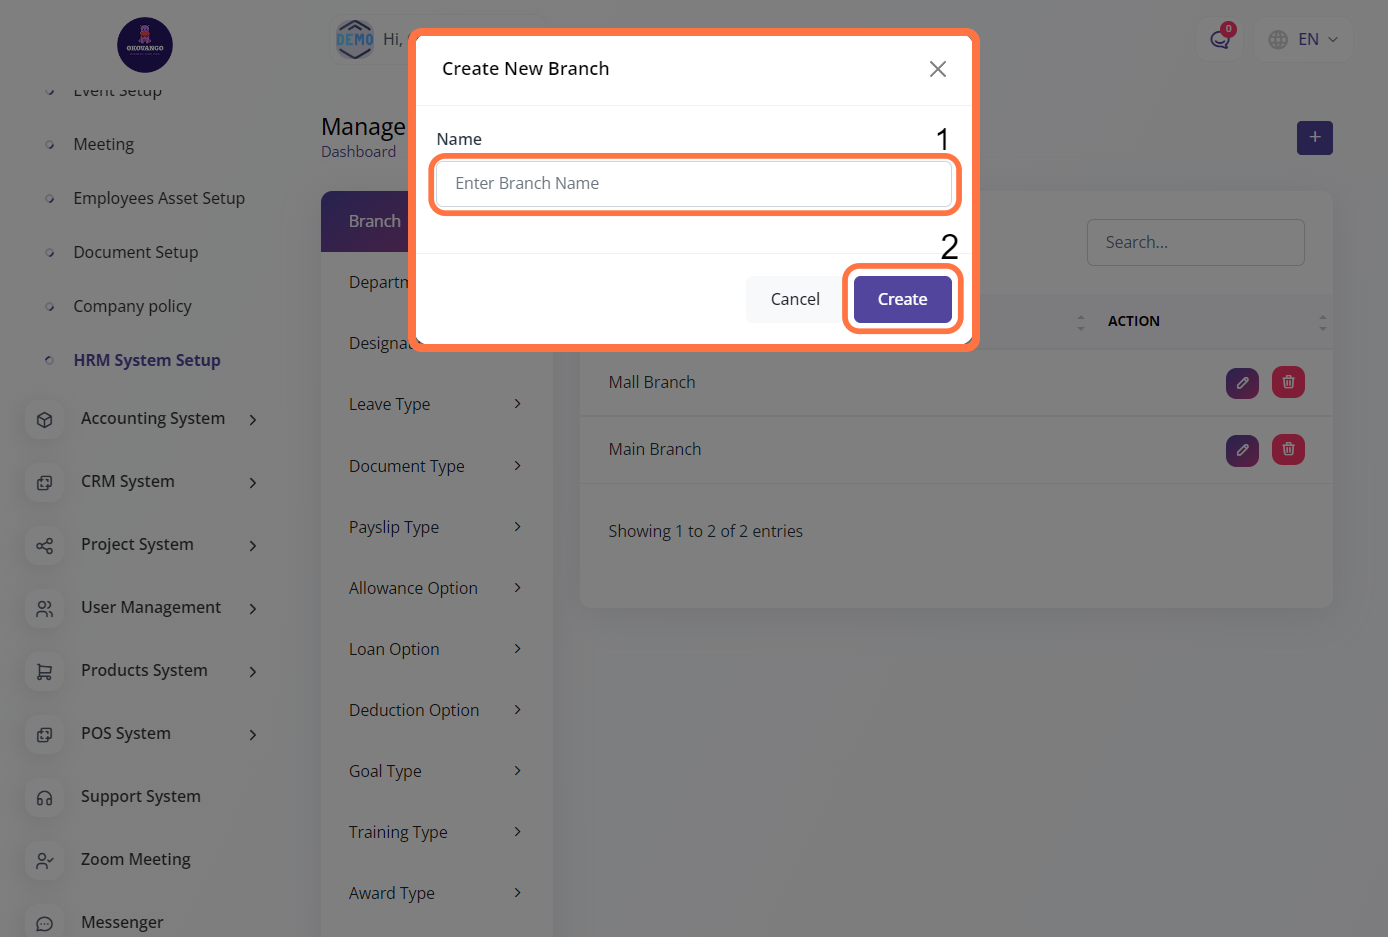
STEP 2: Create New Branch
This button enables you to create the names for your organization's branches. By clicking on it, you can enter and assign unique names to each branch within the system. This helps in identifying and distinguishing the different branches of your organization for HR management and administrative purposes.
- Input the desired name for your branch.
- Click on the "Create" button to proceed.
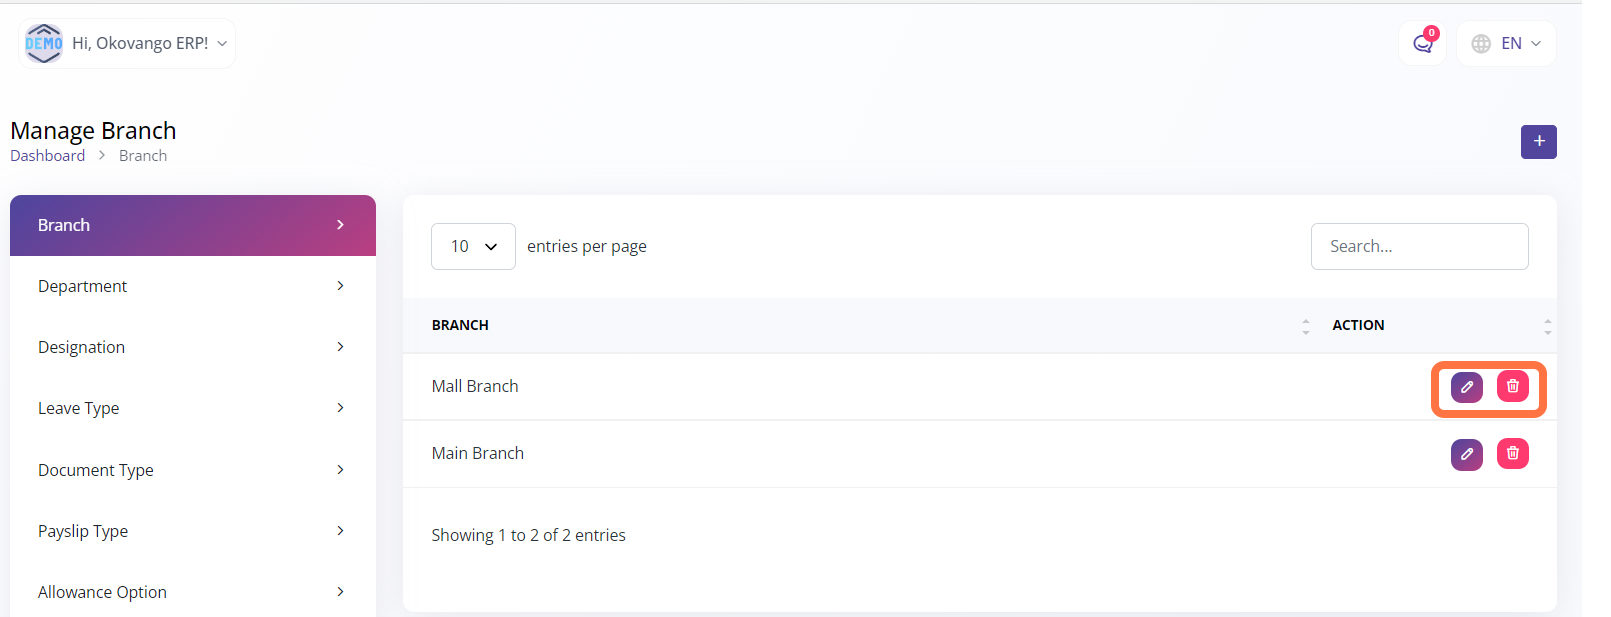
STEP 3: "Edit or Delete" Button
In this section, you have the ability to edit and delete the items you create. This means that after creating a branch or any other item, you can make changes to its information or remove it from the system if needed. By providing options to edit and delete, the system allows for flexibility and enables you to manage your branches effectively based on any updates or modifications required.
Department
In this section, you can create departments for your organization. By utilizing the provided functionality, you can establish and define different departments within your organization. This allows for better organization and management of various functional areas or divisions within your company.
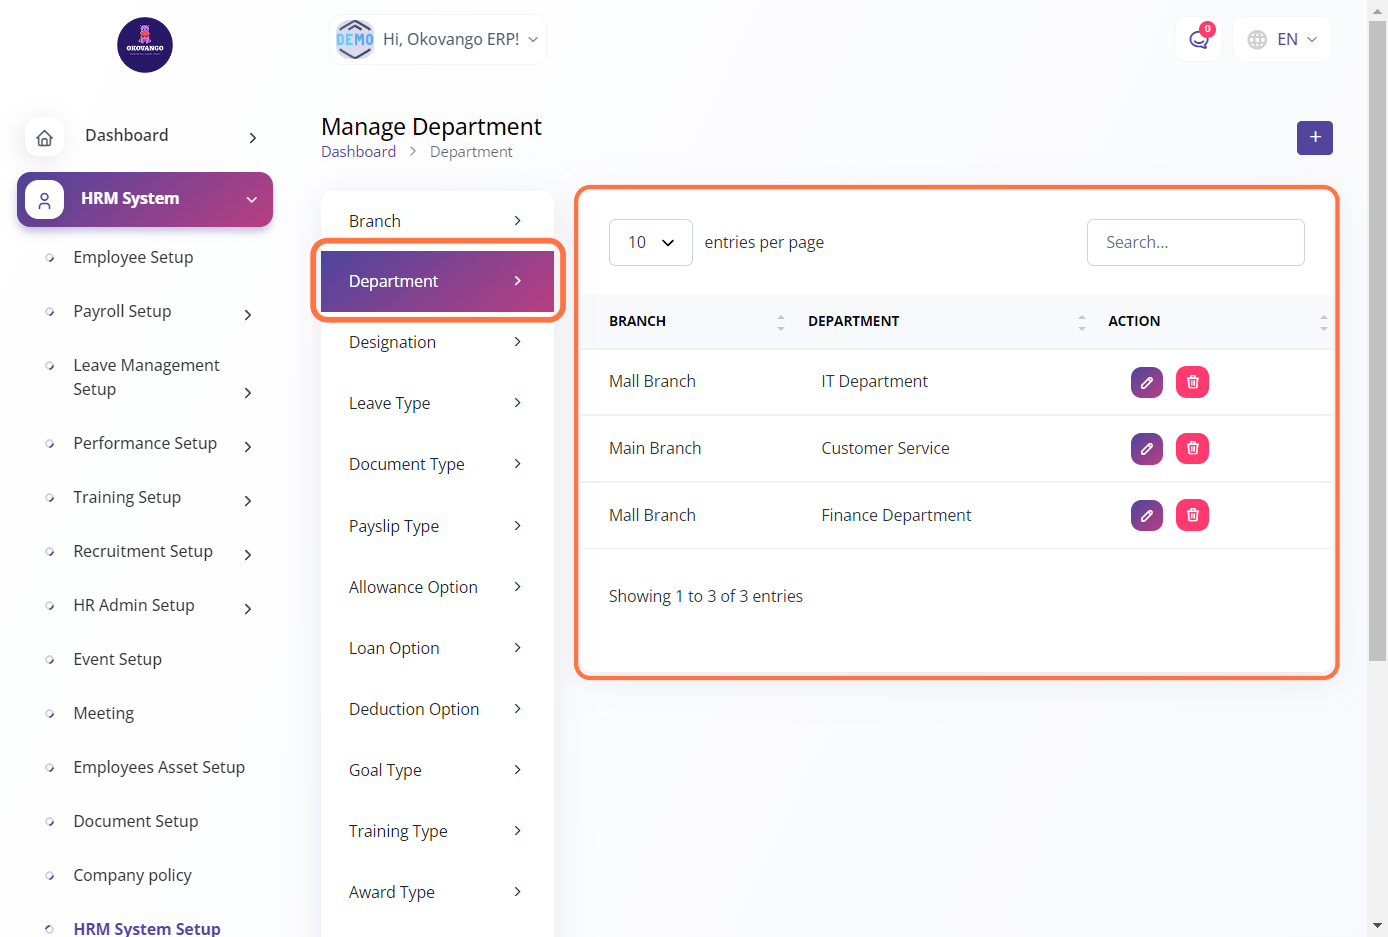
STEP 1: Click the "Create" Button
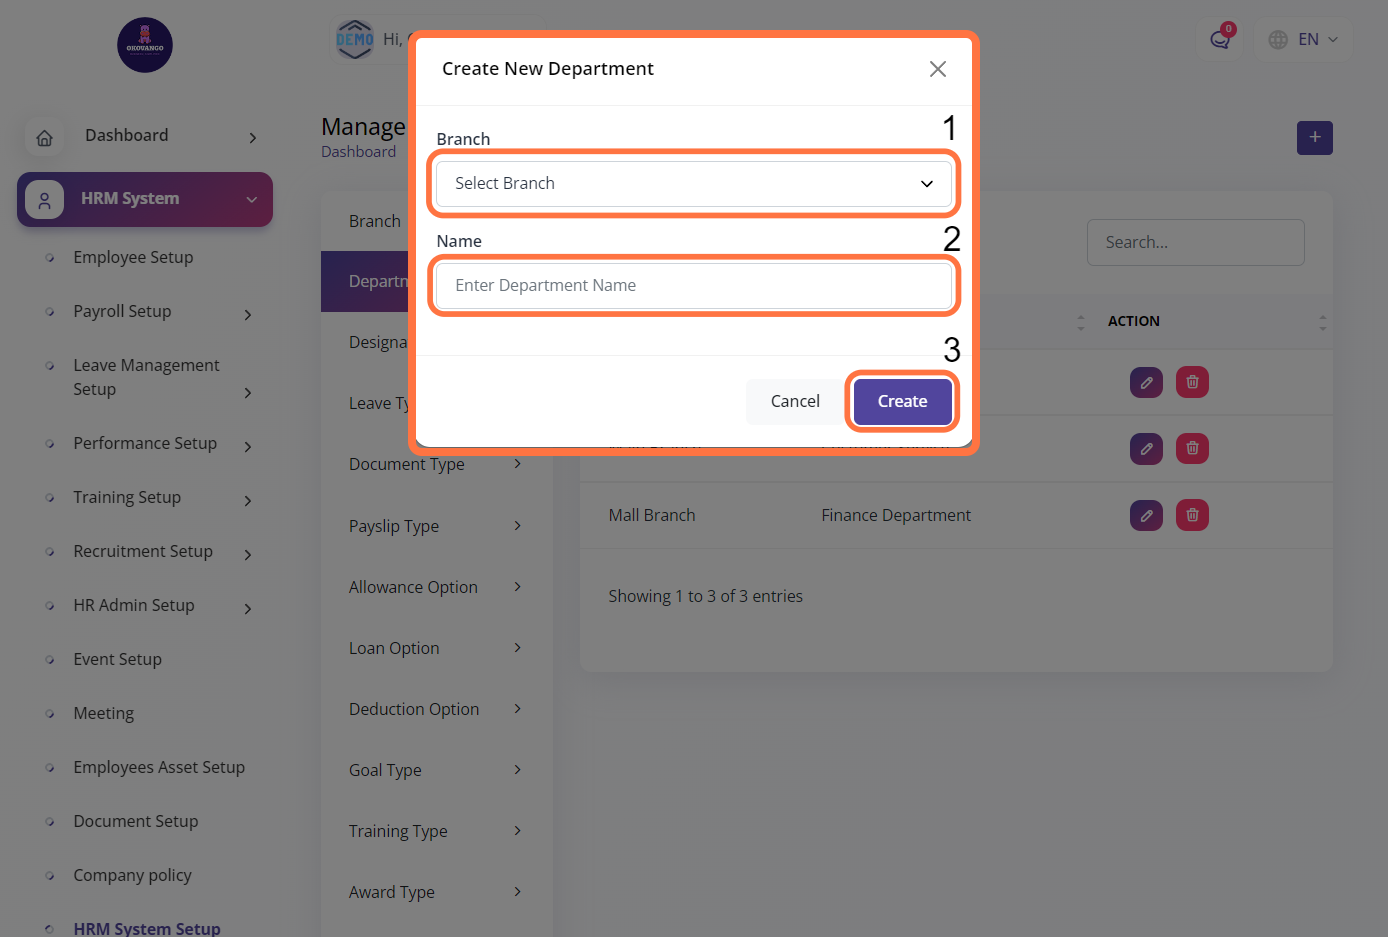
STEP 2: Create New Department
After clicking the "create" button, you can proceed to create your new department. To do this, enter the desired name for the department and select the appropriate branch to which it belongs. This allows you to establish a new department within a specific branch, helping to structure and categorize your organization's functional units effectively.
- Choose the branch from the available options.
- Enter the name of your new department.
- Click on the "Create" button to finalize the creation of the department.
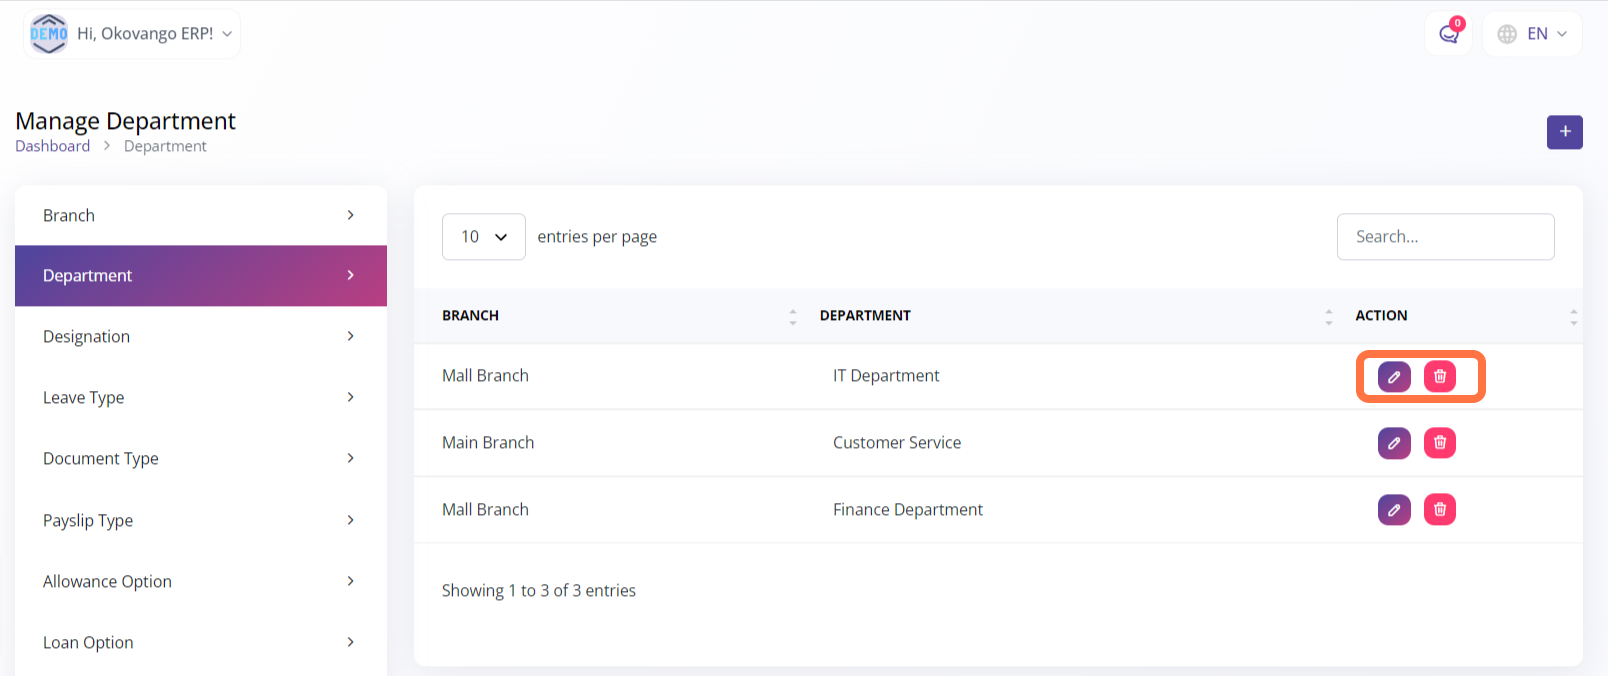
STEP 3: "Edit or Delete" Button
After creating the department, you will be able to view the details of what you have created. Additionally, you have the option to edit and delete the department if necessary. This allows you to make modifications to the department's information or remove it from the system based on your organization's evolving needs.
Designation
In this section, you have the ability to create designations for the departments within your organization. By utilizing the provided functionality, you can establish and define different job titles or roles within each department. This allows for better organization and categorization of positions and responsibilities within your company.
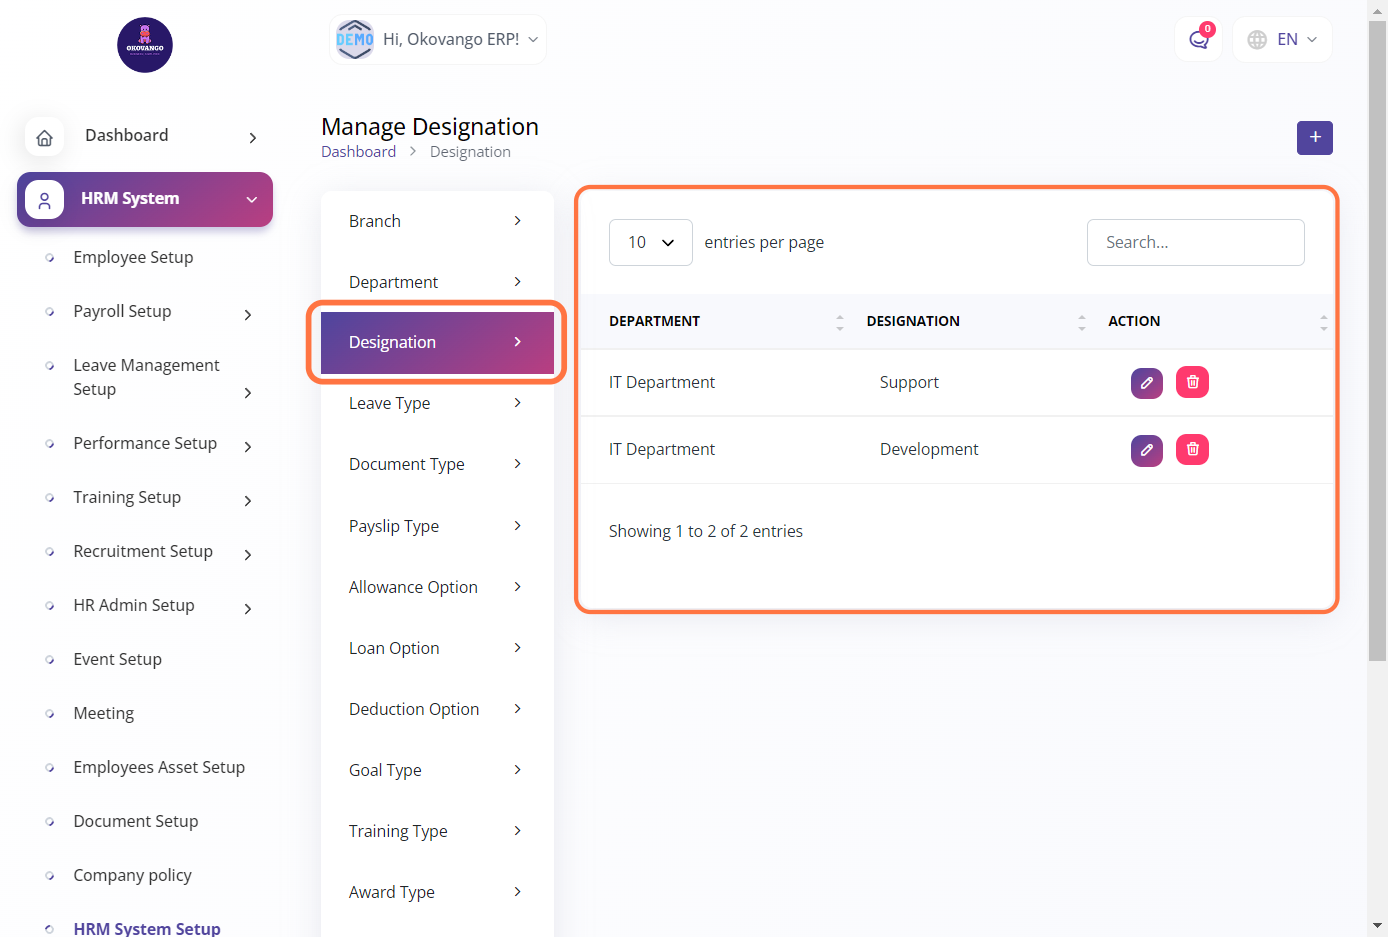
STEP 1: Click on "Create" Button
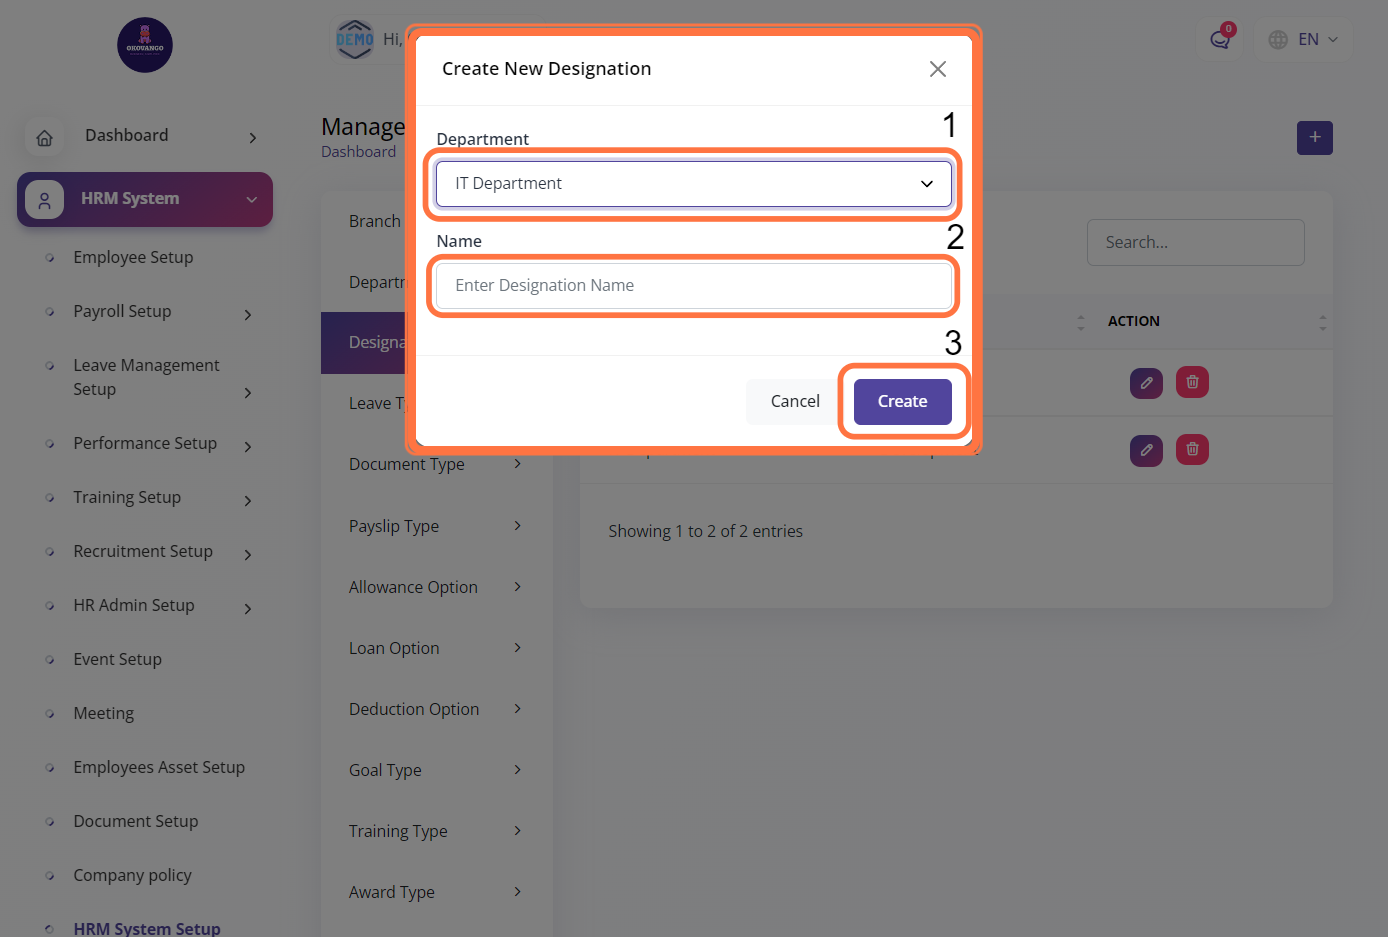
STEP 2: Create New Designation
Upon clicking the "Create" button, you will be able to create a new designation for the department. Follow these steps to create a new designation:
- Select the department from the available options.
- Enter the desired name for the designation.
- Click on the "create" button to finalize the creation of the new designation.
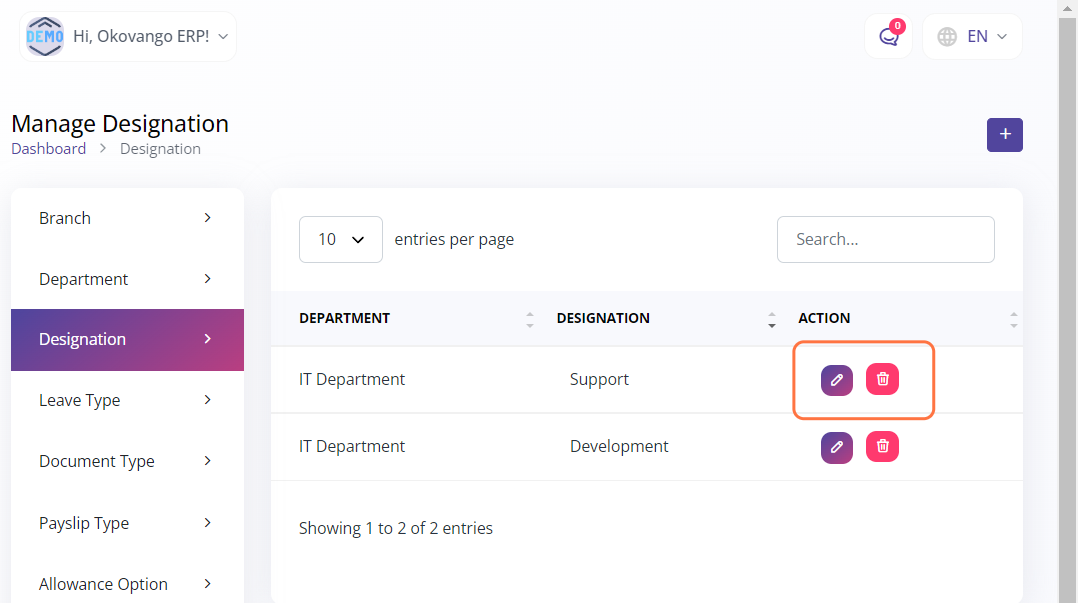
STEP 3: "Edit or Delete" Button
Once you have created the designation, you will have the ability to edit and delete it as needed. This provides you with flexibility and control over the designations within your organization. You can make changes to the designation's information or remove it from the system if necessary, allowing for effective management and adjustment of job titles and roles within the departments.
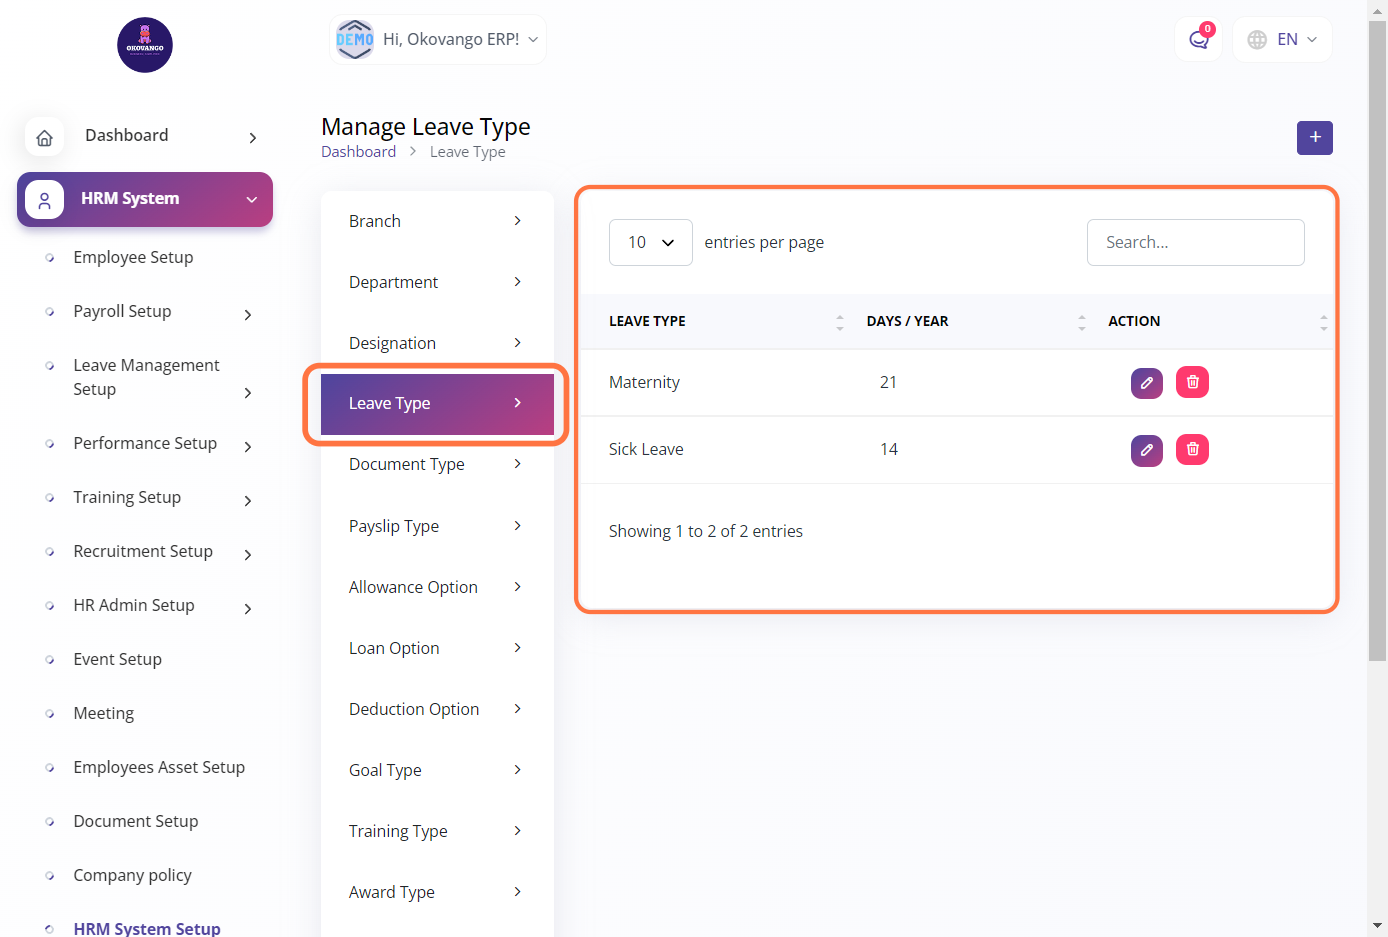
Leave Type
In the Leave Type section, you can create and define the various types of leaves available within your organization. This feature allows you to customize and set up specific leave categories to align with your organization's leave policies and requirements. By creating leave types, you can effectively manage and track different types of leaves such as annual leave, sick leave, maternity/paternity leave, and other applicable leave categories within your organization.
STEP 1: Click on "Create" Button
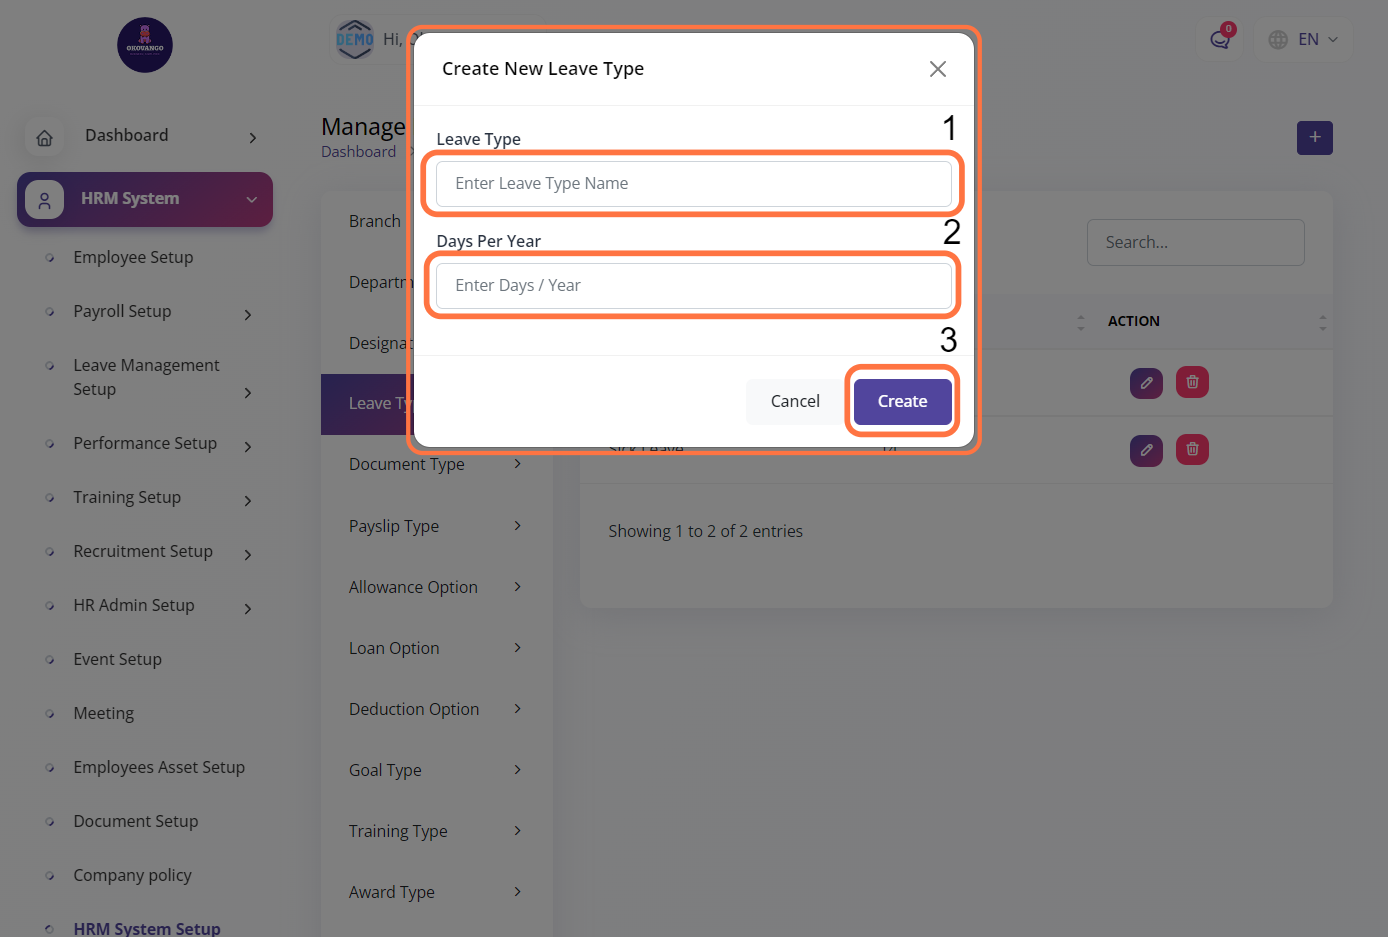
STEP 2: Create New Leave Type
After clicking the create button, you can proceed to create a new leave type using the following steps:
- Enter the name for the leave type.
- Specify the number of days allocated for this leave type per year.
- Click the "create" button to finalize the creation of the new leave type.
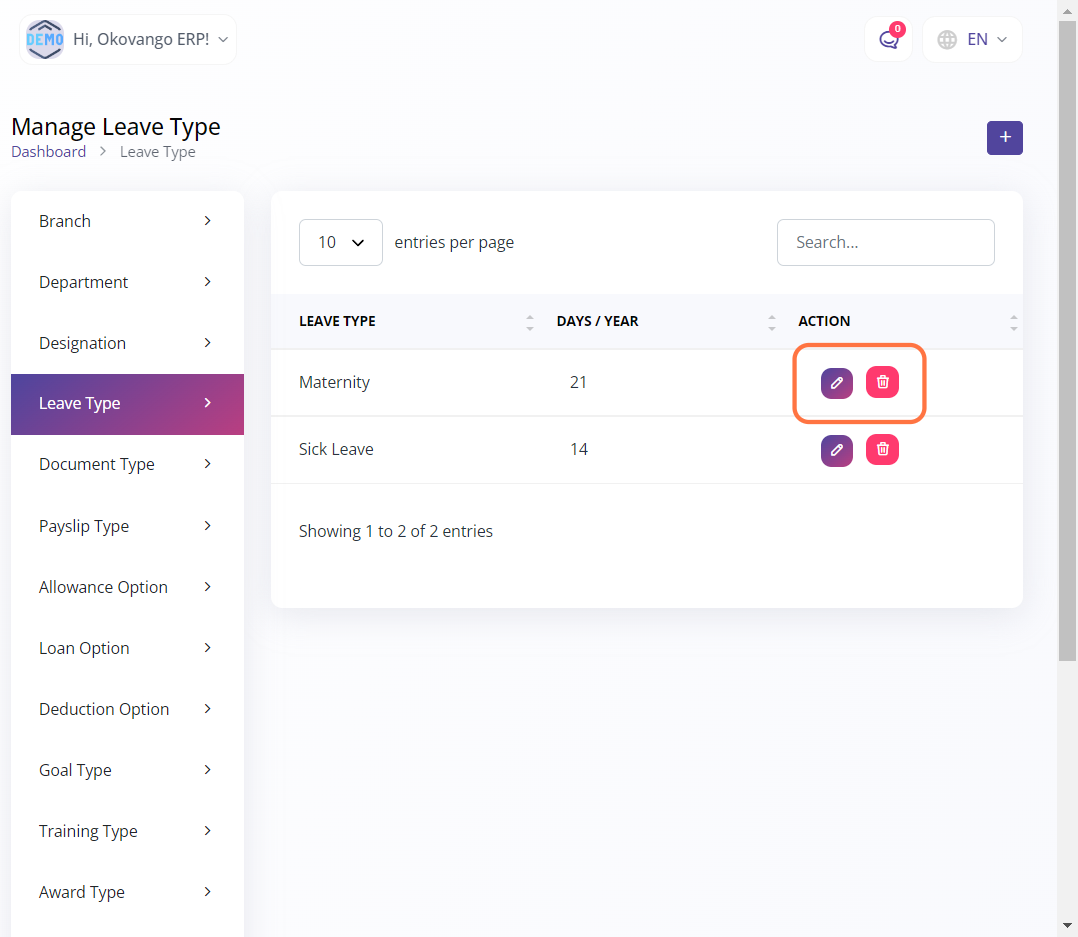
STEP 3: "Edit or Delete" Button
Once the leave type has been created, you will have the option to edit or delete it as needed. This feature allows you to make modifications to the leave type's details or remove it from the system if required. Editing and deleting capabilities provide flexibility in managing and adjusting leave types based on your organization's evolving needs.
Document Type
In this section, you have the ability to create document types specific to your organization, such as CVs, doctor's notes, or other relevant documents. By utilizing this functionality, you can define and categorize different types of documents that are commonly used or required within your organization. This helps in organizing and managing documents effectively, streamlining document-related processes, and ensuring consistent documentation practices.

STEP 1: Click on "Create" Button
STEP 2: Create New Document Type
To create new document types required in the organization, follow these steps:
- Enter the name of the document.
- Select whether the document is "required" or "not required" for the organization.
- Click on the "Create" button to create the new document type.

STEP 3: "Edit or Delete" Button
Once the document type is created, you will have the option to edit or delete it as needed. This allows you to make modifications to the document type's information or remove it from the system if required. The ability to edit and delete document types provides flexibility in managing and maintaining the list of document types based on your organization's changing needs and requirements.
 \
\
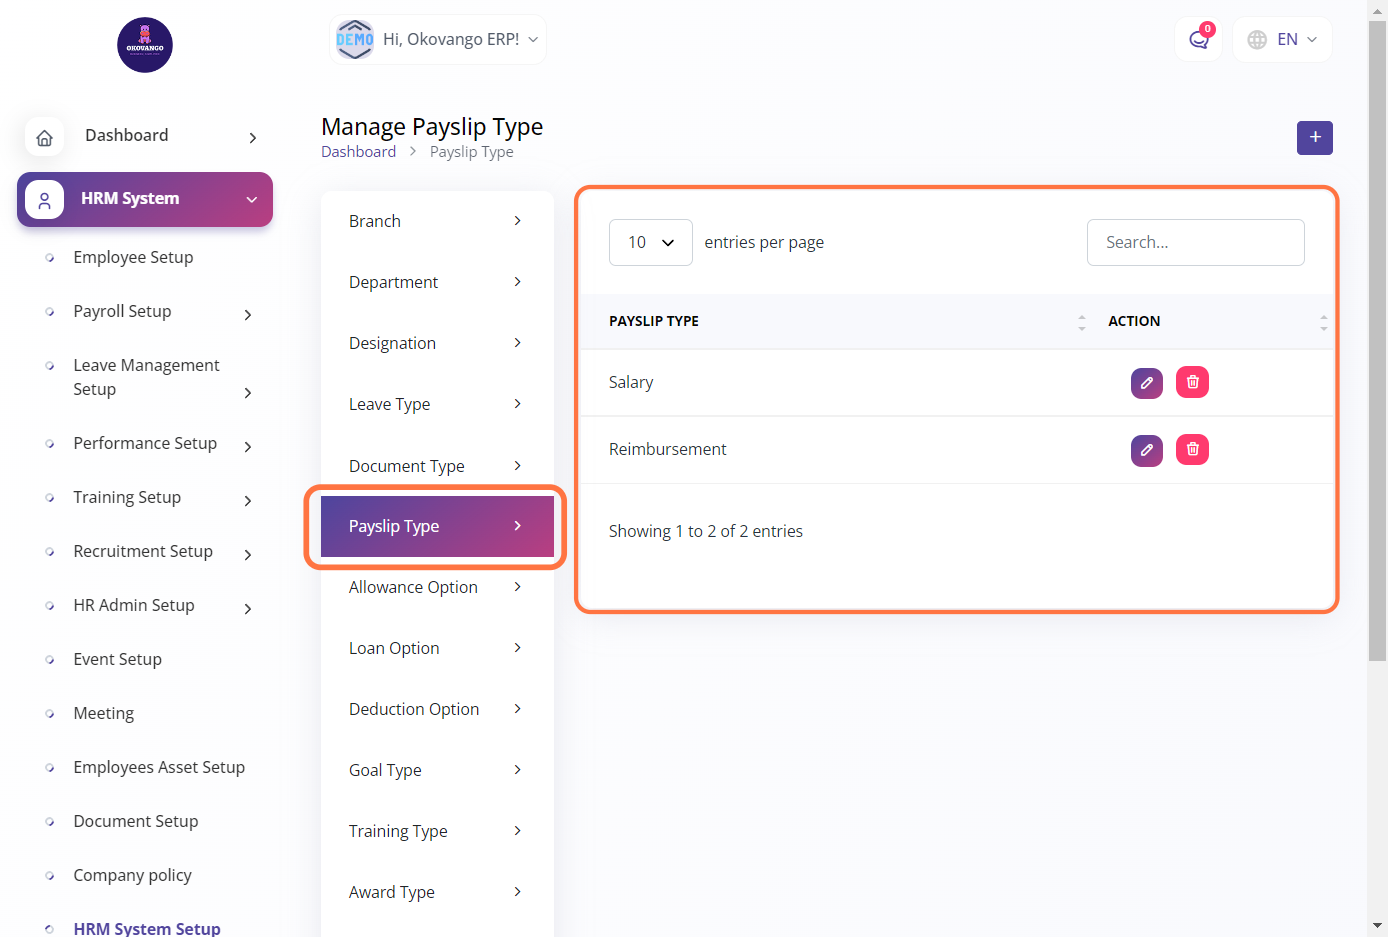
Payslip Type
In this section, you can create payslip types specific to your organization, such as salary, reimbursement, or any other applicable categories. This functionality allows you to define and categorize different types of payslips used within your organization. By creating payslip types, you can accurately reflect the various types of compensation and reimbursements provided to employees and effectively manage payslip generation and distribution processes.
 \
\
STEP 1: Click on "Create" Button
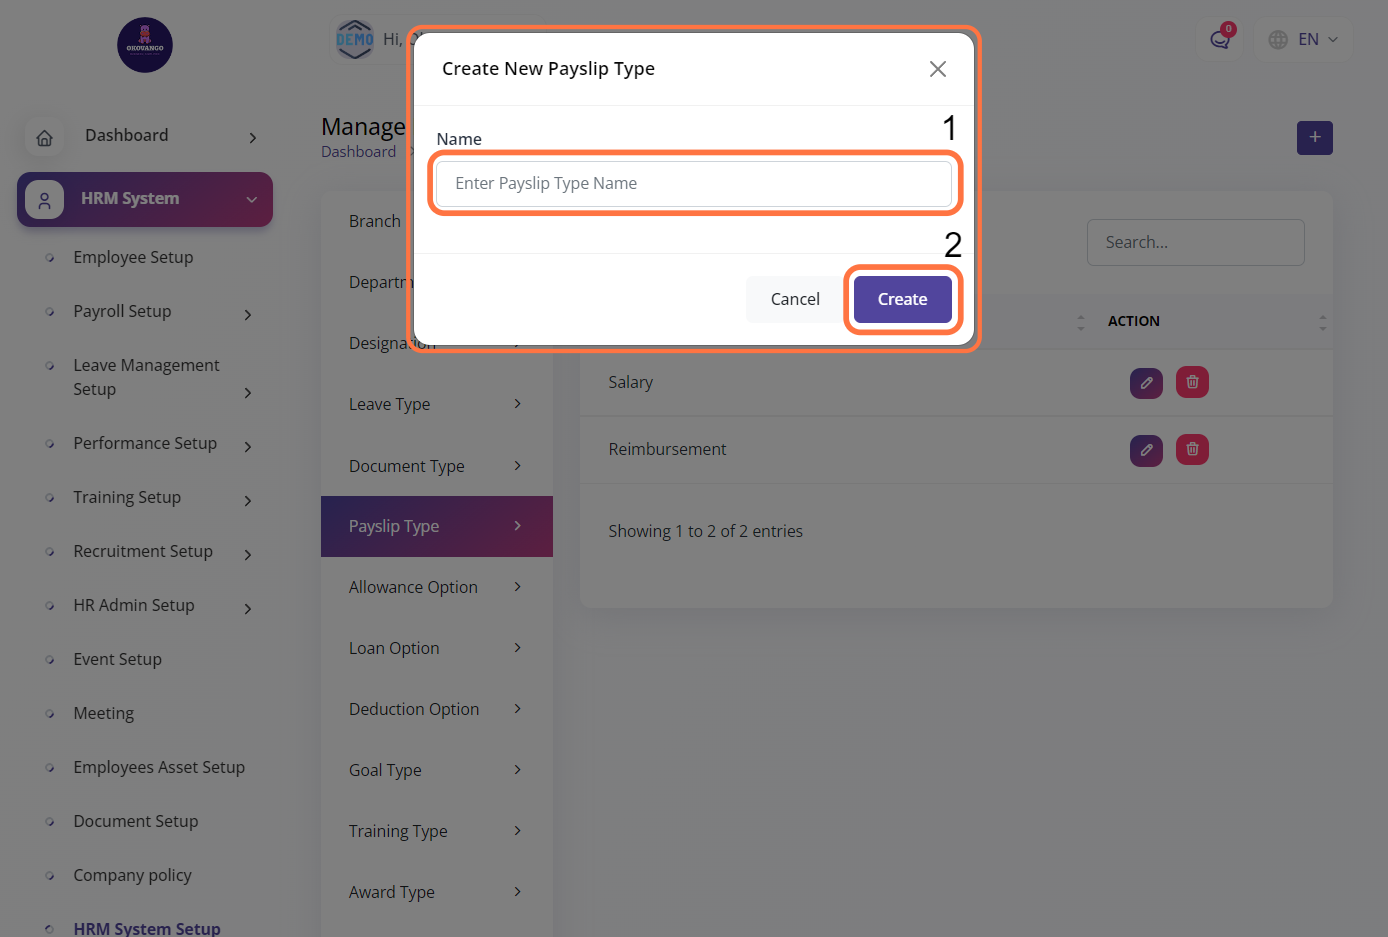
STEP 2: Create New Payslip Type
Once you click the create button, you can proceed to create a new pay slip type using the following steps:
- Enter the name of the payslip type.
- Click the create button to finalize the creation of the new payslip type.
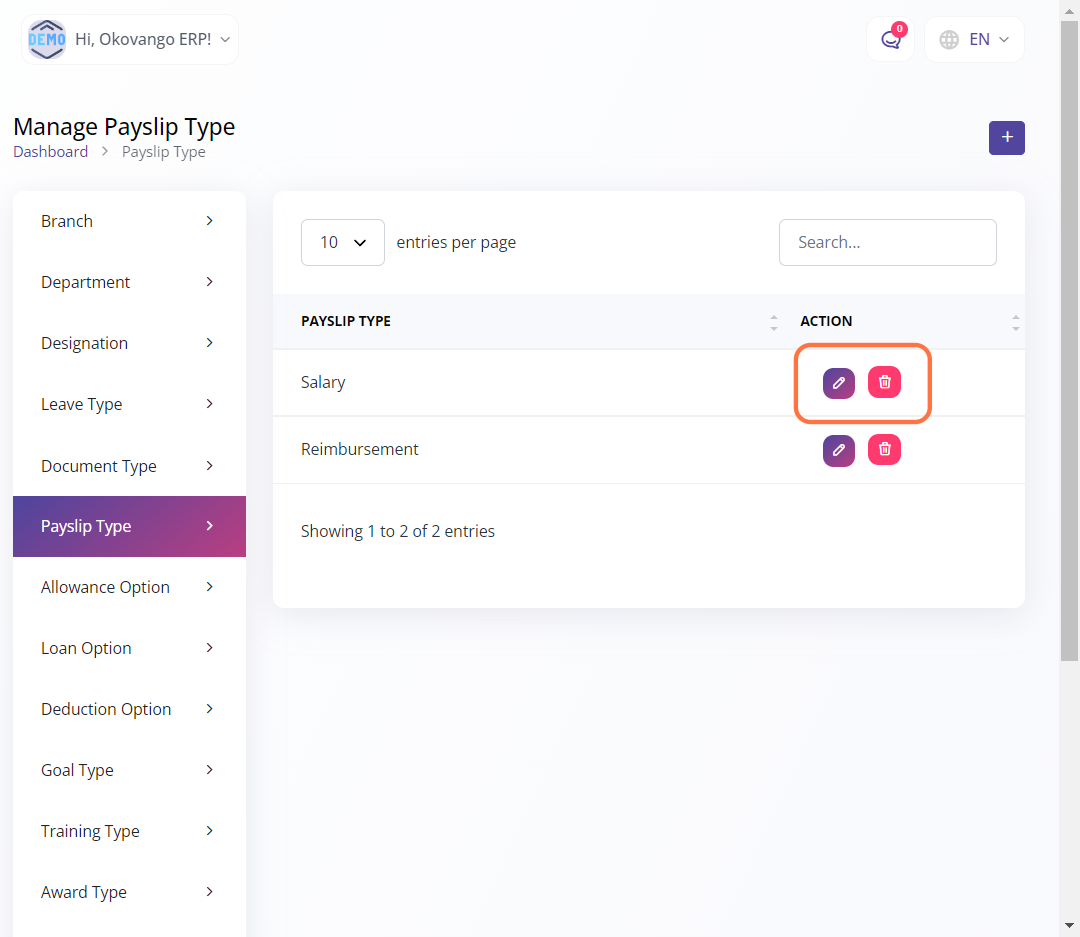
STEP 3: "Edit or Delete" Button
After creating the new payslip type, you will have the option to edit or delete it as needed. This allows you to make modifications to the payslip type's details or remove it from the system if necessary. The ability to edit and delete payslip types provides flexibility in managing and maintaining the list of payslip categories based on your organization's requirements and changes over time.
Allowance Type
In this section, you can create allowance options for employees within your organization. This functionality allows you to define and set up different types of allowances provided to employees, such as housing allowance, travel allowance, or any other applicable categories. By creating allowance options, you can effectively manage and track the allowances allocated to employees, ensuring accurate compensation calculations and transparent financial processes.
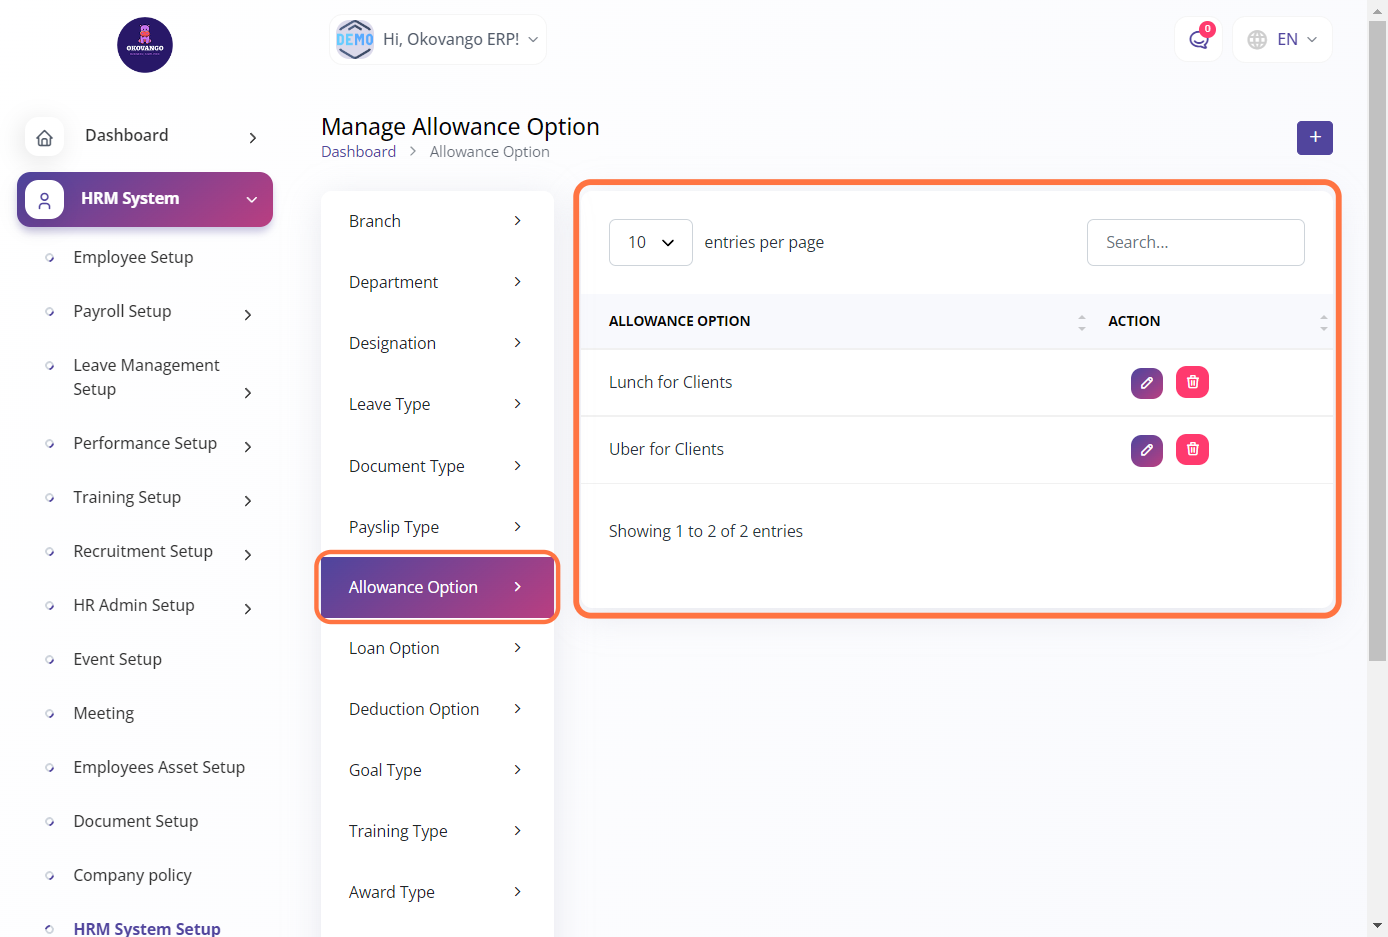
STEP 1: Click on "Create" Button
STEP 2: Create New Allowance Option
Once you click the create button, you can proceed to create a new allowance option using the following steps:
- Enter the name of the allowance option.
- Click the create button to finalize the creation of the new allowance option.

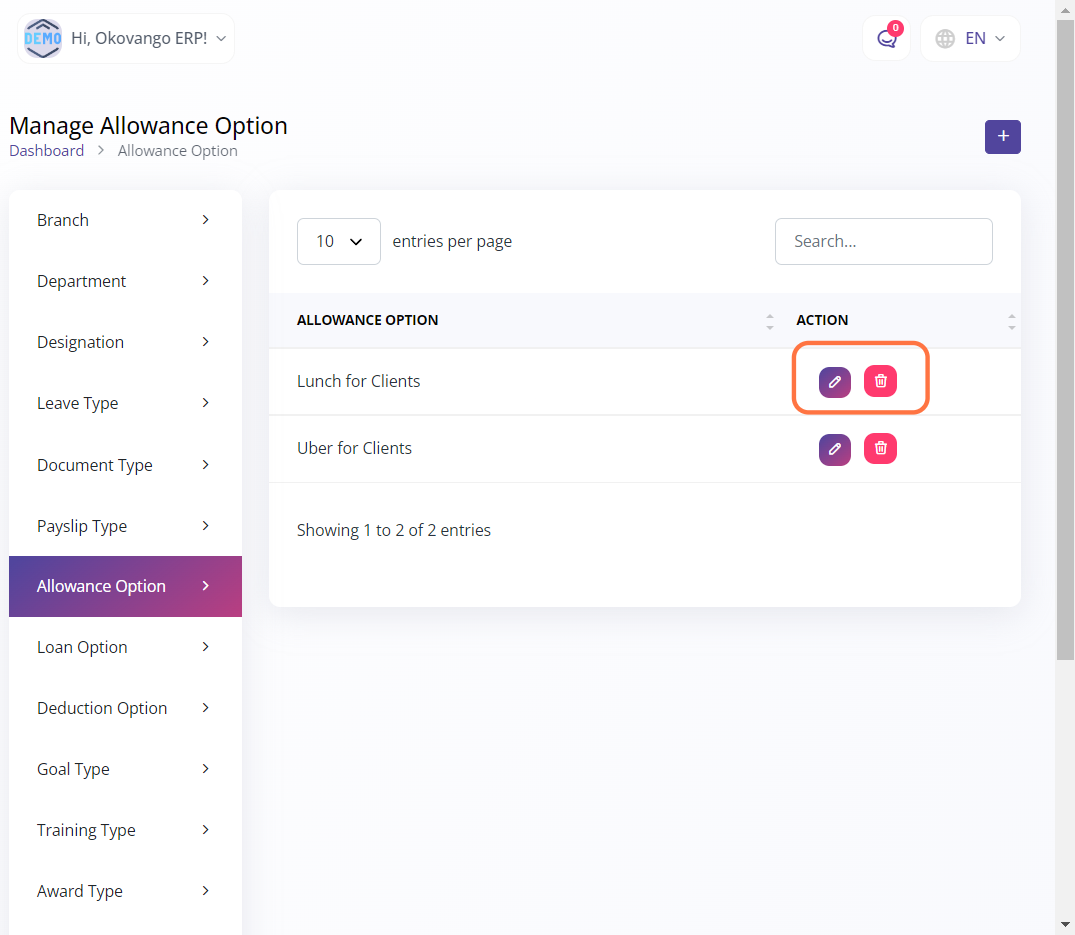
STEP 3: "Edit or Delete" Button
After creating the new allowance option type, you will have the ability to edit or delete it as needed. This provides flexibility in managing and maintaining the list of allowance options within your organization. You can make changes to the allowance option's details or remove it from the system if necessary, ensuring accurate and up-to-date allowance management based on your organization's requirements.
Loan Option
In this section, you can create loan options within your organization. This feature allows you to define and set up different types of loans that employees can avail, such as personal loans, housing loans, or any other applicable categories. By creating loan options, you can effectively manage and track loan programs, terms, and repayment details, ensuring accurate loan administration and financial management within your organization.
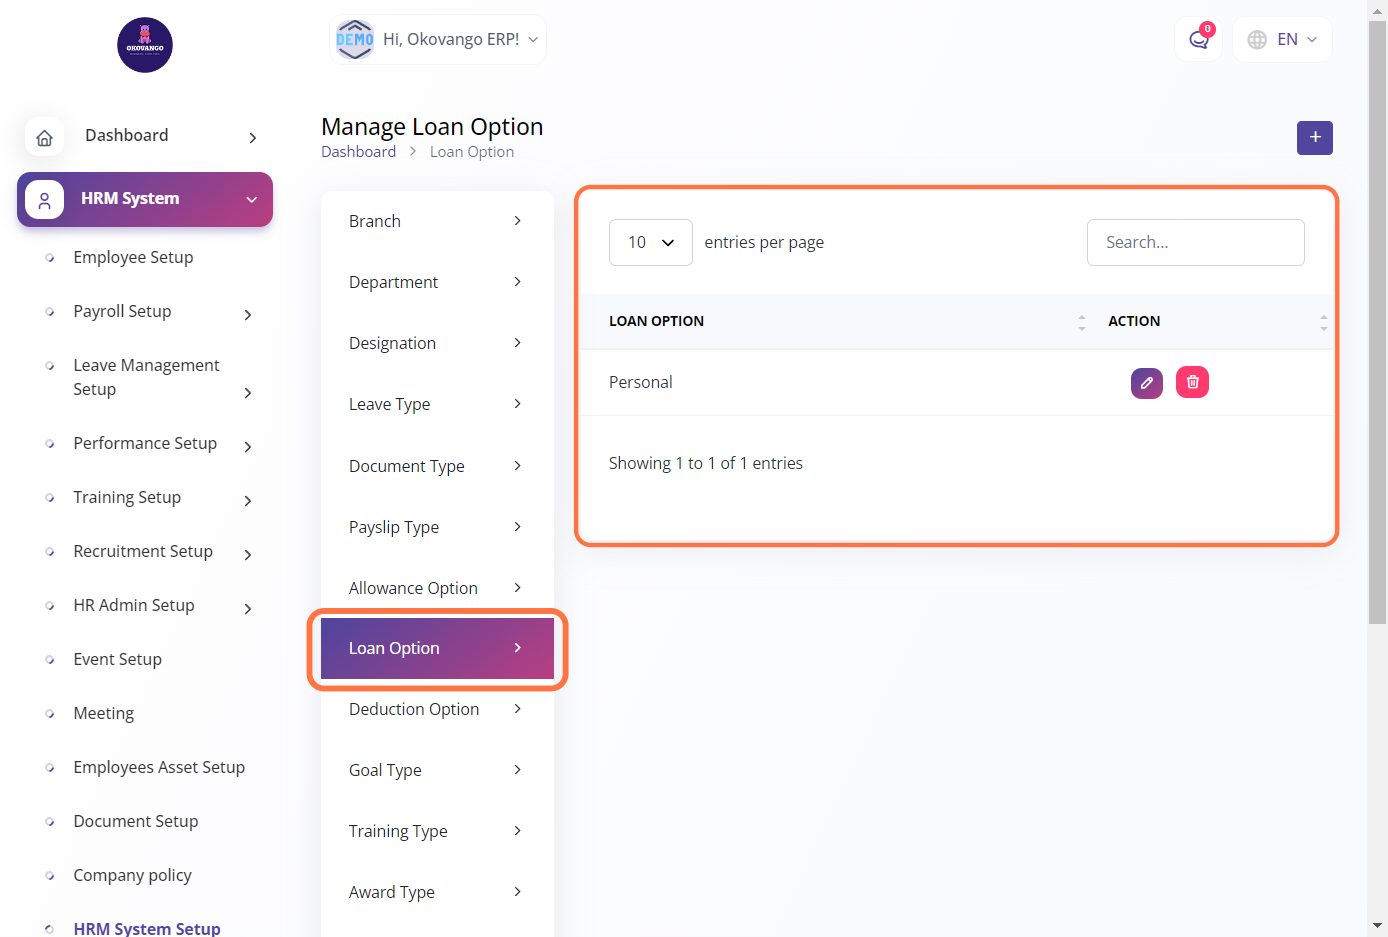
STEP 1: Click on "Create" Button
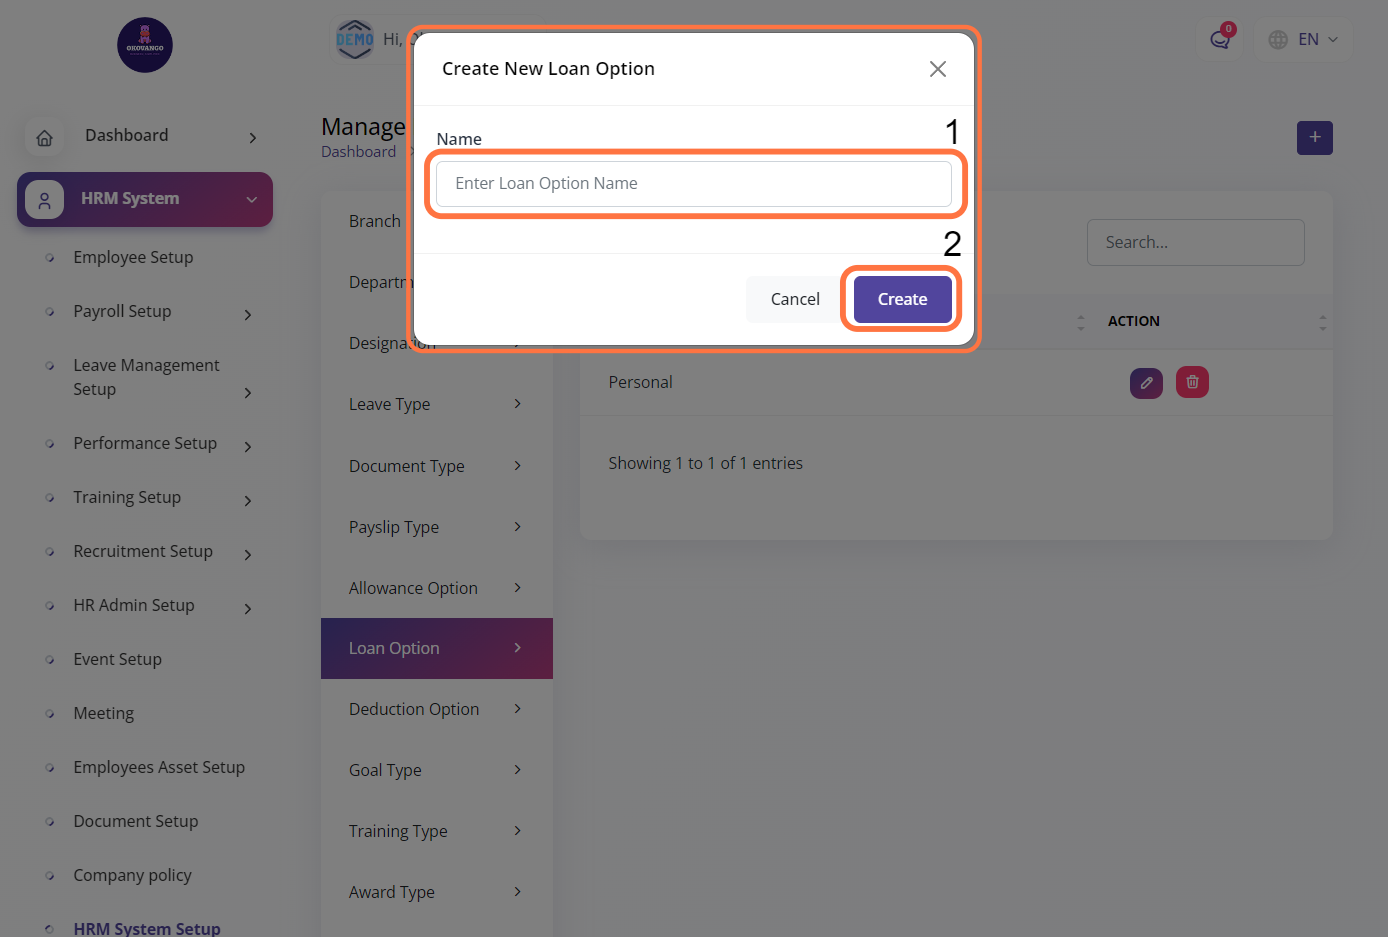
STEP 2: Create New Loan Option
Once you click the create button, you can proceed to create a new loan option using the following steps:
- Enter the name of the loan option.
- Click the create button to finalize the creation of the new loan option.
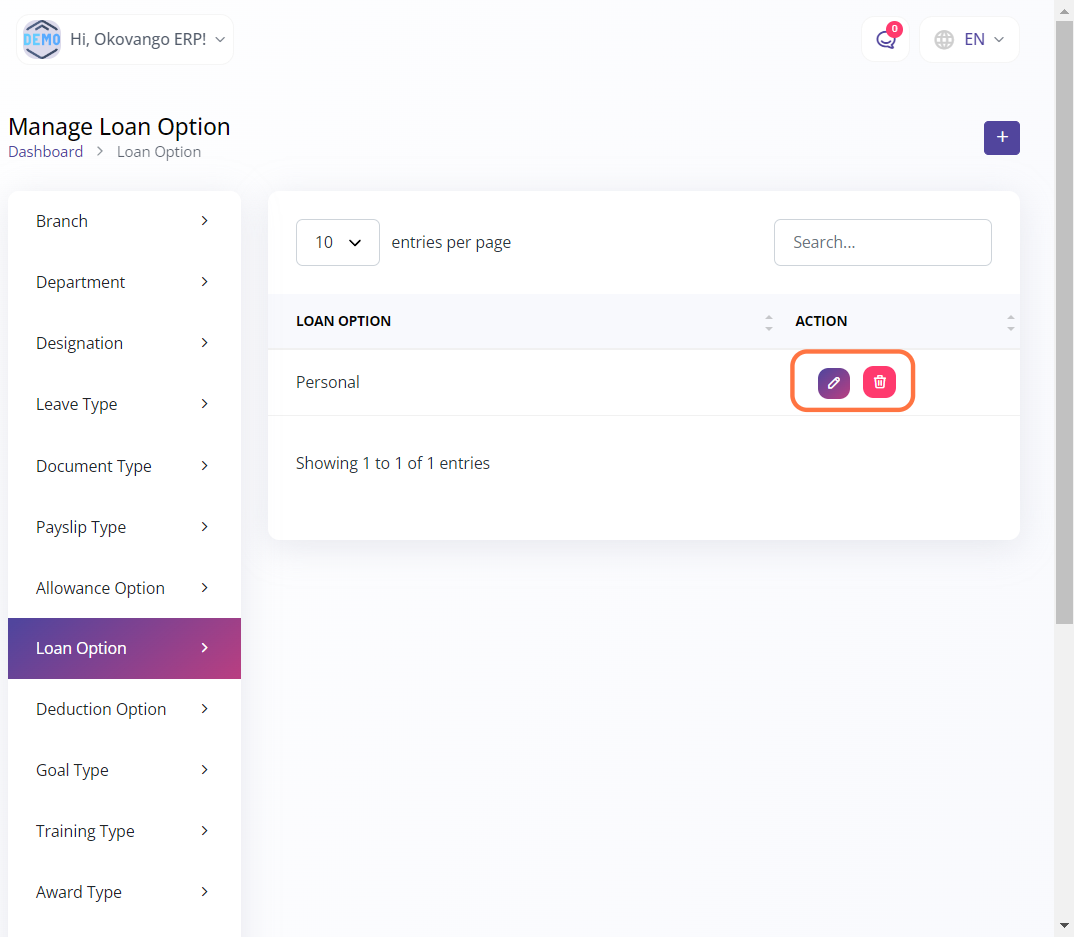
STEP 3: "Edit or Delete" Button
After creating the new loan option, you will have the ability to edit or delete it as needed. This provides flexibility in managing and maintaining the list of loan options within your organization. You can make changes to the loan option's details or remove it from the system if necessary, ensuring accurate and up-to-date loan management based on your organization's requirements.
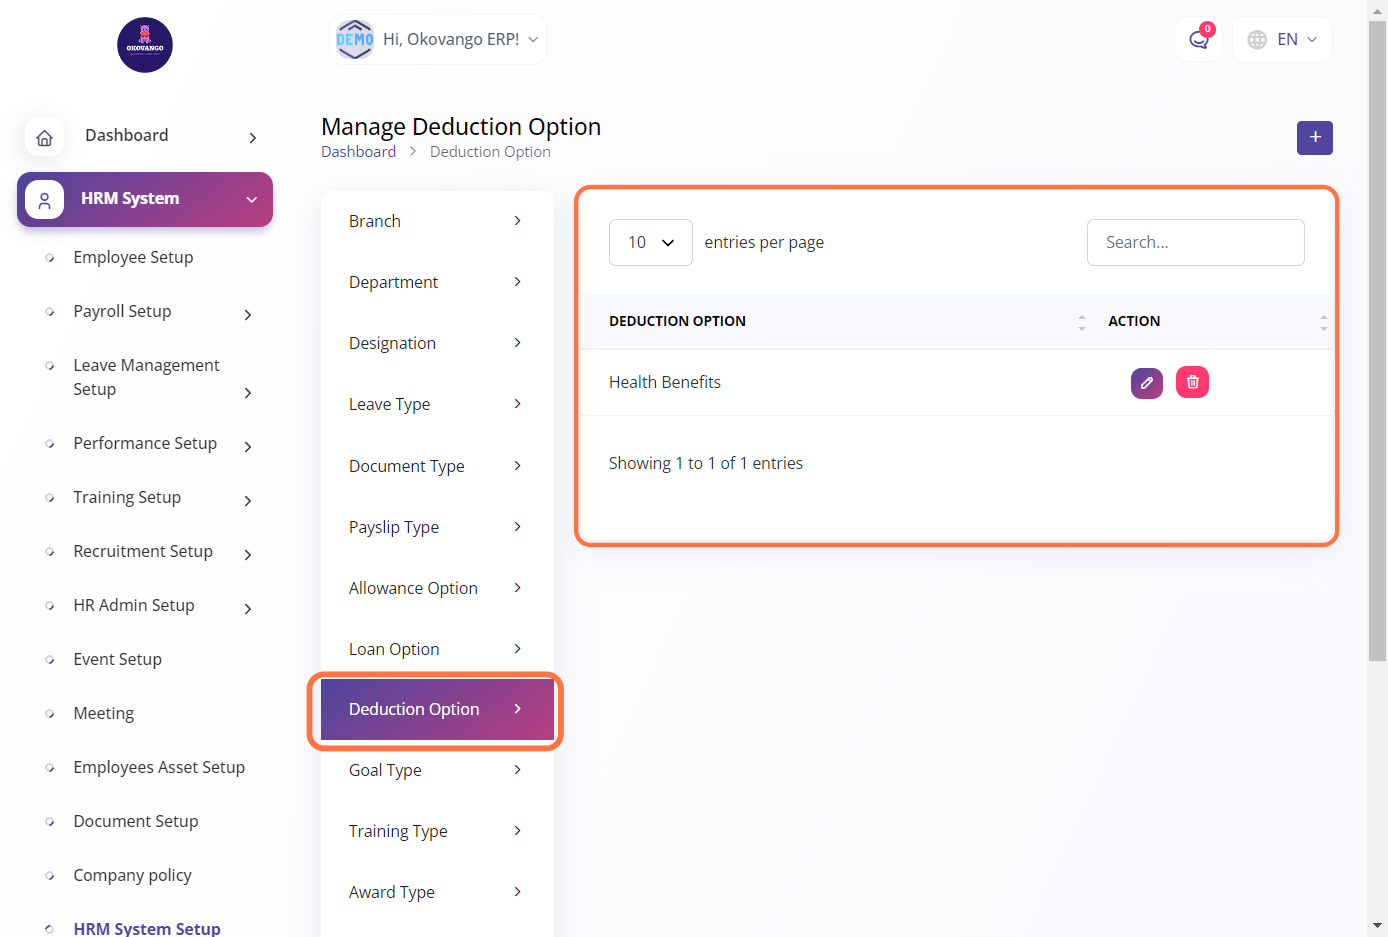
Deduction Option
In this section, you can create deduction options within your organization. This functionality allows you to define and set up different types of deductions that can be applied to employee salaries or benefits, such as tax deductions, insurance premiums, or any other applicable categories. By creating deduction options, you can effectively manage and track deductions, ensuring accurate salary calculations and proper deduction administration within your organization.
STEP 1: Click on "Create" Button
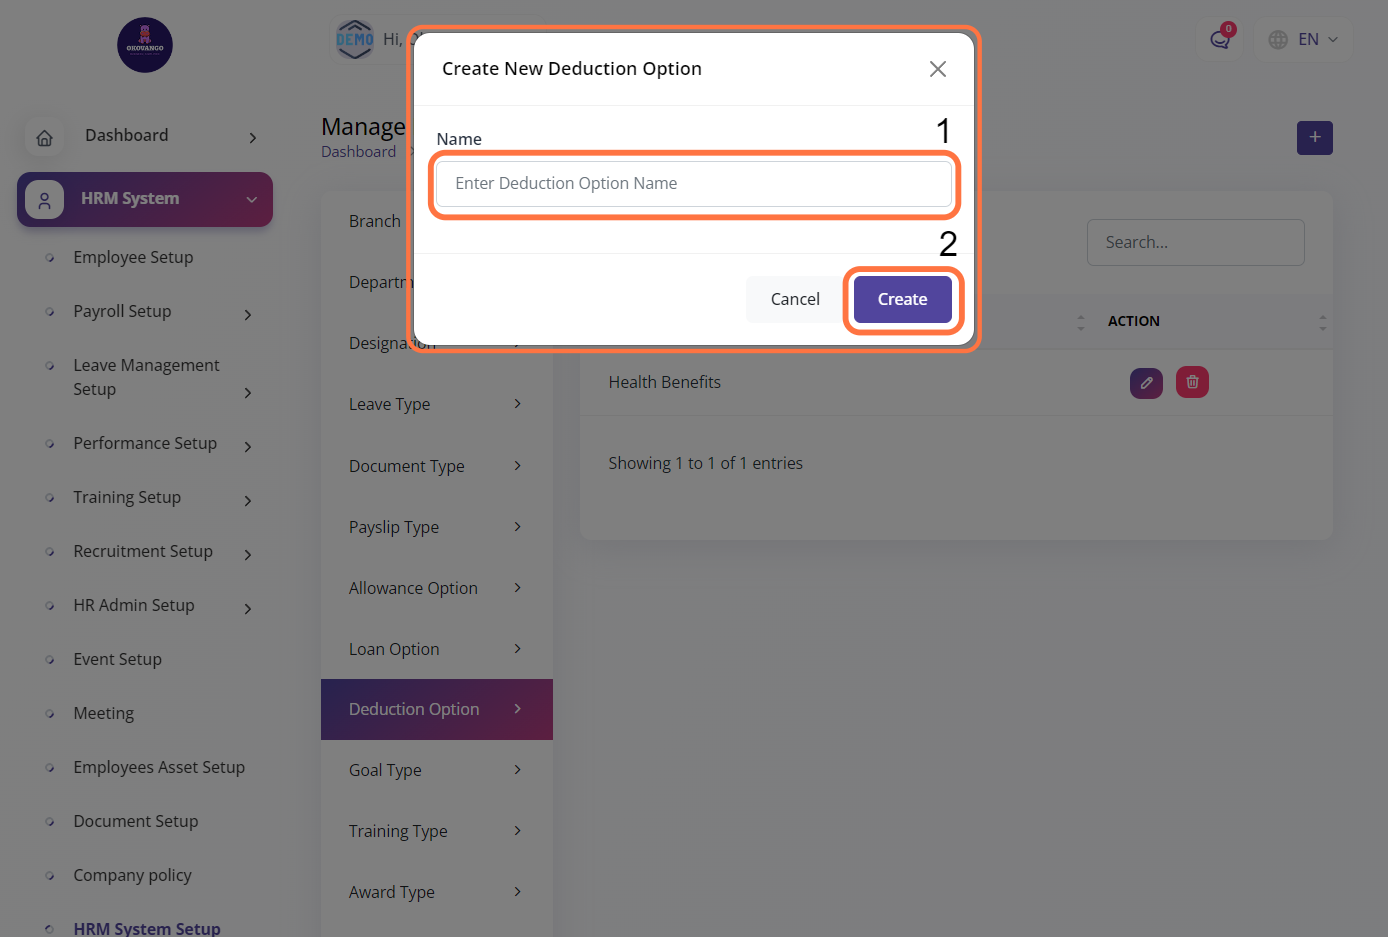
STEP 2: Create New Deduction Option
Once you click the create button, you can proceed to create a new deduction option using the following steps:
- Enter the name of the deduction option.
- Click the create button to finalize the creation of the new deduction option.
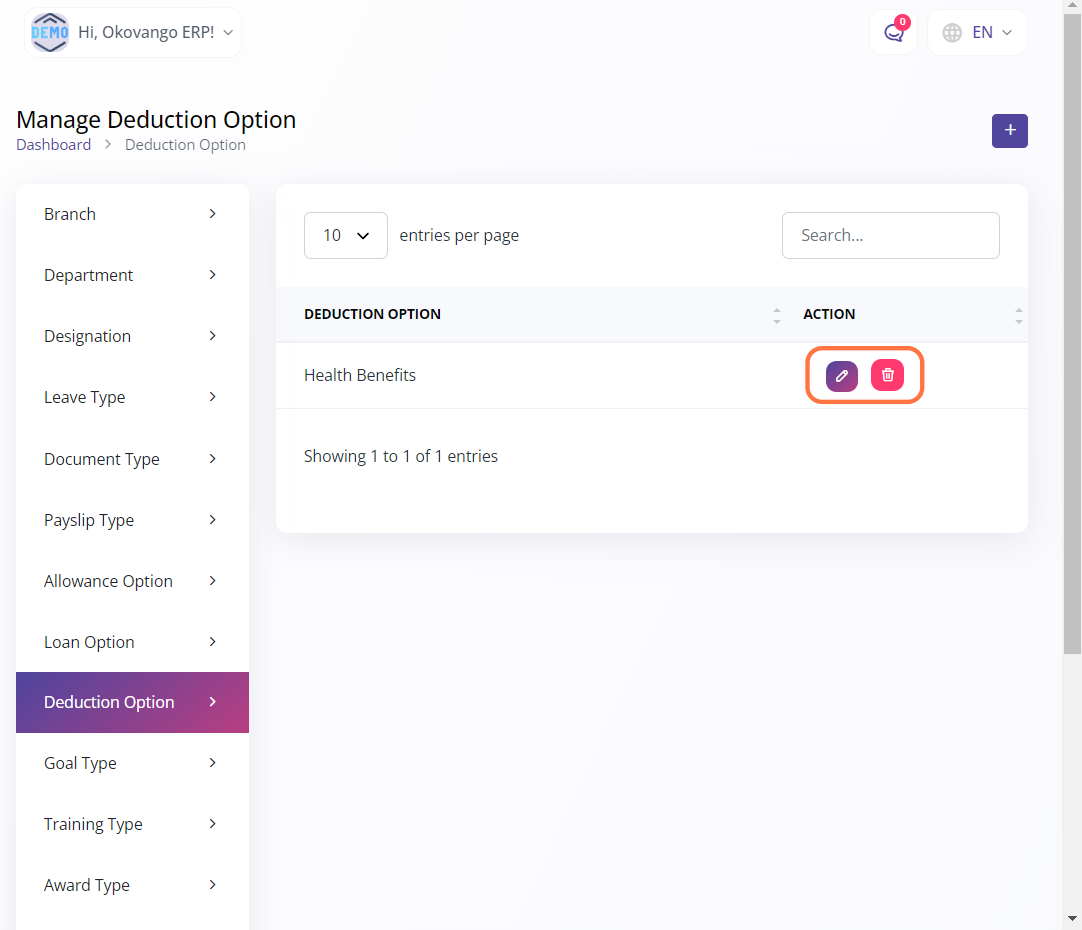
STEP 3: "Edit or Delete" Button
After creating the new deduction option, you will have the ability to edit or delete it as needed. This allows for flexibility in managing and maintaining the list of deduction options within your organization. You can make changes to the deduction option's details or remove it from the system if necessary, ensuring accurate and up-to-date deduction management based on your organization's requirements.
Goal Type
In this section, you can define the goal types for your organization, such as performance-based goals or revenue-based goals. By utilizing this functionality, you can categorize and track different types of goals that align with your organization's objectives and strategies. Creating goal types allows for better organization and measurement of progress towards achieving specific targets within your organization.
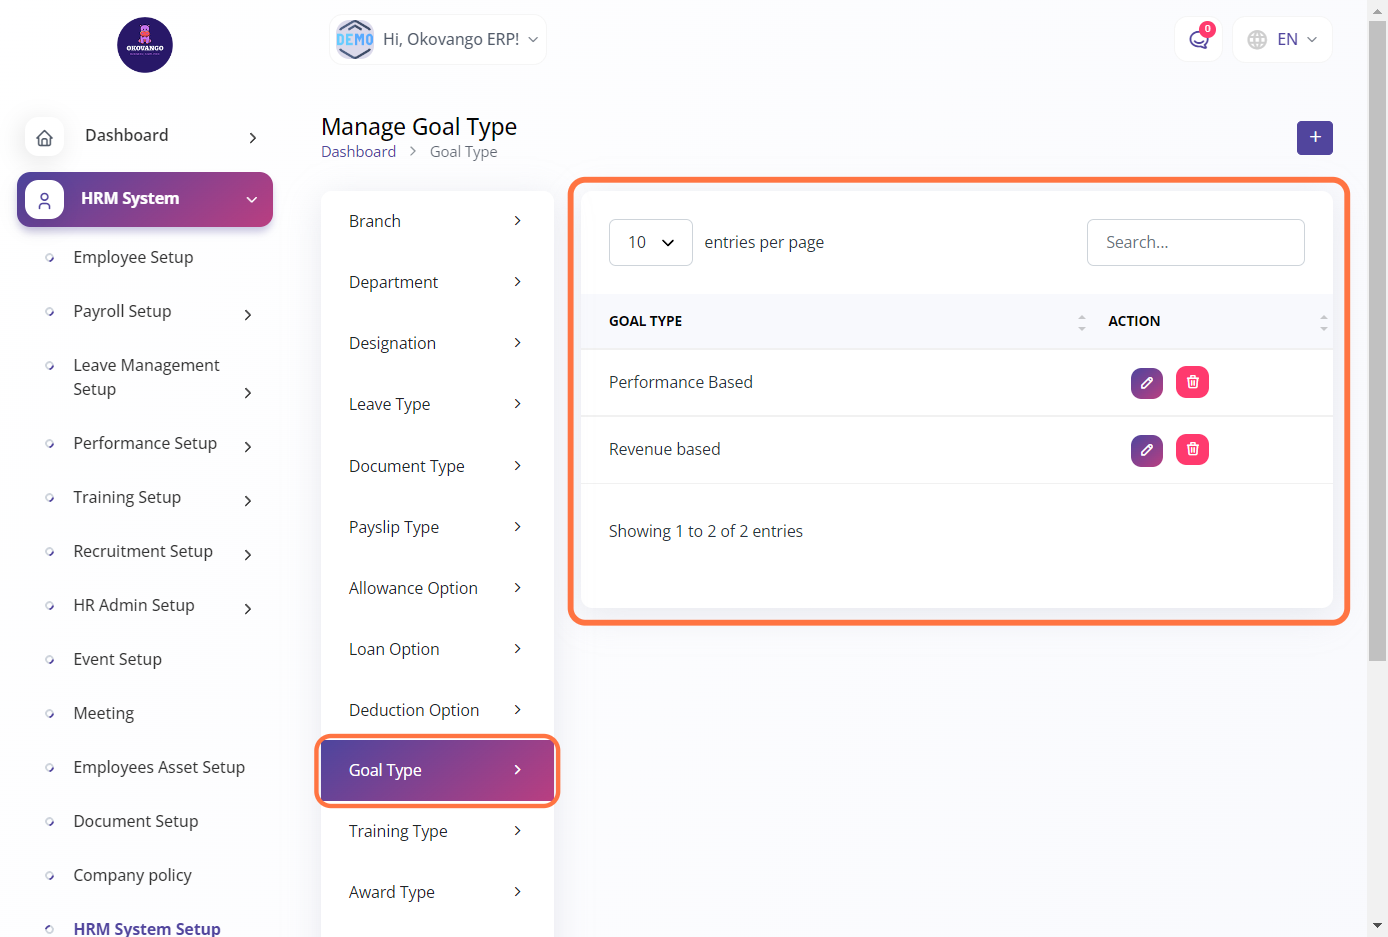
STEP 1: Click on "Create" Button
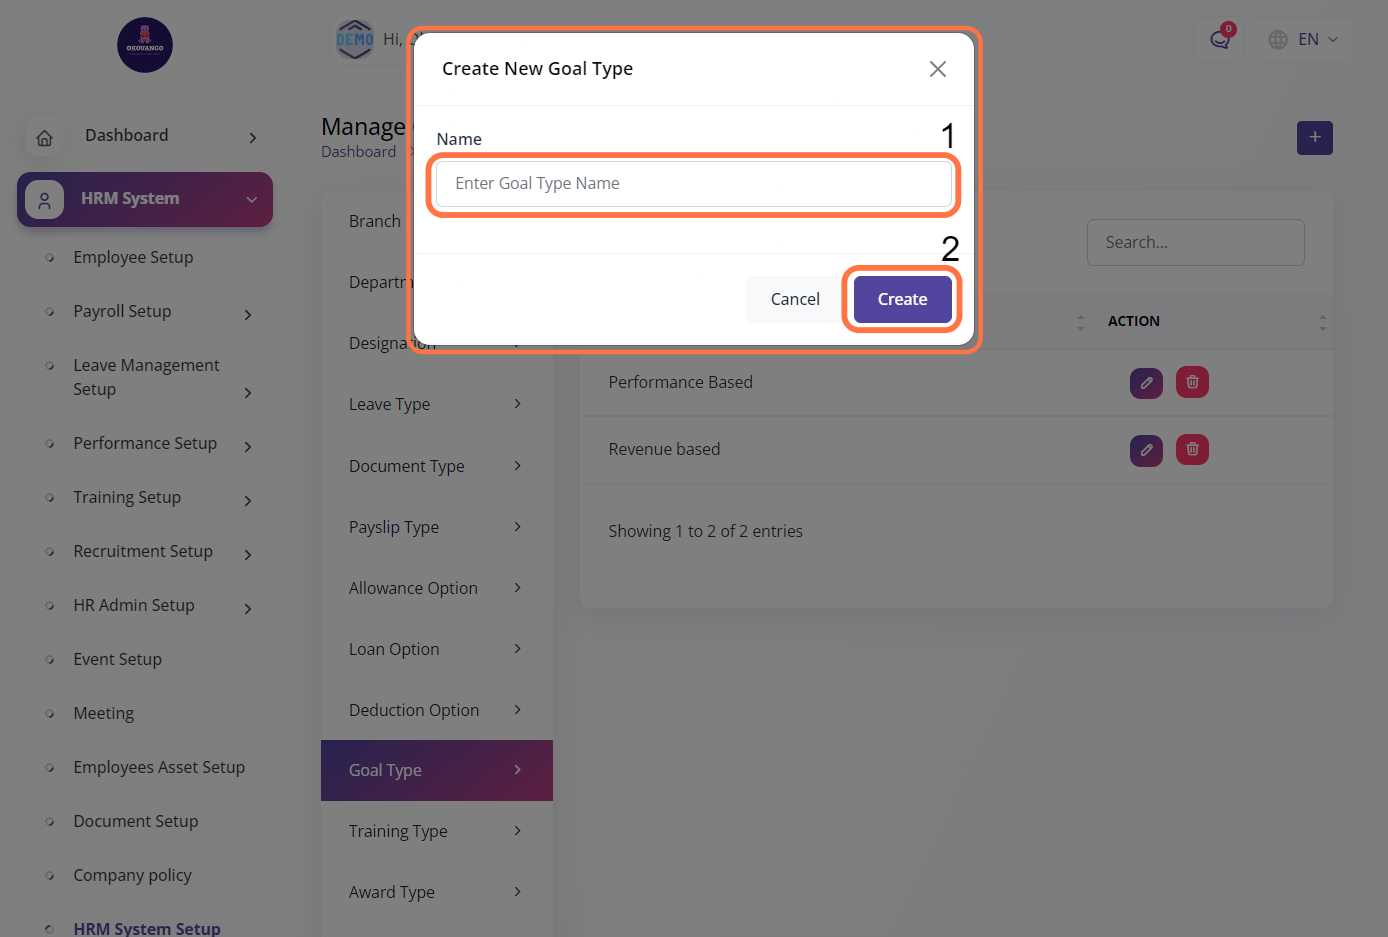
STEP 2: Create New Goal Type
Once you click the create button, you can proceed to create a new goal type using the following steps:
- Enter the name of the goal type.
- Click the create button to finalize the creation of the new goal type.
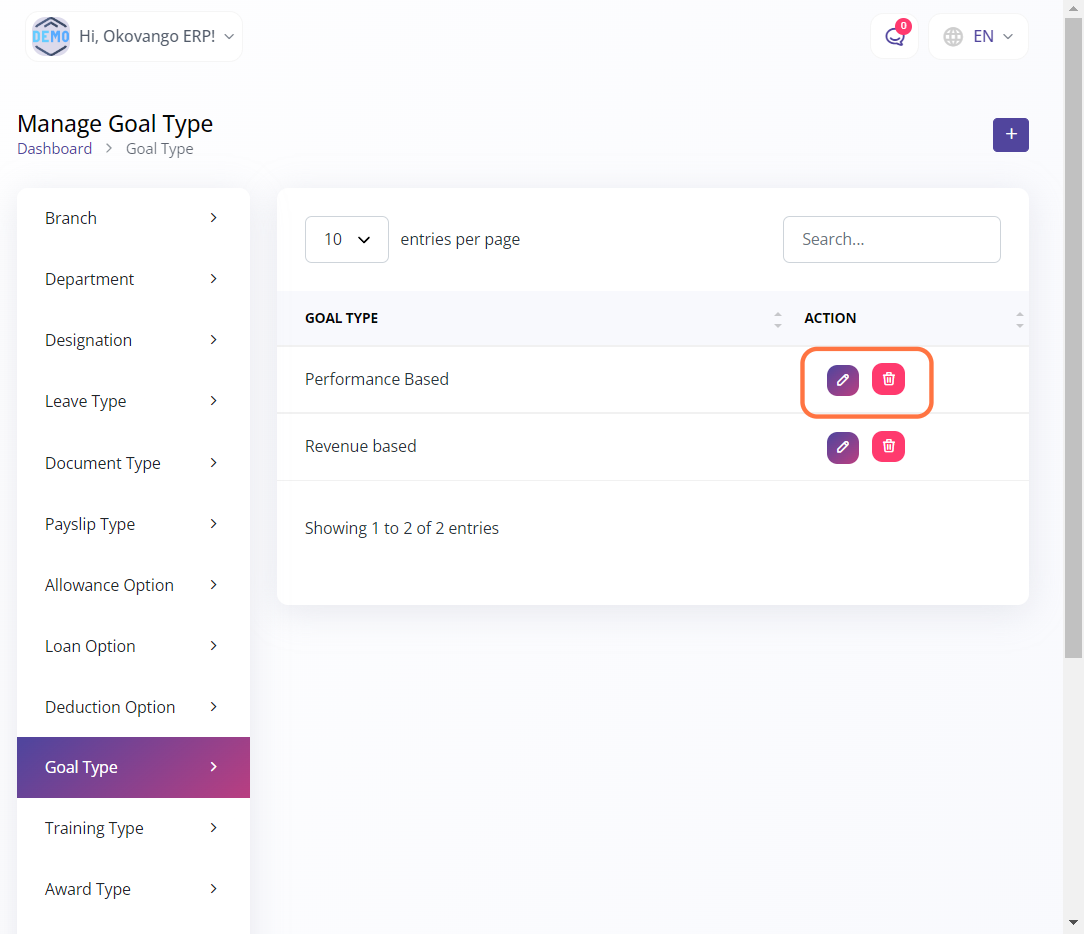
STEP 3: "Edit or Delete" Button
After creating the new goal type, you will have the ability to edit or delete it as needed. This allows for flexibility in managing and maintaining the list of goal types within your organization. You can make changes to the goal type's details or remove it from the system if necessary, ensuring accurate and up-to-date goal management based on your organization's requirements and evolving objectives.
Training Type
In this section, you can define the training types for your organization, such as leadership training, team training, and other relevant categories. By utilizing this functionality, you can categorize and track different types of training programs and initiatives within your organization. Creating training types allows for better organization and management of training activities, ensuring that employees receive the appropriate training based on their development needs and organizational goals.
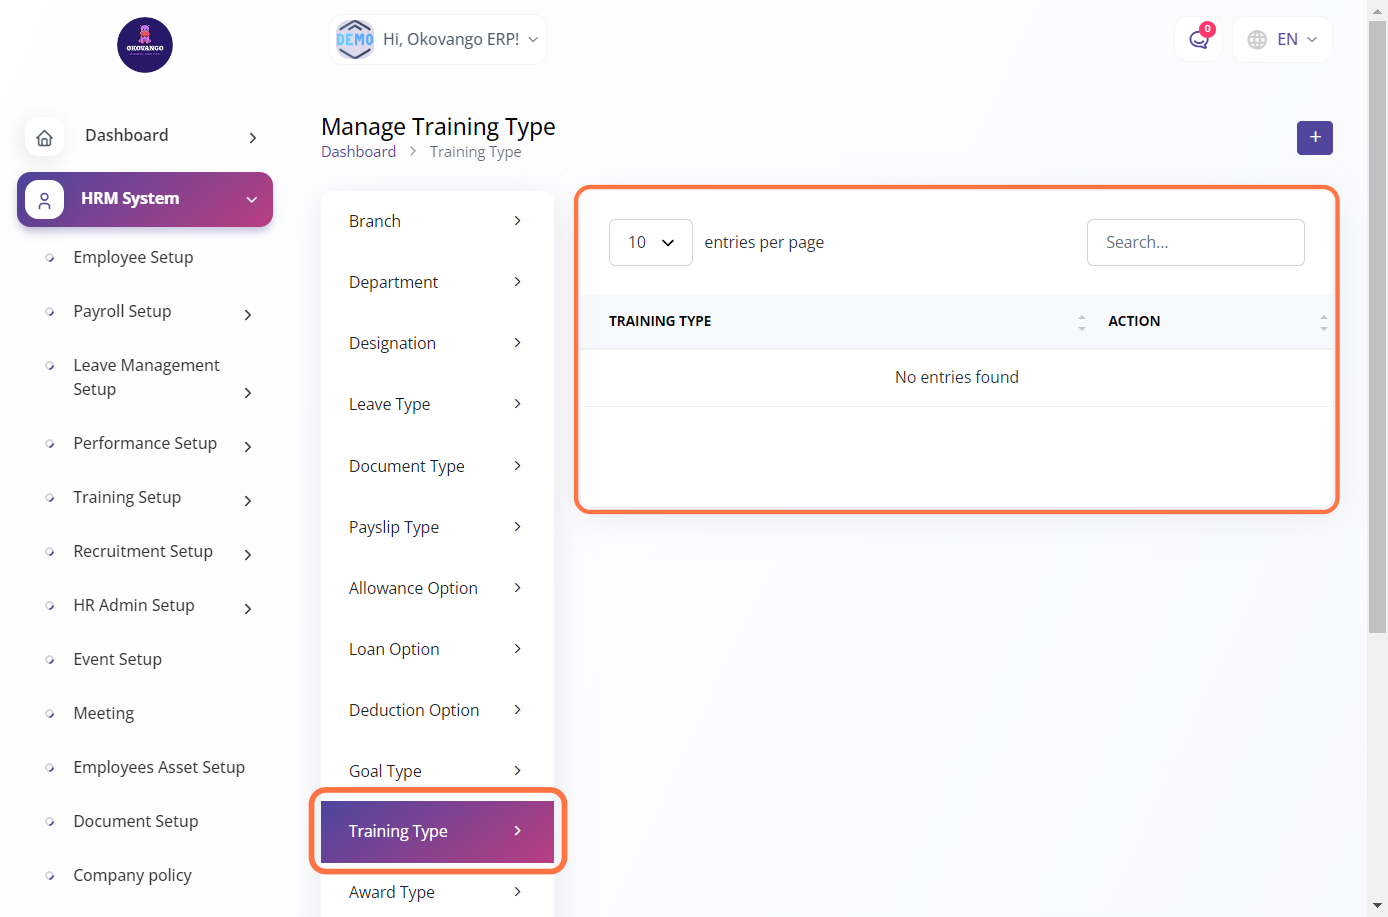
STEP 1: Click on "Create" Button
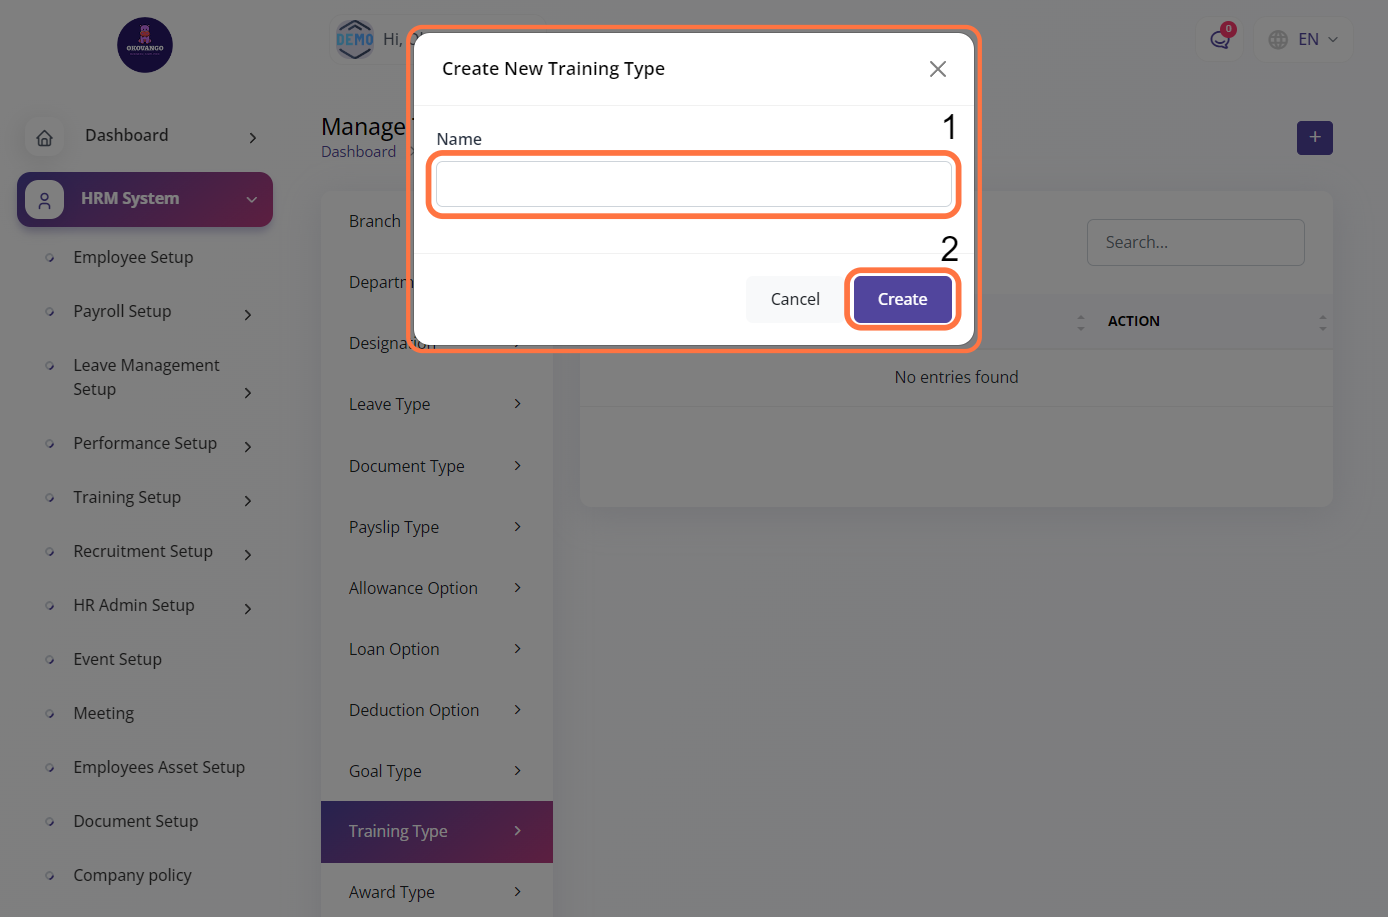
STEP 2: Create New Training Type
Once you click the create button, you can proceed to create a new training type using the following steps:
- Enter the name of the training type.
- Click the create button to finalize the creation of the new training type.
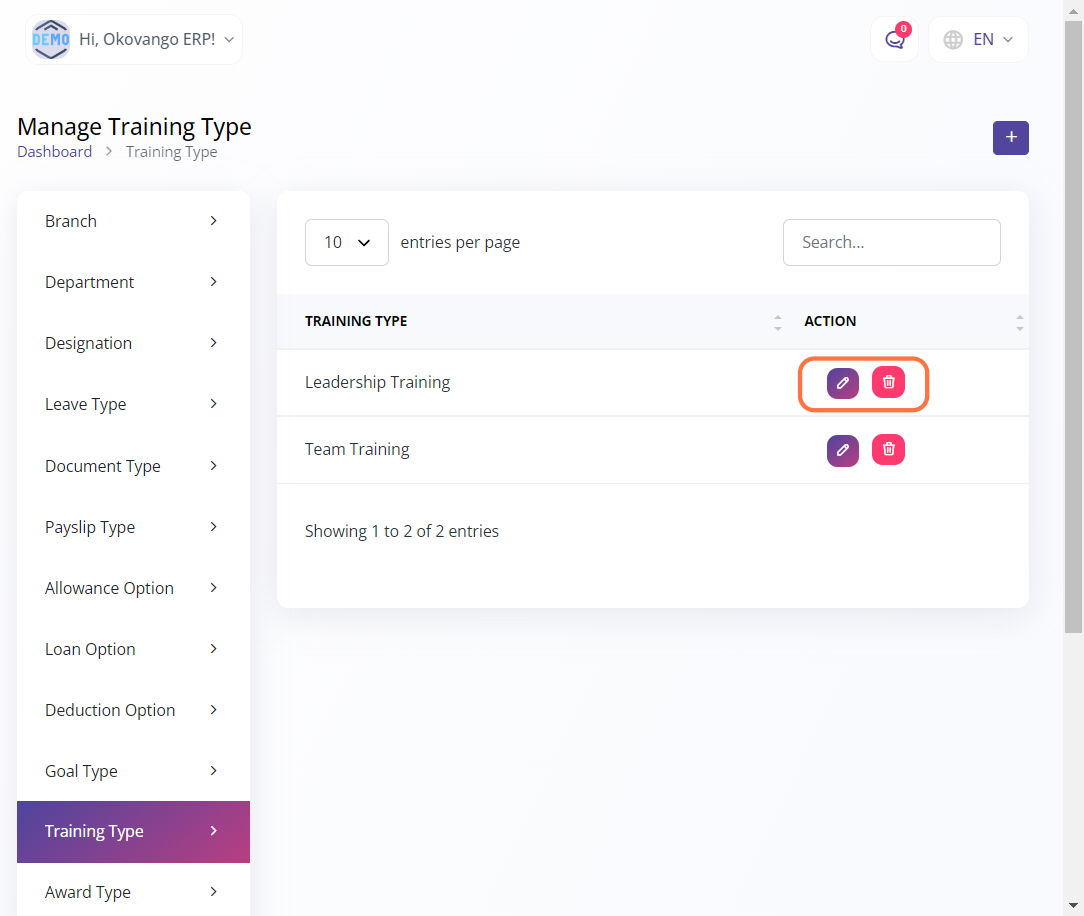
STEP 3: "Edit or Delete" Button
After creating the training type, you will have the ability to edit or delete it as needed. This provides flexibility in managing and maintaining the list of training types within your organization. You can make changes to the training type's details or remove it from the system if necessary, ensuring accurate and up-to-date training management based on your organization's requirements and changes over time.
Award Type
In this section, you can create different award types for your organization. This feature allows you to define and categorize the various types of awards or recognition given to employees or teams, such as Employee of the Month, Team Excellence Award, or any other relevant categories. By creating award types, you can effectively manage and track different forms of recognition, promoting a positive and rewarding work environment within your organization.
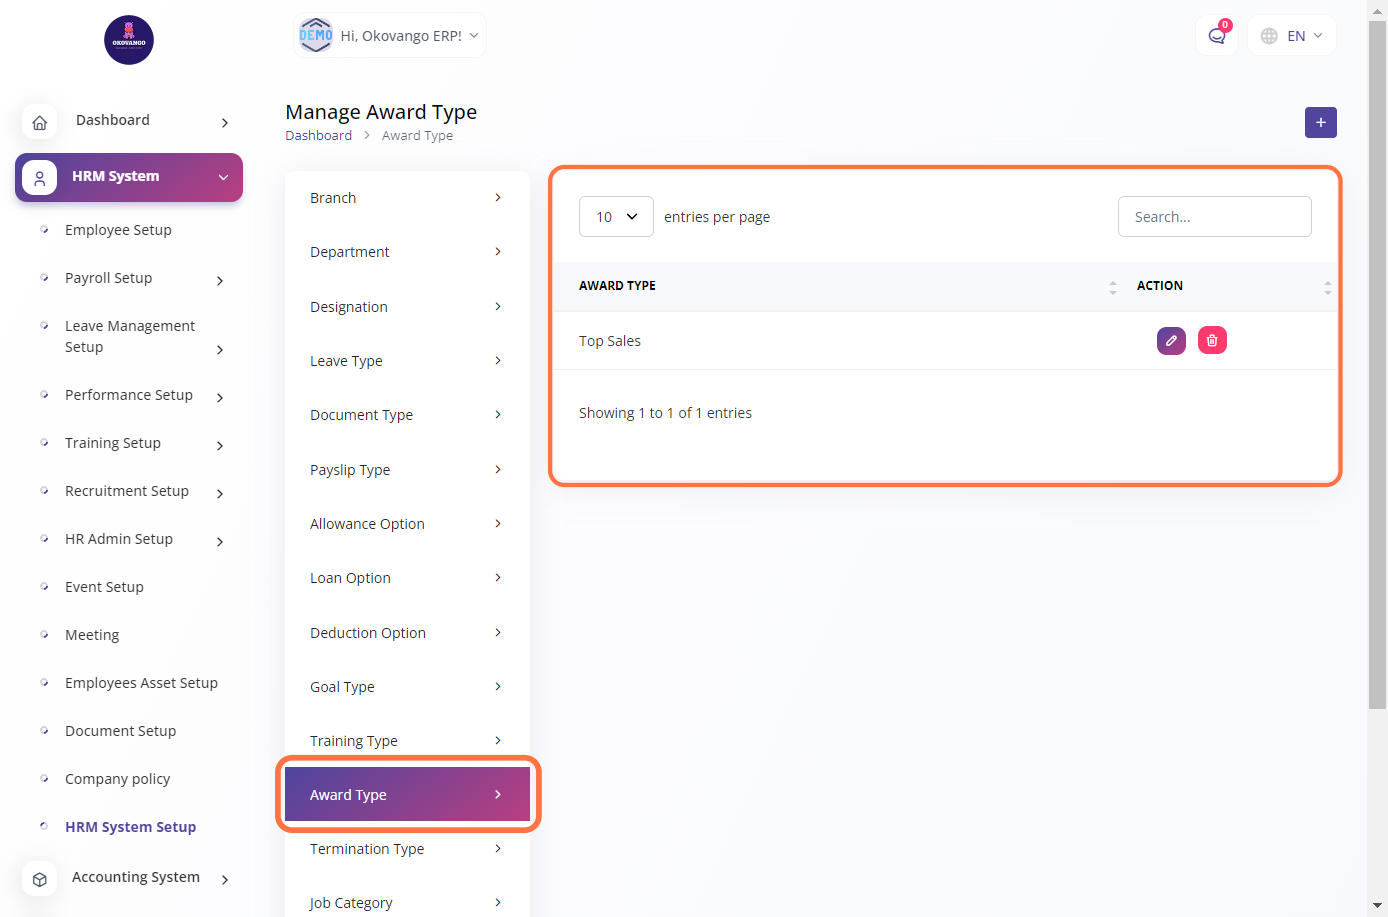
STEP 1: Click on "Create" Button
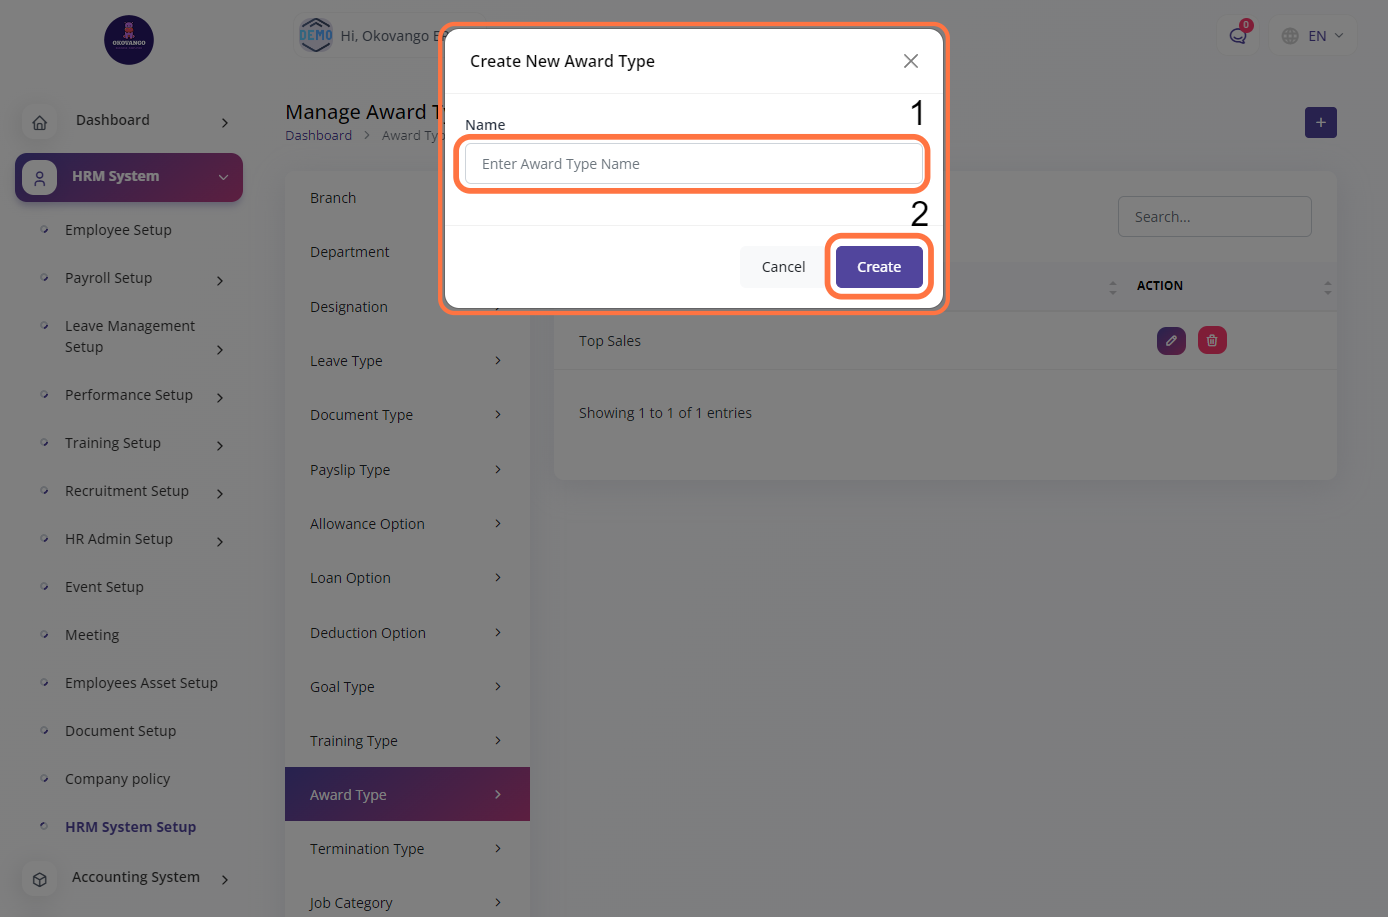
STEP 2: Create New Award Type
Once you click the create button, you can proceed to create a new award type using the following steps:
- Enter the name of the award type.
- Click the create button to finalize the creation of the new award type.
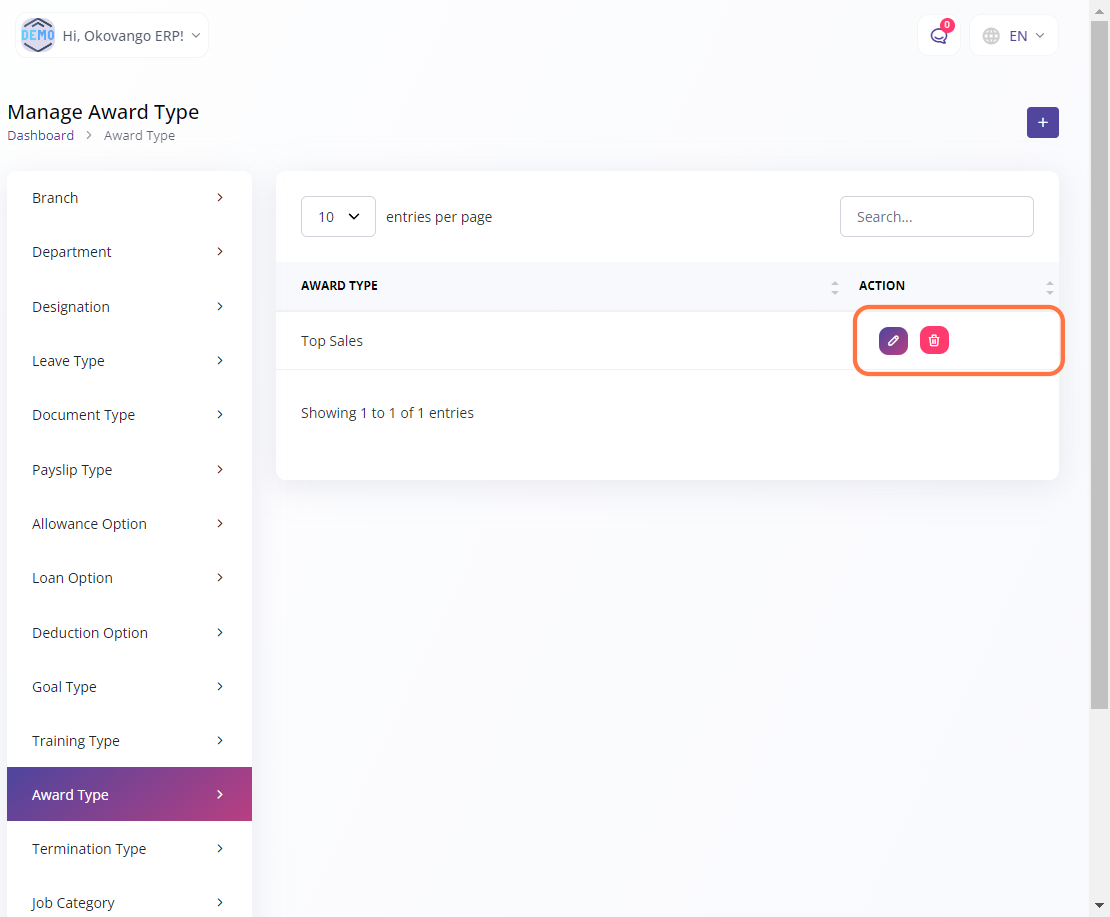
STEP 3: "Edit or Delete" Button
After creating the award type, you will have the ability to edit or delete it as needed. This provides flexibility in managing and maintaining the list of award types within your organization. You can make changes to the award type's details or remove it from the system if necessary, ensuring accurate and up-to-date award management based on your organization's requirements and changes over time.
Termination Type
In this section, you can define and set up termination types within your organization. This functionality allows you to categorize and classify different types of terminations, such as voluntary resignation, termination for cause, layoff, or any other relevant categories. By specifying termination types, you can effectively track and manage employee separations, maintain accurate records, and analyze trends related to employee turnover within your organization.
STEP 1: Click on "Create" Button
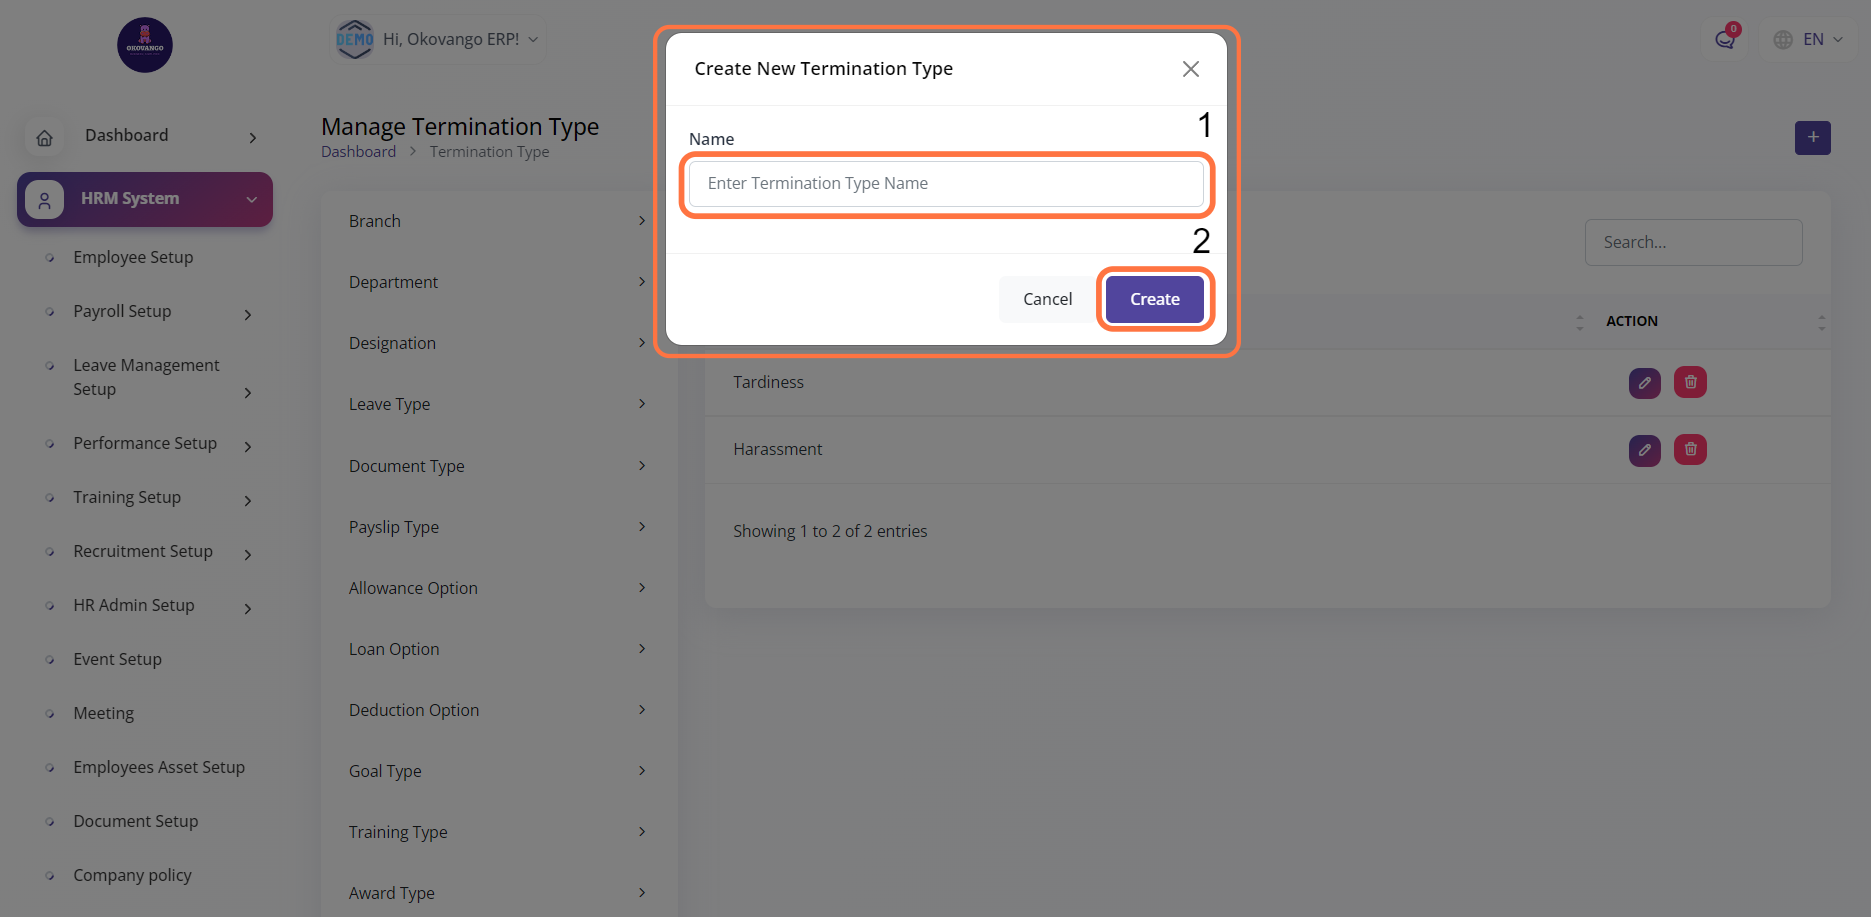
STEP 2: Create New Termination Type
Once you click the create button, you can proceed to create a new termination type using the following steps:
- Enter the name of the termination type.
- Click the create button to finalize the creation of the new termination type.
STEP 3: "Edit or Delete" Button
After creating the termination type, you will have the ability to edit or delete it as needed. This provides flexibility in managing and maintaining the list of termination types within your organization. You can make changes to the termination type's details or remove it from the system if necessary, ensuring accurate and up-to-date termination management based on your organization's requirements and changes over time.

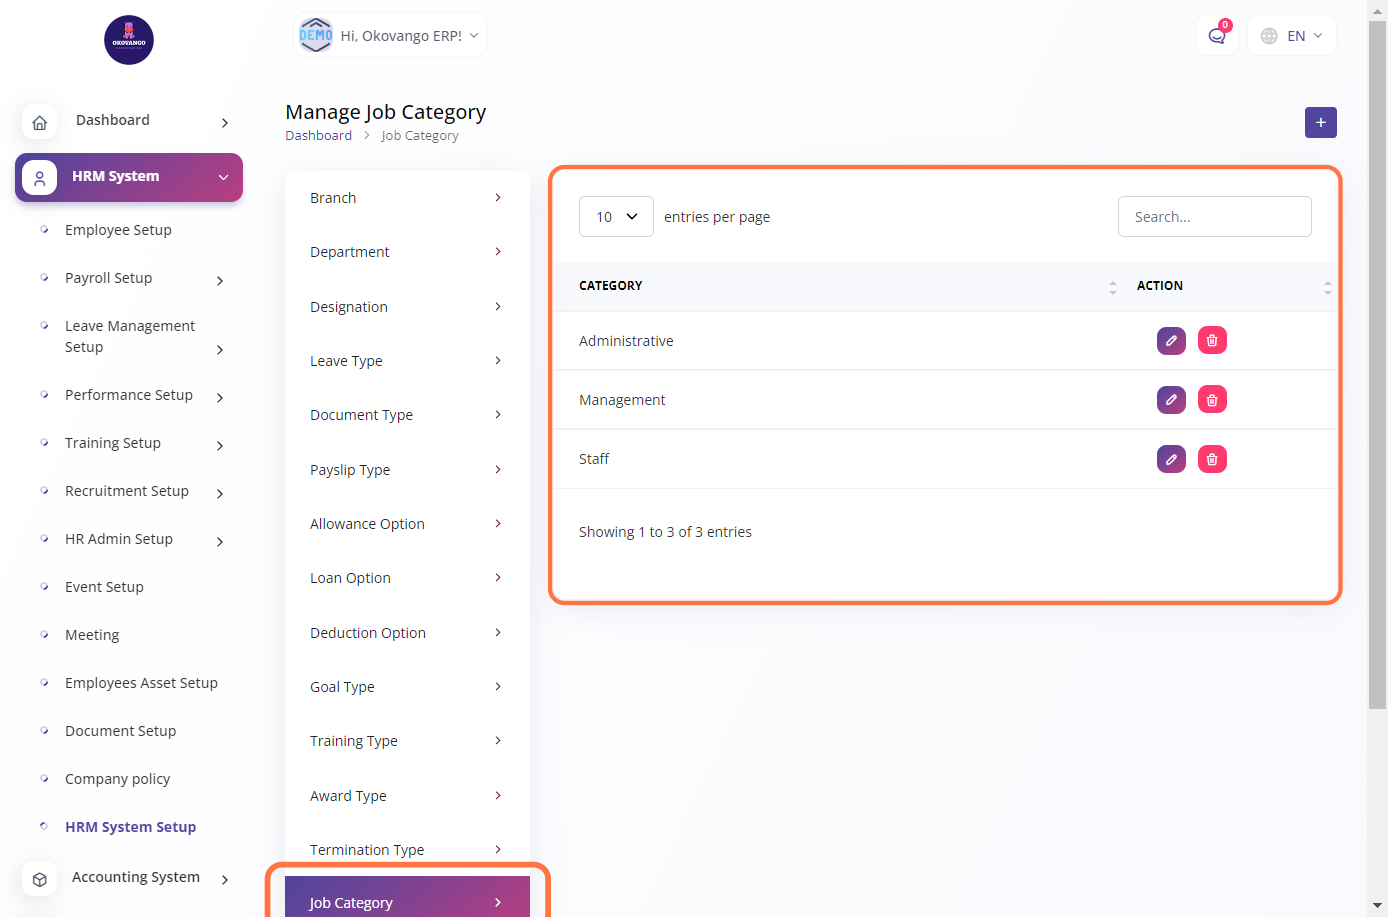
Job Category
In this section, you can define and set up job categories within your organization. This functionality allows you to classify and categorize different types of jobs or positions, such as managerial roles, technical positions, administrative positions, or any other relevant categories. By specifying job categories, you can effectively organize and manage job-related information, streamline recruitment processes, and ensure accurate job classification and reporting within your organization.
STEP 1: Click on "Create" Button
STEP 2: Create New Job Category
Once you click the create button, you can proceed to create a new Job Category using the following steps:
- Enter the name of the Job Category.
- Click the create button to finalize the creation of the new Job Category.

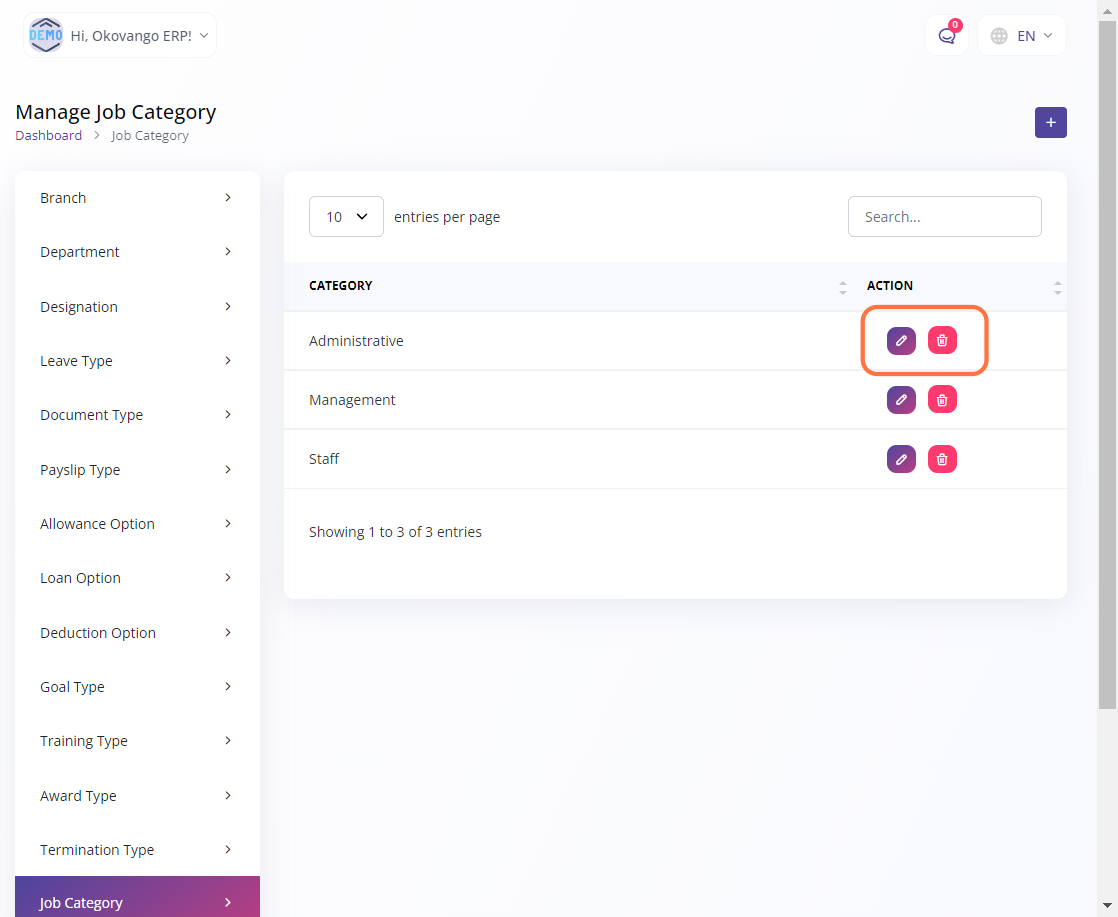
STEP 3: "Edit or Delete" Button
After creating the Job Category, you will have the ability to edit or delete it as needed. This provides flexibility in managing and maintaining the list of Job Categories within your organization. You can make changes to the Job Category's details or remove it from the system if necessary, ensuring accurate and up-to-date Job Category management based on your organization's requirements and changes over time.
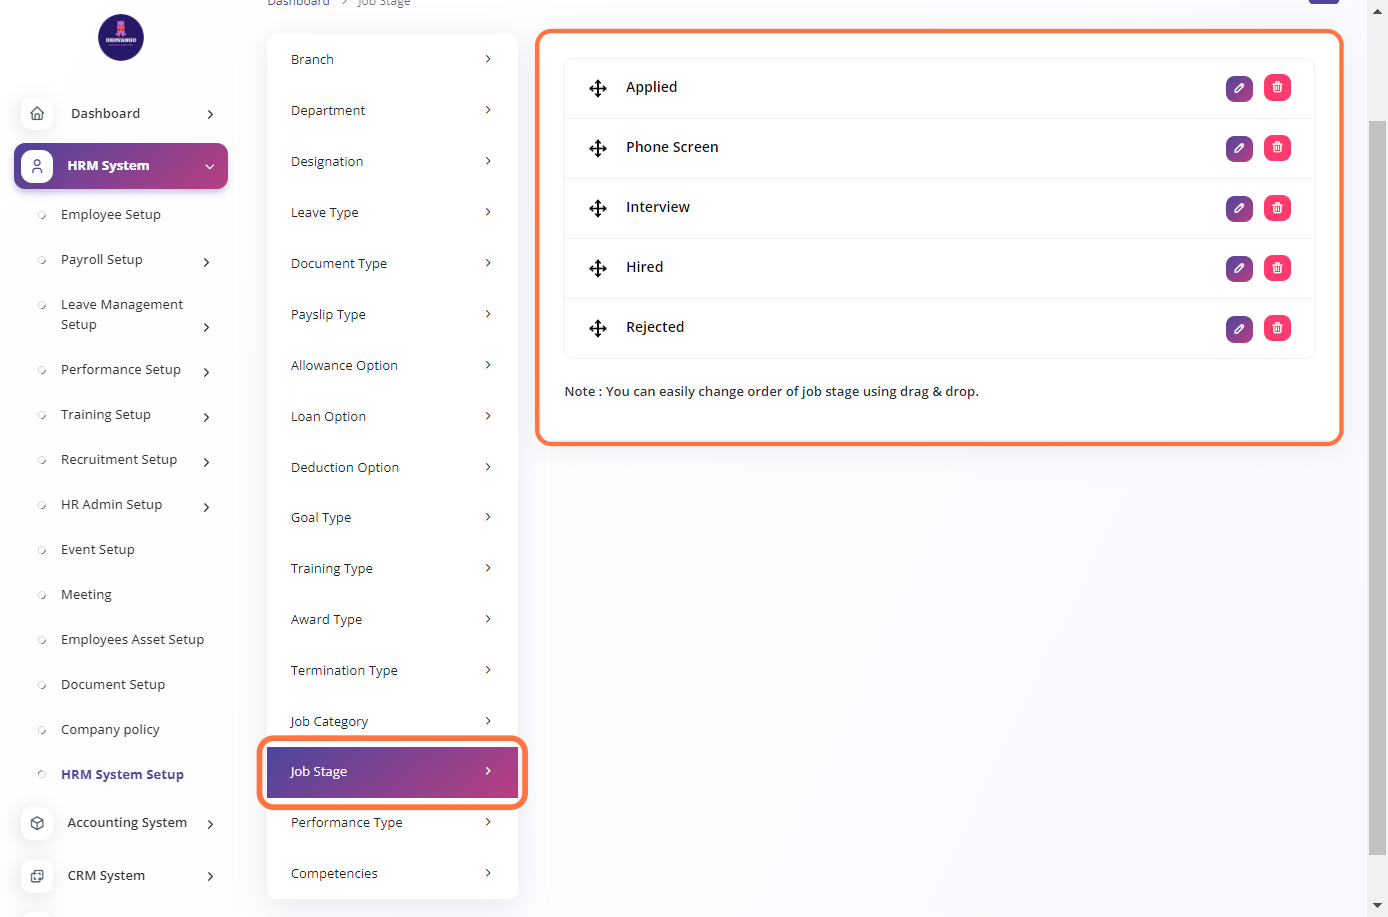
Job Stage
In this section, you can define and set up job stages within your organization. This functionality allows you to categorize and classify different stages or phases of the job lifecycle, such as application stage, interview stage, offer stage, or any other relevant categories. By specifying job stages, you can effectively track and manage the progress of job candidates throughout the recruitment process, ensuring a structured and organized approach to hiring within your organization.
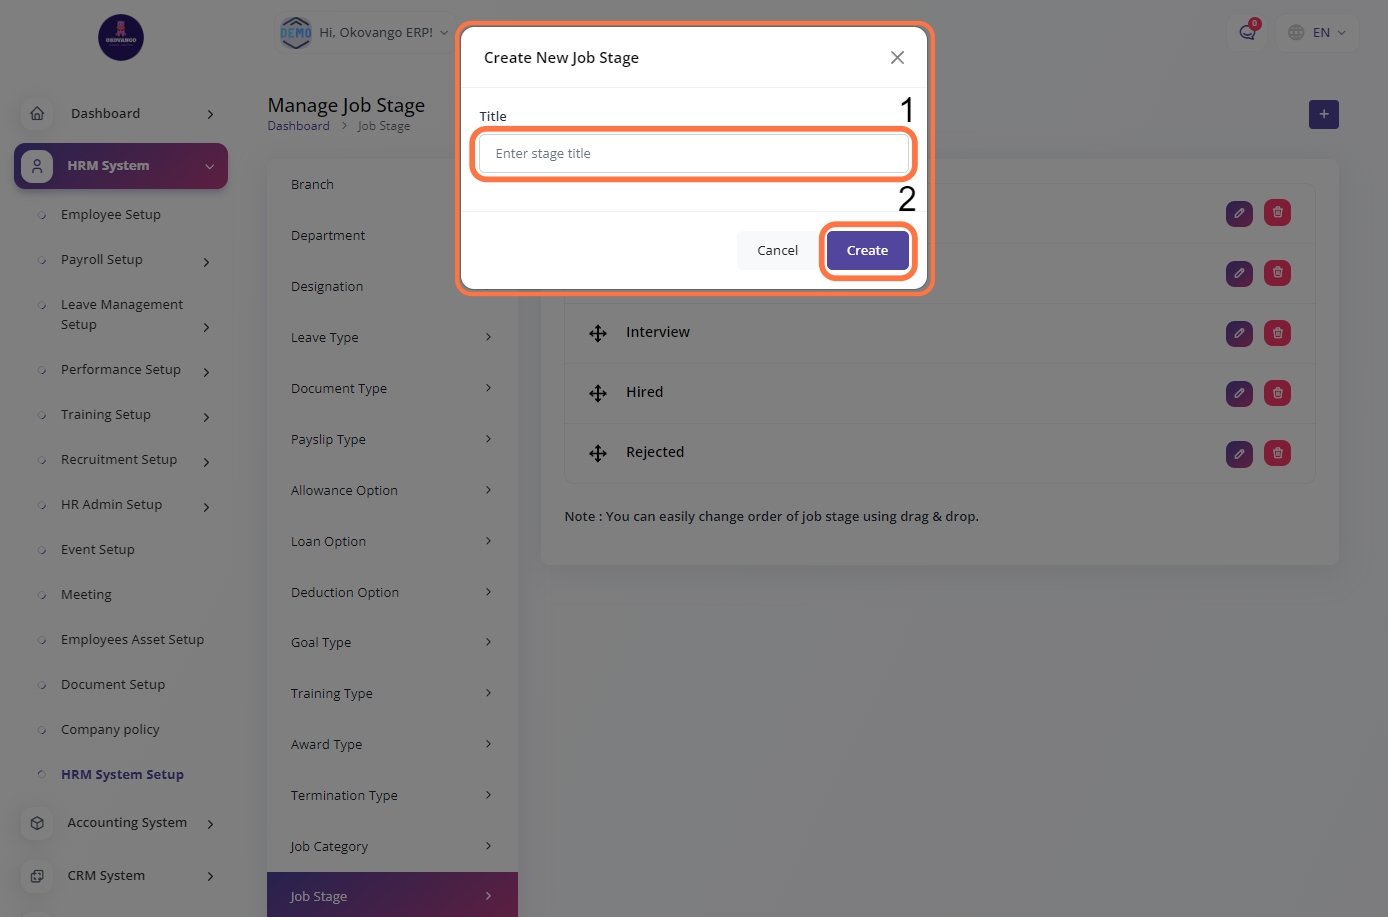
STEP 1: Click on "Create" Button
STEP 2: Create New Job stage
Once you click the create button, you can proceed to create a new Job Stage using the following steps:
- Enter the name of the Job Stage.
- Click the create button to finalize the creation of the new Job Stage.
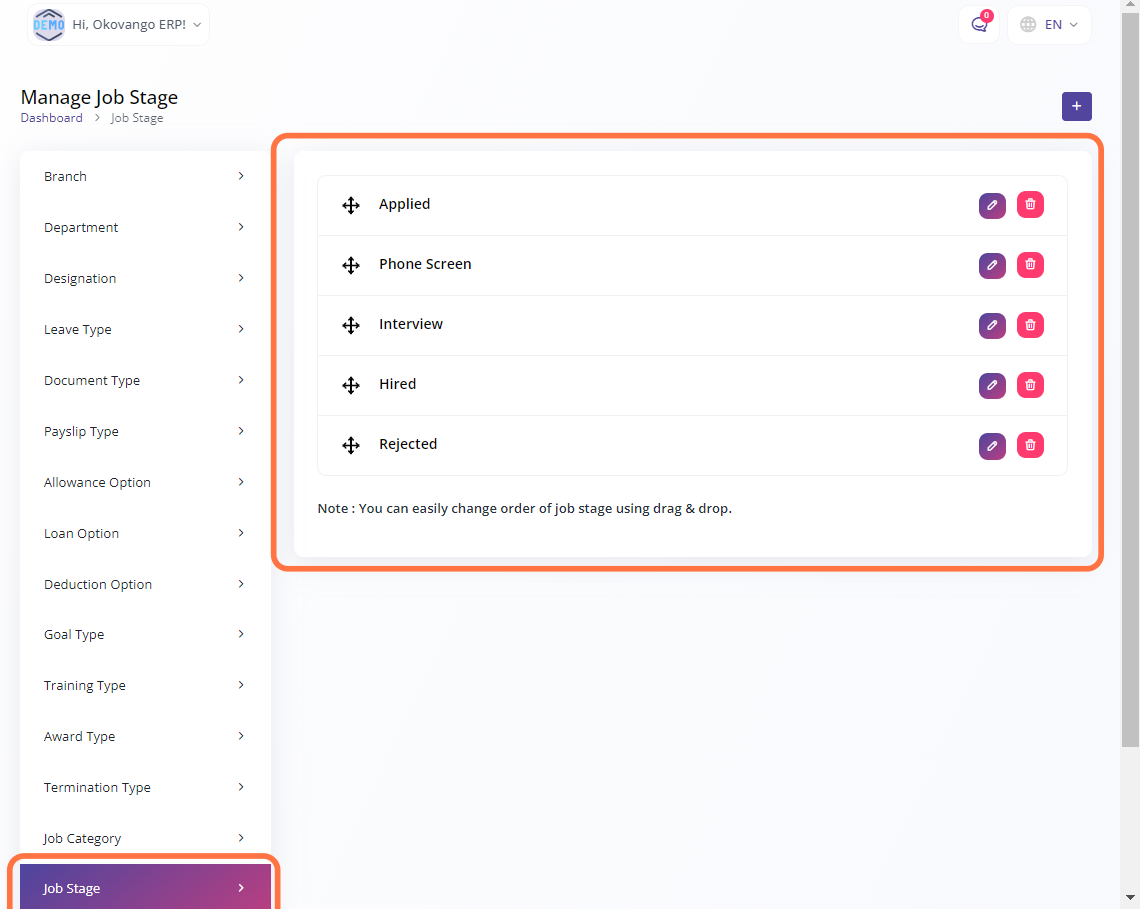
STEP 3: "Edit or Delete" Button
After creating the Job stage, you will have the ability to edit or delete it as needed. This provides flexibility in managing and maintaining the list of Job stages within your organization. Additionally, you can change the order of the stages by utilizing the drag and drop functionality. This allows you to rearrange the sequence of job stages according to your organization's recruitment process, ensuring a customized and streamlined workflow.
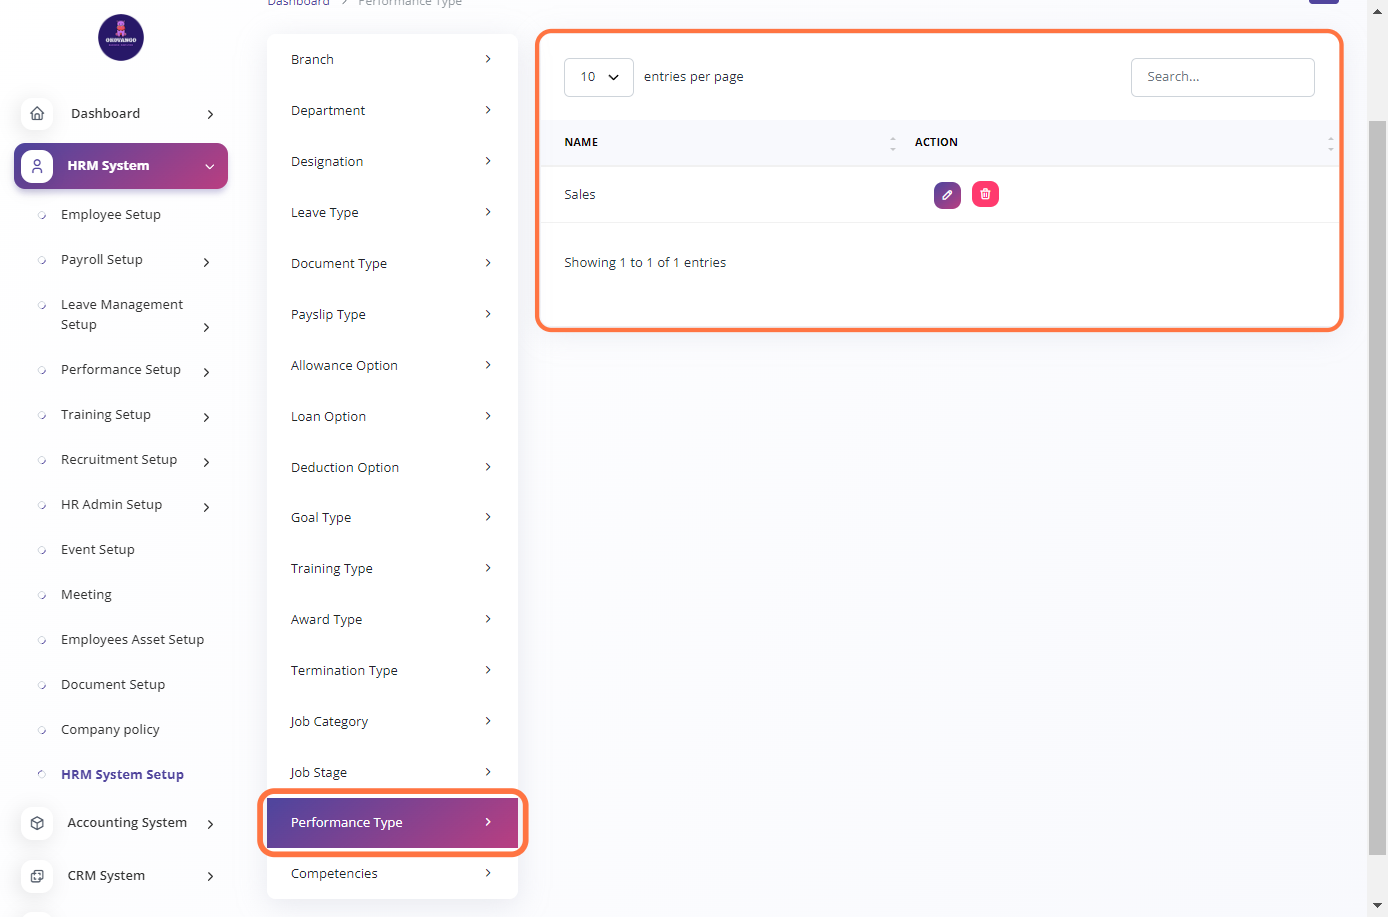
Performance Type
In this section, you can define and set up performance types within your organization. This functionality allows you to categorize and classify different types of performance evaluations or assessments, such as annual performance reviews, quarterly assessments, project-based evaluations, or any other relevant categories. By specifying performance types, you can effectively track and manage employee performance, provide feedback, and measure progress towards goals within your organization.
STEP 1: Click on "Create" Button
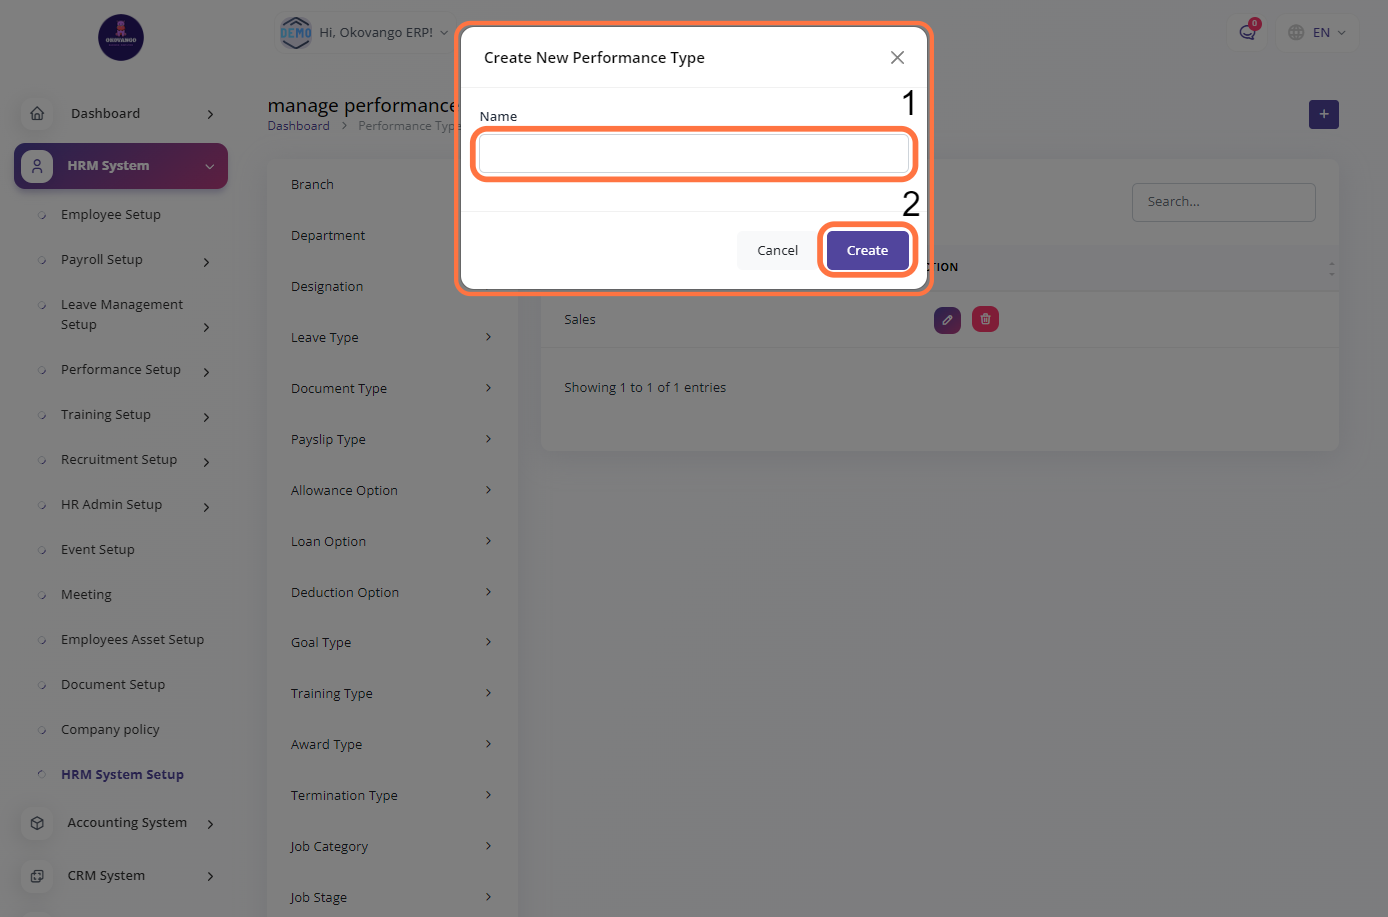
STEP 2: Create New Performance Type
Once you click the create button, you can proceed to create a new Performance Type using the following steps:
- Enter the name of the Performance Type.
- Click the create button to finalize the creation of the new Performance Type.
STEP 3: "Edit or Delete" Button
After creating the performance type, you will have the ability to edit or delete it as needed. This provides flexibility in managing and maintaining the list of performance types within your organization. You can make changes to the performance type's details or remove it from the system if necessary, ensuring accurate and up-to-date performance management based on your organization's requirements and changes over time.


