Navigating CRM System Setup
The CRM system allows you to manage and track interactions with your customers, leads, and prospects. You can set up various features and functionalities of the CRM system, such as contact Sales pipeline, Lead stages, deal stages, sources, labels and contract type. By customizing the CRM system to your organization's needs, you can enhance your customer relationships, streamline sales processes, and improve overall customer satisfaction.
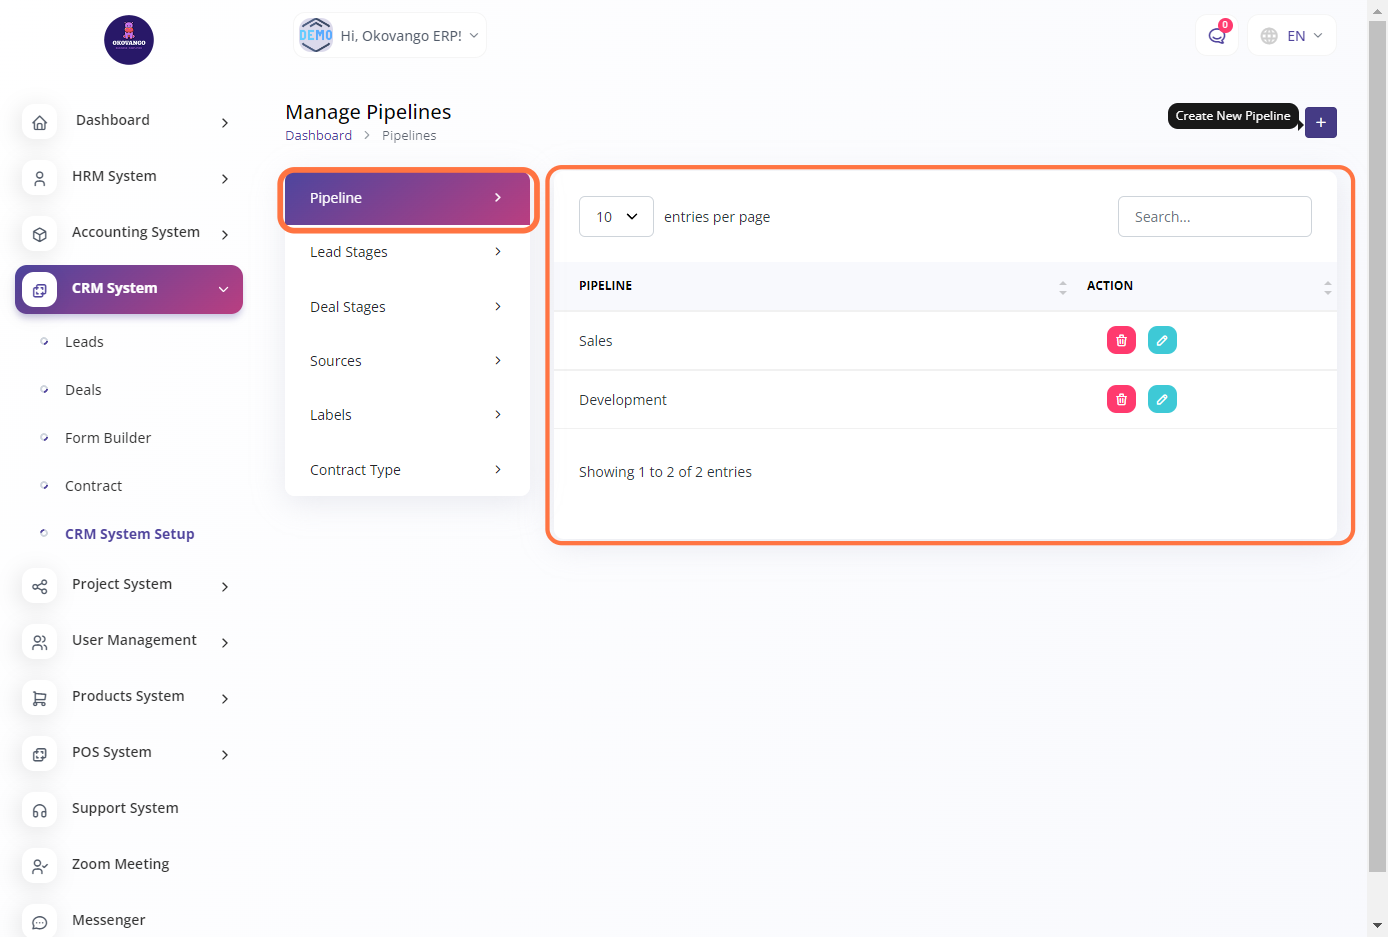
Pipeline
In this section, you can configure and set up your pipeline. The pipeline refers to the stages or steps involved in a particular process or workflow, such as sales, recruitment, or project management. By setting up the pipeline, you can define the various stages, statuses, or actions that need to be taken to move an item or task through the process. This allows for better organization, tracking, and management of your workflow, ensuring that tasks or items progress smoothly and efficiently from one stage to another.
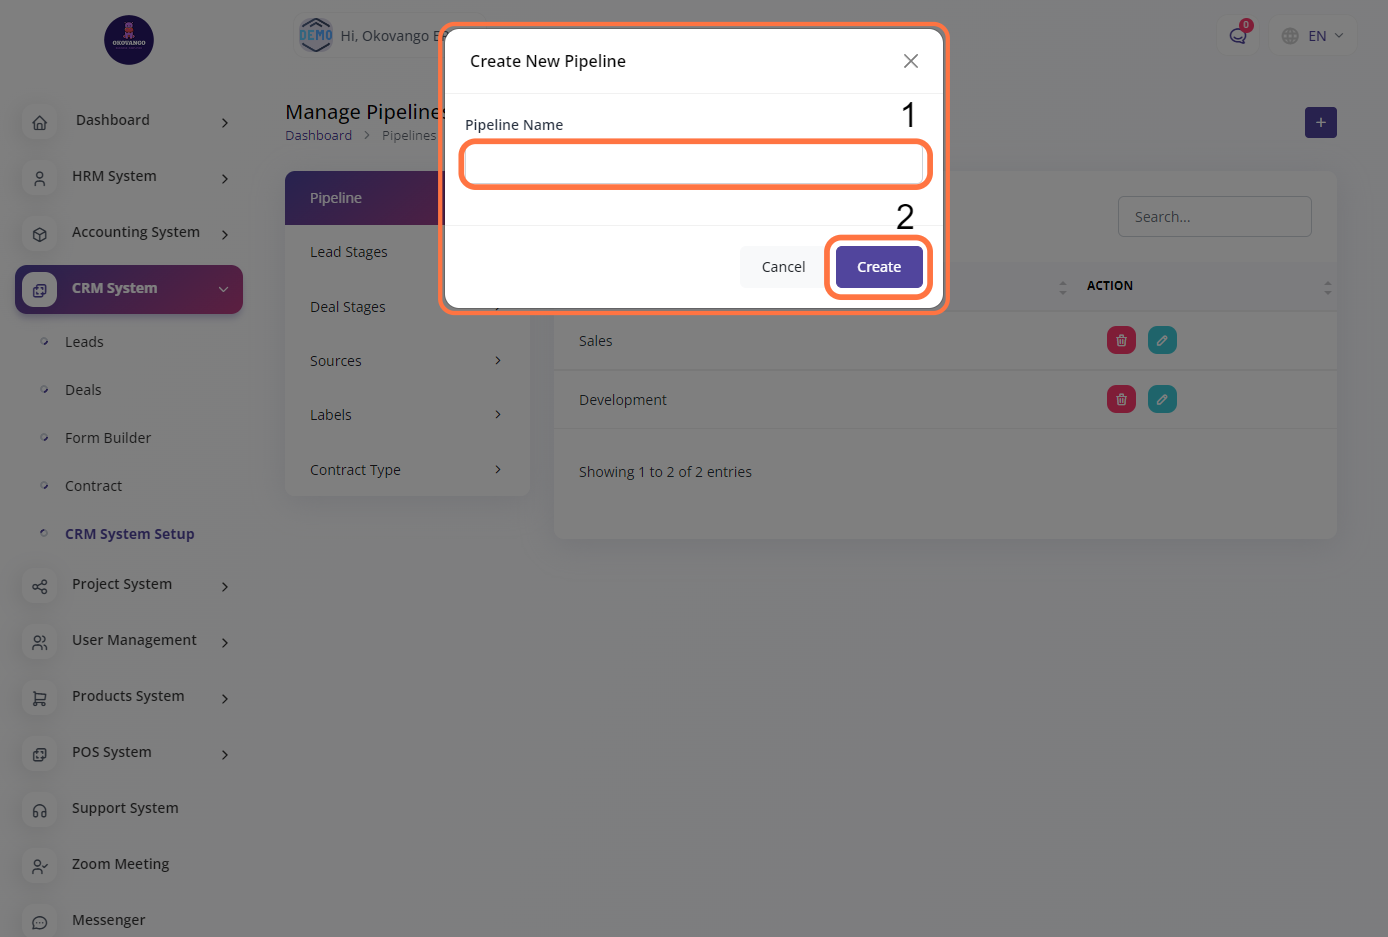
STEP 1: Click on "Create" Button

STEP 2: Create New Pipeline
After clicking the create button, you can proceed to create a new pipeline using the following steps:
- Enter the name of the pipeline.
- Click the create button.
This allows you to define a specific pipeline for your desired process or workflow, enabling you to track and manage tasks or items more effectively.
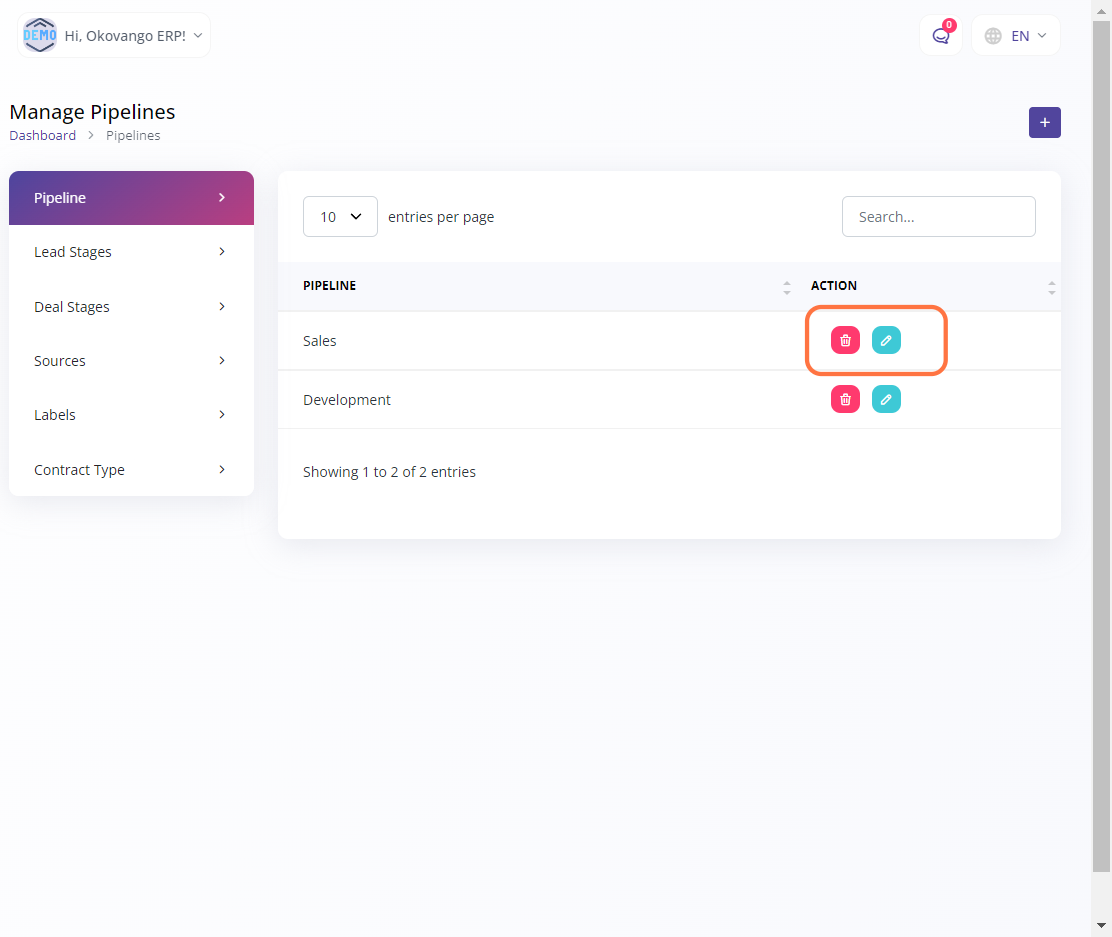
STEP 3: "Edit or Delete" Button
In this section, you have the option to edit and delete the pipelines that you have created. This provides flexibility and allows you to make modifications or remove pipelines as needed. Editing a pipeline enables you to update its name or make changes to its configuration, while deleting a pipeline removes it from the system entirely. This functionality ensures that you can adapt and refine your pipelines based on evolving requirements or organizational changes.
Lead Stages
In this section, you can define and configure lead stages for your organization. Lead stages represent the different steps or phases in the sales process, from initial contact to final conversion. By setting up lead stages, you can customize and tailor the stages to align with your specific sales workflow and terminology. This allows you to track and manage leads effectively, providing clear visibility into the progress and status of each lead. Additionally, you can customize the properties and actions associated with each lead stage, such as assigning tasks or sending automated notifications, to streamline your sales process and enhance productivity.

STEP 1: Click on "Create" Button
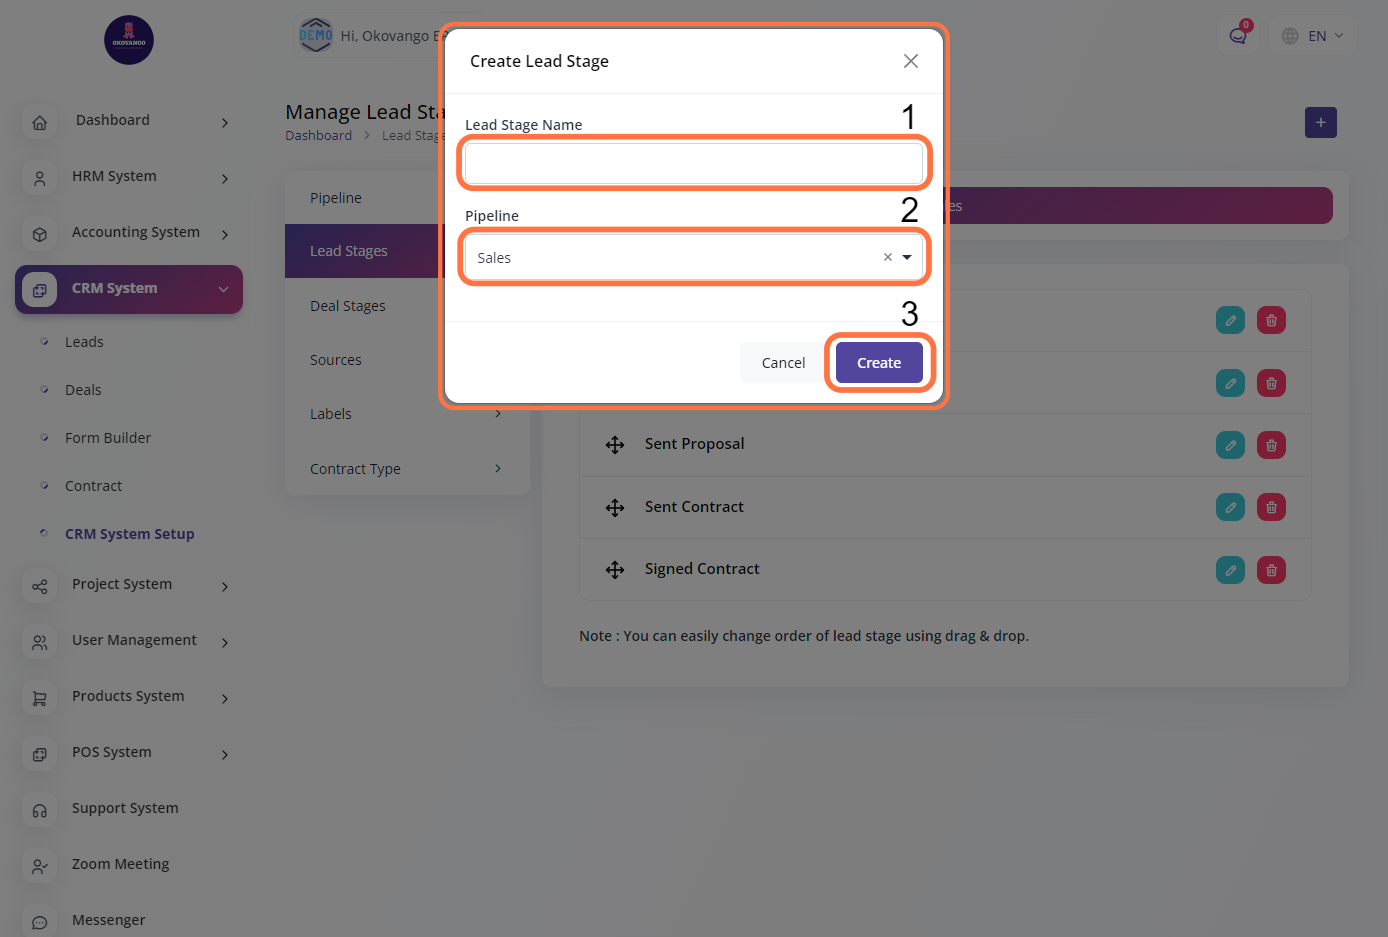
STEP 2: Create New Lead Stages
After clicking the create button, you can proceed to create new lead stages by following these steps:
- Enter the name of the lead stage.
- Select the pipeline to which the lead stage belongs.
- Click the create button to finalize the creation of the new lead stage.
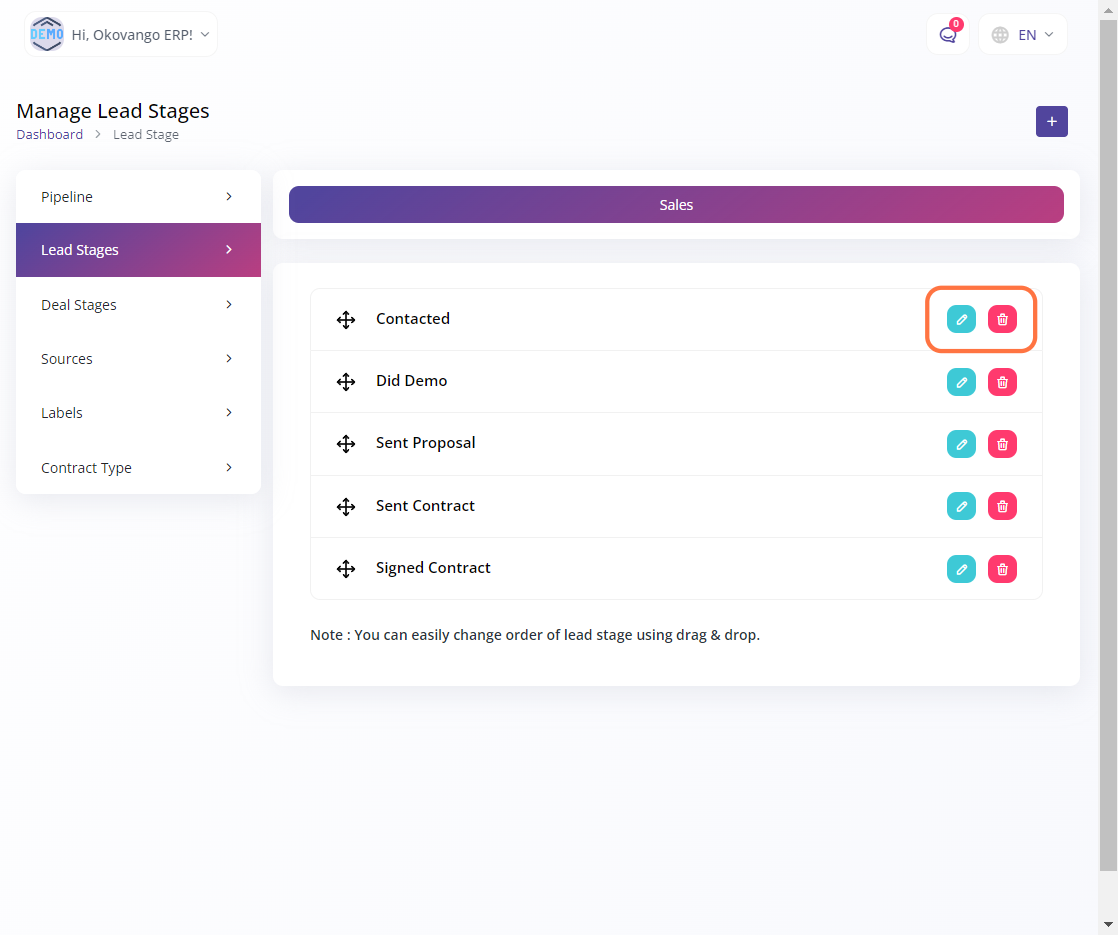
- Please note that you can also easily change the order of lead stages by using the drag and drop functionality, allowing you to rearrange the stages according to your preferred sequence.
This allows you to customize and define the various stages in your sales pipeline, providing a structured and organized approach to managing leads and tracking their progress towards conversion.
STEP 3: "Edit or Delete" Button
After creating the lead stages, you have the flexibility to edit or delete them as needed. To make changes to a lead stage, you can select the stage you wish to modify and update the desired fields such as the stage name, description, or order. Once you have made the necessary changes, you can save the updated lead stage.
Deal Stages
In this section, you can configure and define the different stages of a deal or sales process. By setting up deal stages, you can outline the various steps involved in moving a potential sale from initial contact to closing. Each stage represents a specific milestone or action that needs to be completed, such as qualification, negotiation, or contract signing. This allows you to track and manage the progress of deals, ensuring a systematic and organized approach to your sales pipeline.
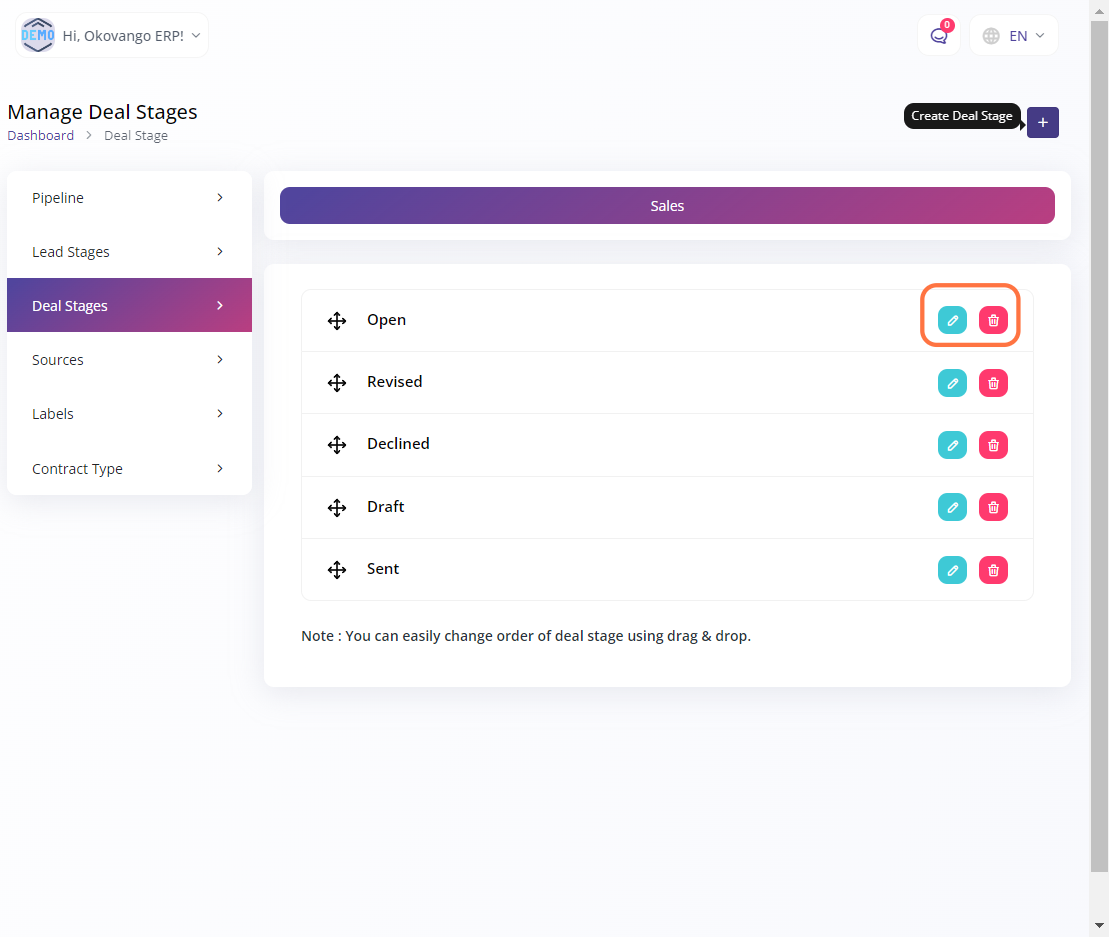
STEP 1: Click the "Create" Button
STEP 2: Create New Deal stages
Once you click the create button, you can proceed to set up deal stages in the schedule by following these steps:
- Enter the name of the deal stage you want to create.
- Select the appropriate pipeline for the deal stage.
- Click the create button to finalize the creation of the deal stage.
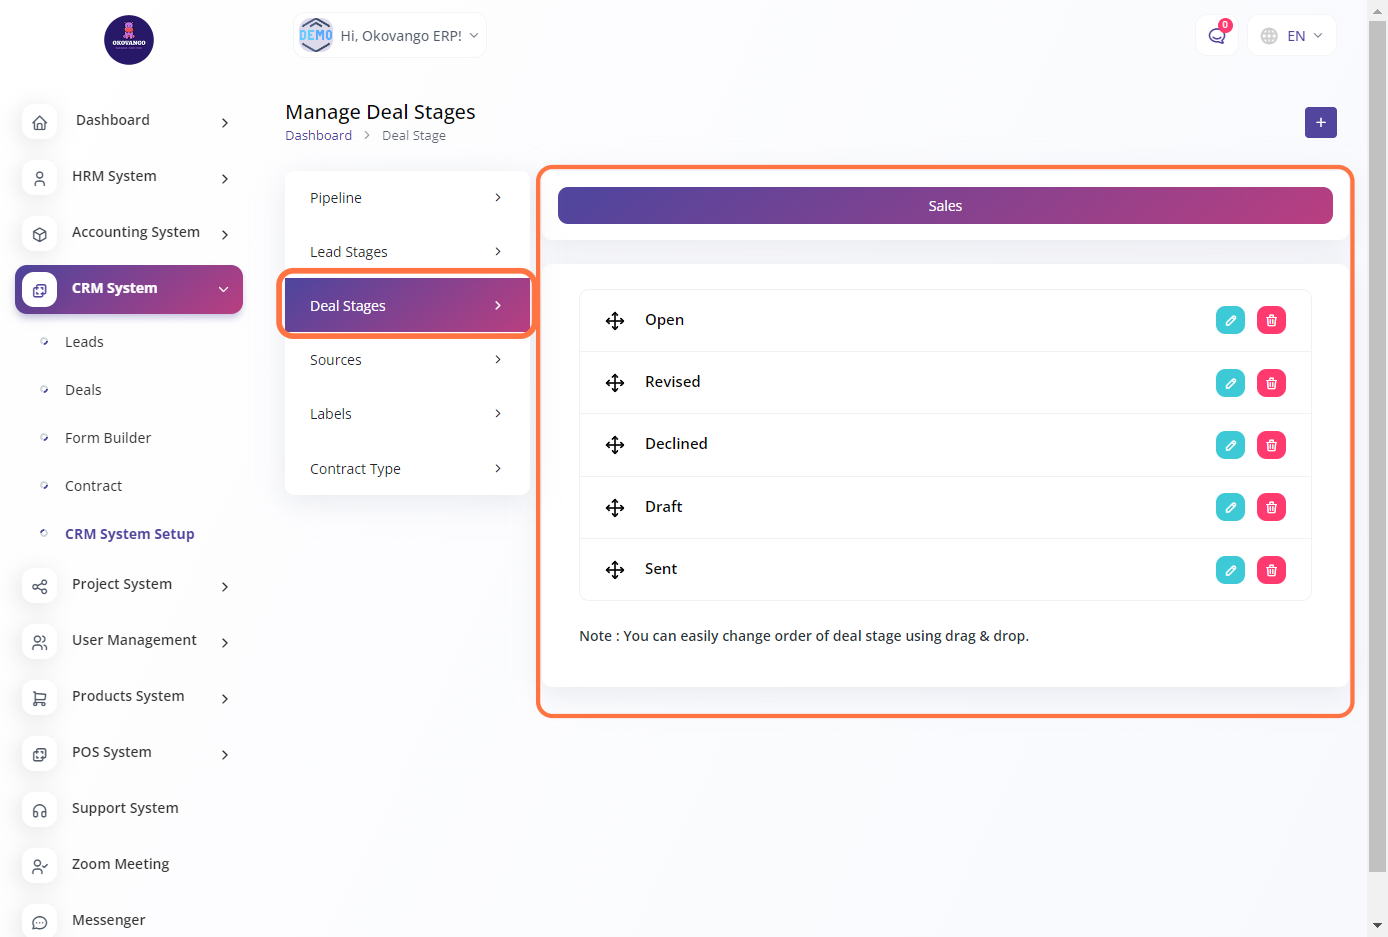
- Additionally, you have the flexibility to easily rearrange the order of deal stages by using the drag and drop feature. This allows you to customize the sequence of deal stages based on your specific workflow or business requirements.
STEP 3: "Edit or Delete" Button
After creating the deal stages, you have the flexibility to edit or delete them as needed. To make changes to a deal stage, you can select the stage you wish to modify and update the desired fields such as the stage name, description, probability, or order. Once you have made the necessary changes, you can save the updated deal stage.
Sources
In this section, you can configure and manage CRM sources. CRM sources refer to the different channels or platforms through which your organization acquires leads or potential customers. By setting up CRM sources, you can categorize and track the origin of your leads, helping you analyze the effectiveness of various marketing and sales channels. This feature allows you to efficiently manage and evaluate the performance of different lead generation sources, enabling you to make informed decisions and optimize your marketing and sales strategies.
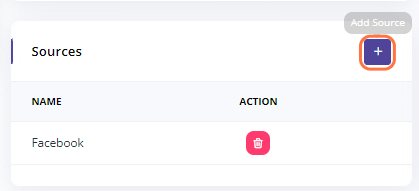
STEP 1: Click on "Create" Button
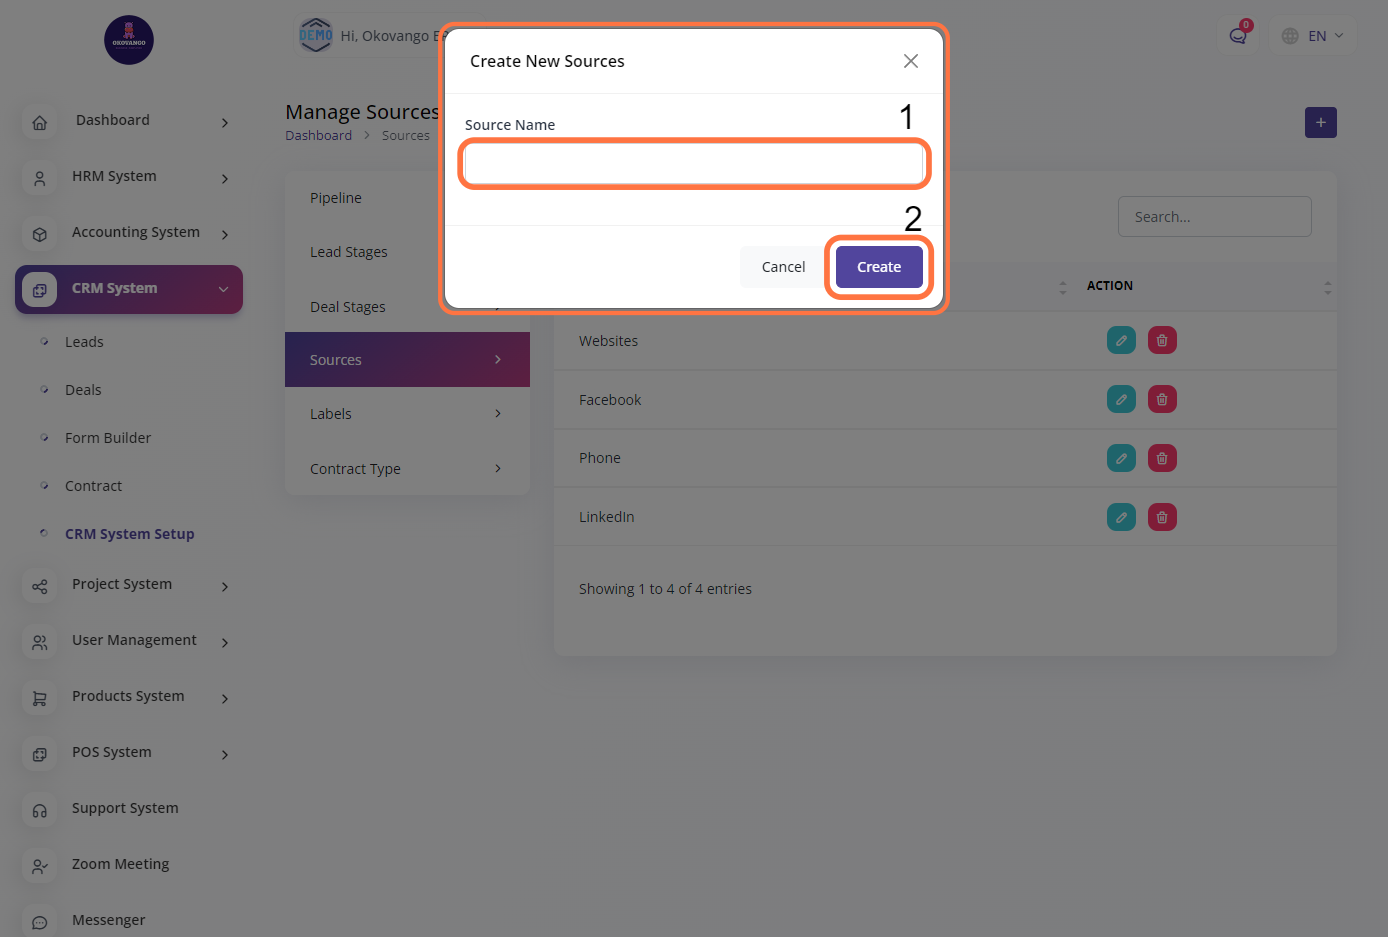
STEP 2: Create New Sources
After clicking the create button, you can proceed to set up a source by following these steps:
- Enter the name of the source.
- Click the create button to finalize the setup of the source.
Setting up sources allows you to track and categorize the different channels or methods through which job candidates or leads are acquired. By creating and organizing sources, you can gain insights into the effectiveness of your recruitment or marketing strategies and make informed decisions to optimize your sourcing efforts.
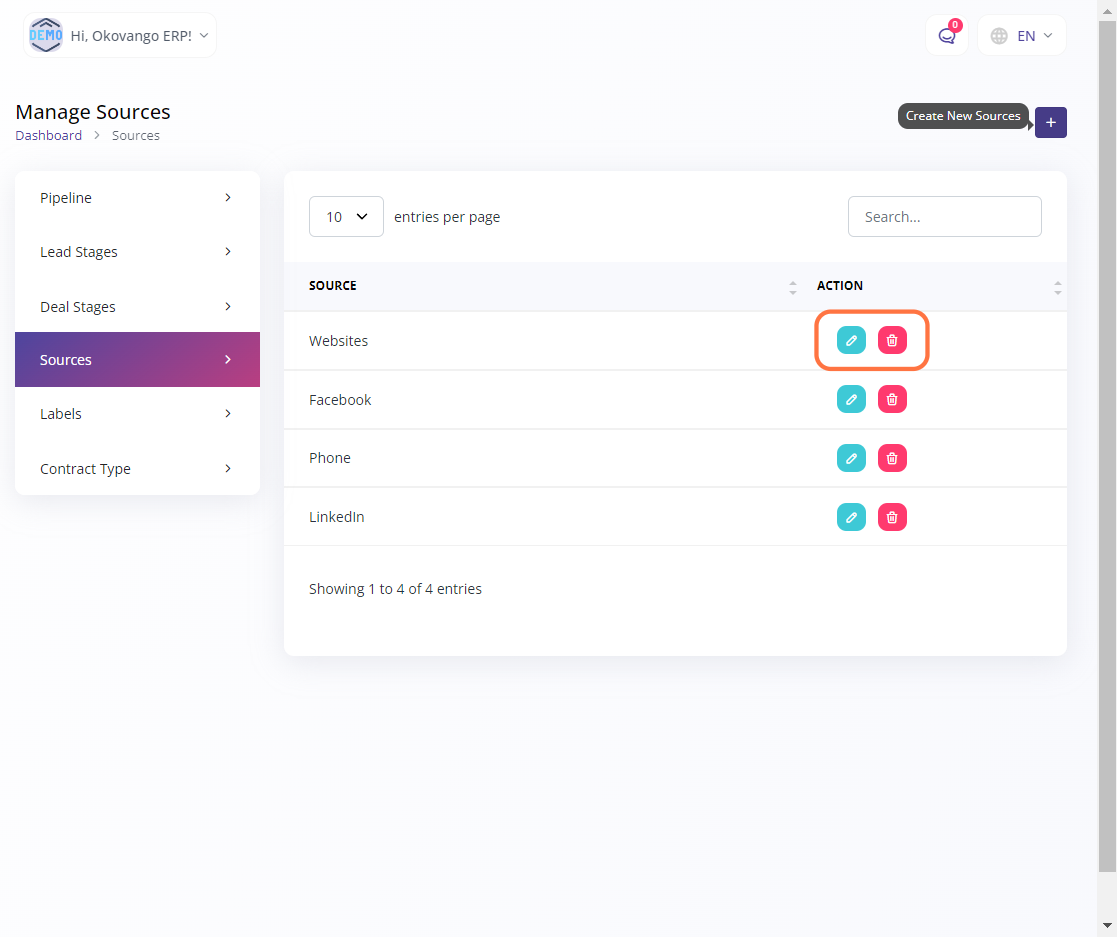
STEP 3: "Edit or Delete" Button
After creating the sources, you have the flexibility to edit or delete them as needed. To make changes to a source, you can select the source you wish to modify and update the desired fields such as the source name, description, or any other relevant information. Once you have made the necessary changes, you can save the updated source.
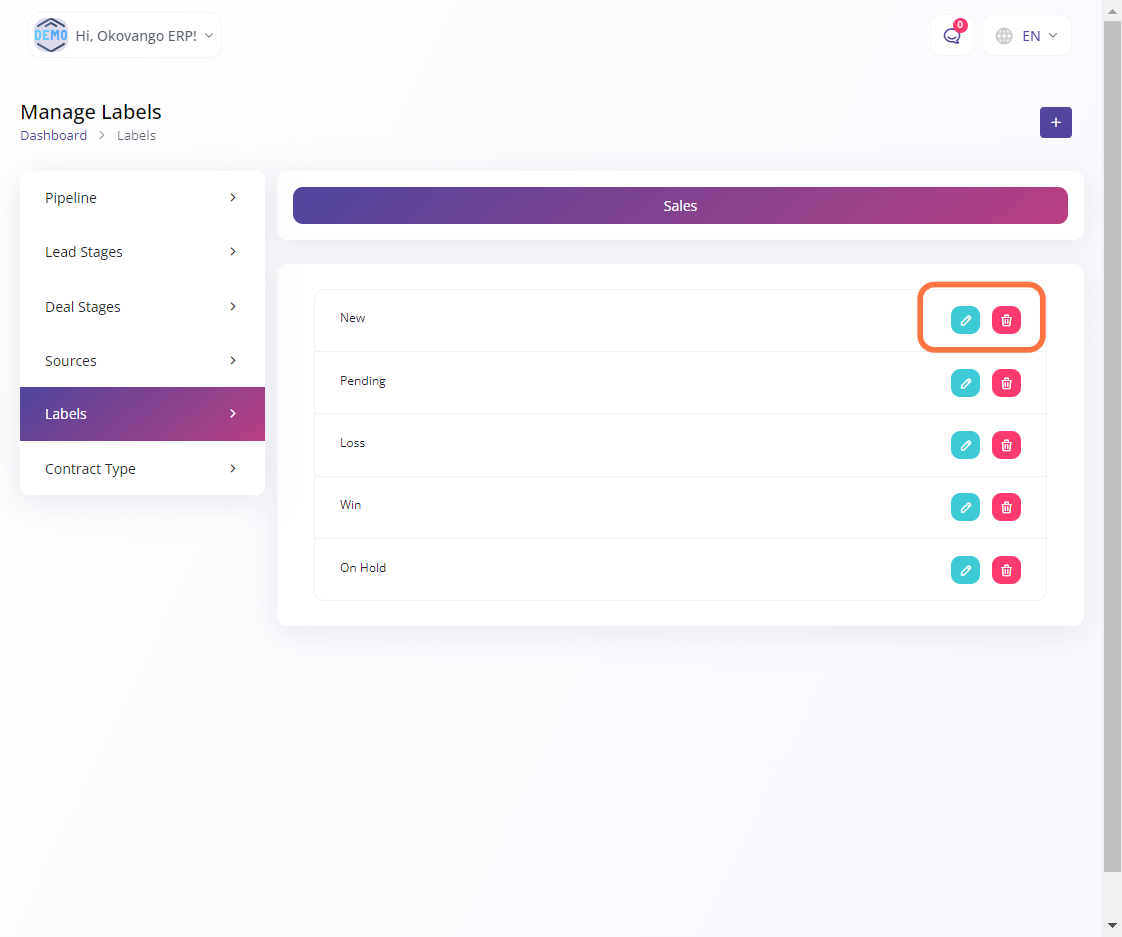
Labels
In the CRM labels setup section, you can define and customize labels that are used to categorize and track the status of customer relationships and deals. These labels help you organize and manage your CRM data effectively. By setting up these labels, you can easily assign them to customers or deals based on their current status or progress. This enables you to track and analyze your sales pipeline, monitor customer interactions, and make informed decisions to drive successful customer relationship management.

STEP 1: Click on "Create" Button
STEP 2: Create New Labels
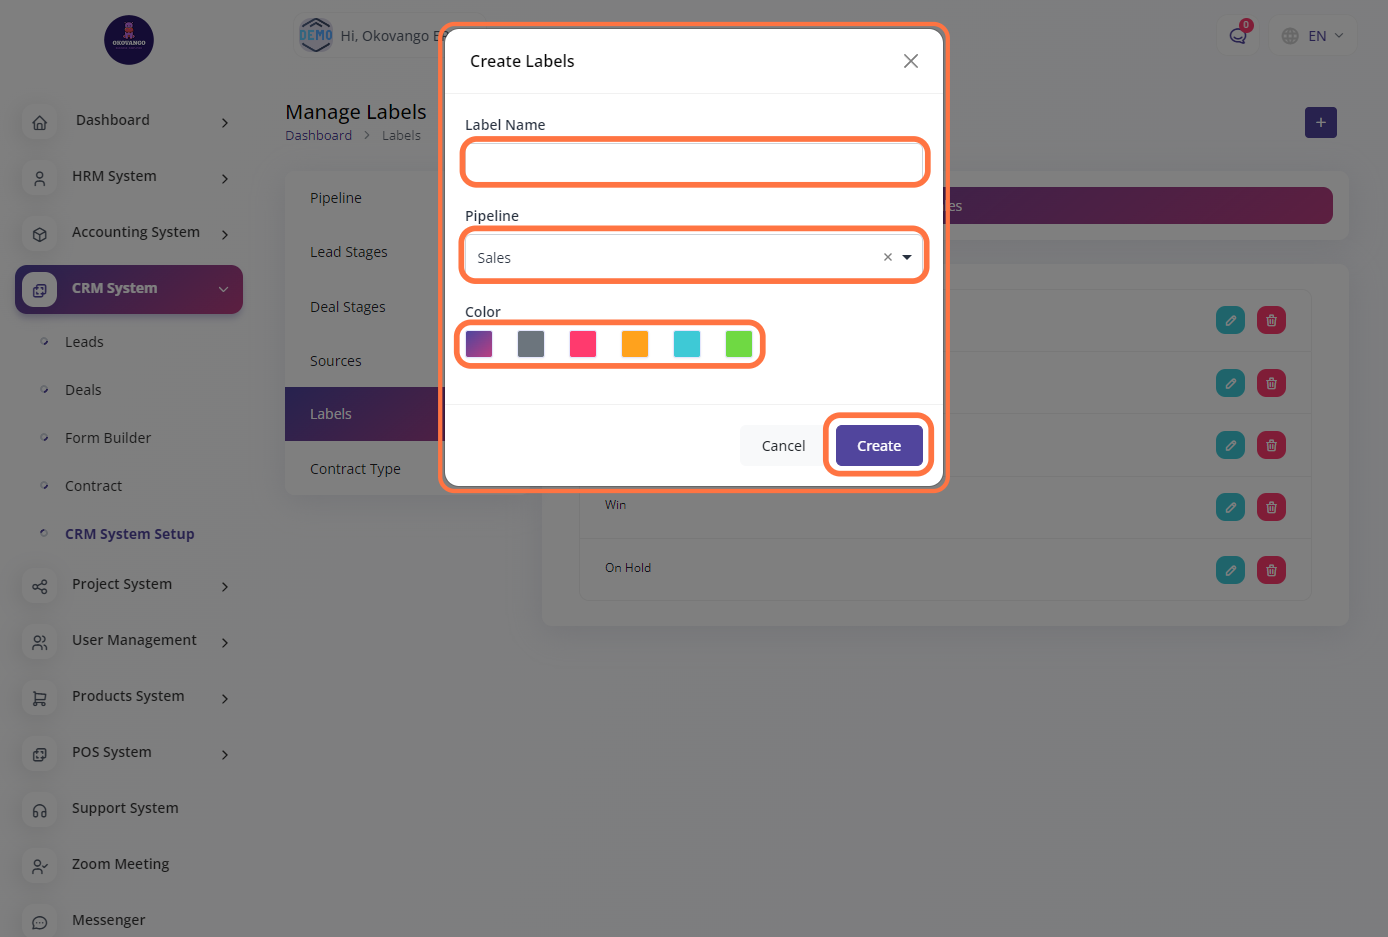
After clicking the create button, you can proceed to set up a label using the following steps:
- Enter the label name.
- Select the pipeline to which the label belongs.
- Choose a color for the label.
- Click the create button to finalize the setup.
By following these steps, you can create and assign labels to items or tasks within the specified pipeline. Labels provide a visual representation and categorization of items, helping in organizing and managing workflows effectively.
STEP 3: "Edit or Delete" Button
After creating the labels, you have the flexibility to edit or delete them as needed. To make changes to a label, you can select the label you wish to modify and update the desired fields such as the label name, pipeline, or color. Once you have made the necessary changes, you can save the updated label. By providing the ability to edit and delete labels, the system allows for customization and refinement of label management, ensuring that the labels align with the evolving needs of your organization.
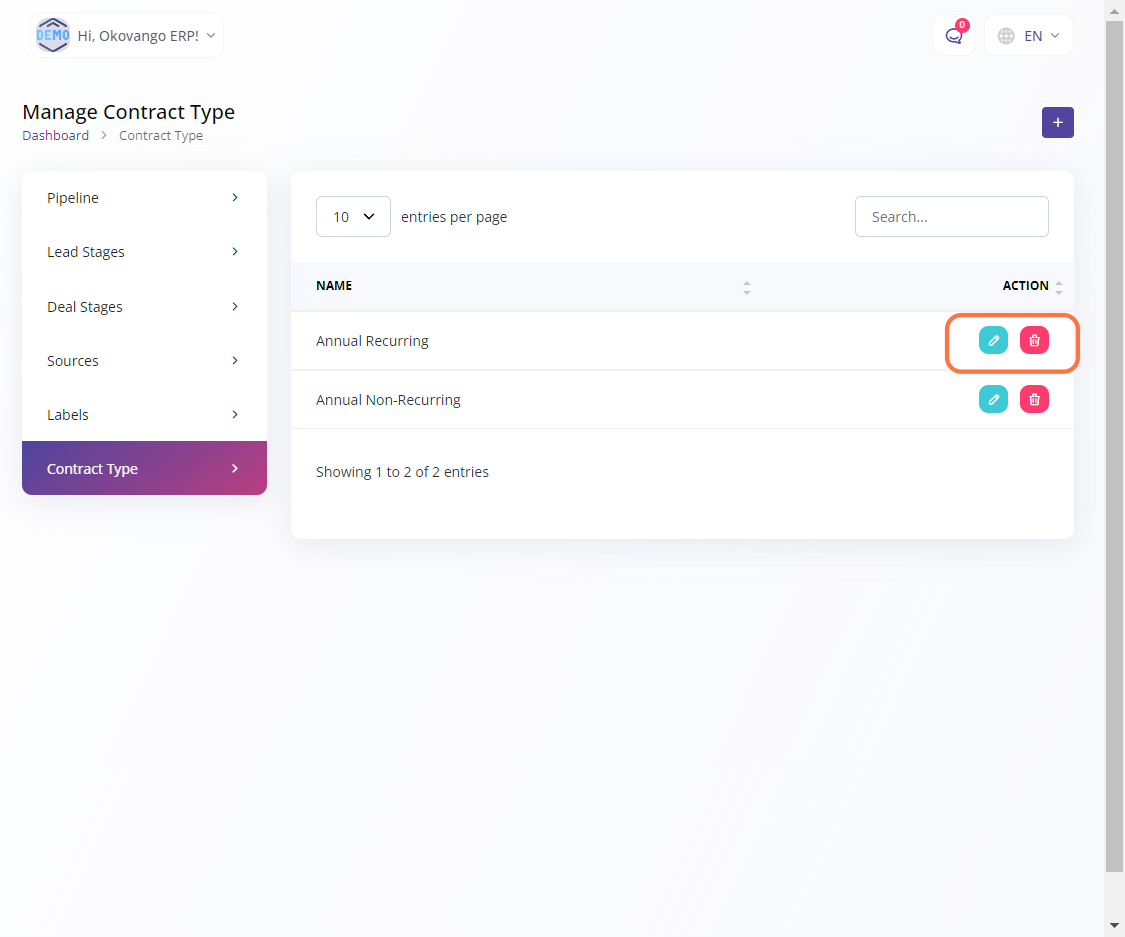
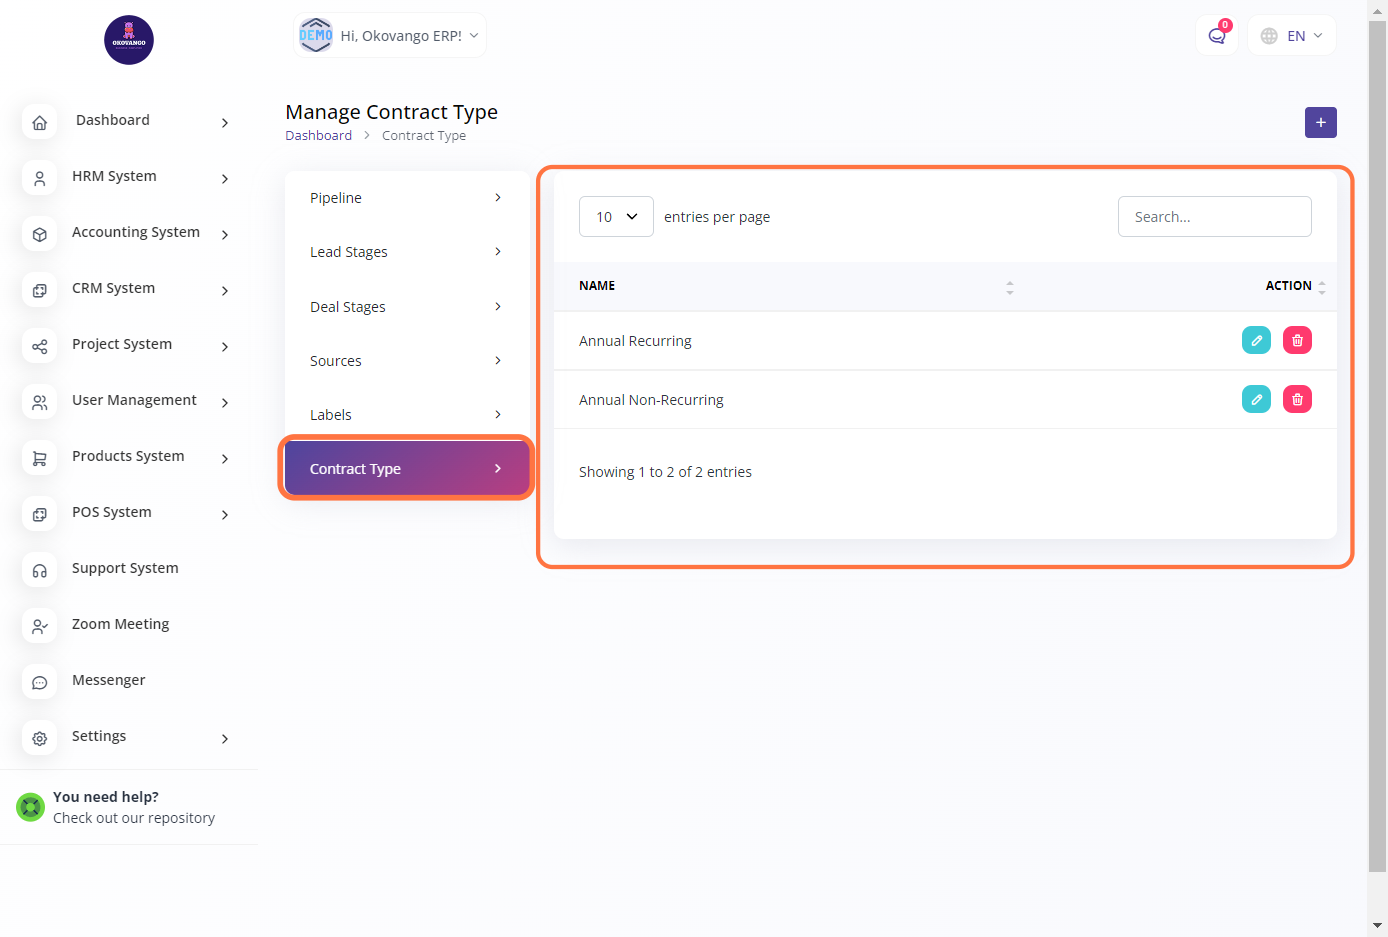
Contract Type
In the CRM contract type section, you can create and manage different types of contracts that are relevant to your customer relationship management activities. This feature allows you to define and categorize the various types of contracts your organization uses when engaging with customers. You can create contract types such as service contracts, sales contracts, subscription contracts, or any other type that aligns with your business requirements. By creating contract types, you can effectively organize and classify your contracts, making it easier to track and manage customer agreements and obligations.
STEP 1: Click on "Create" Button
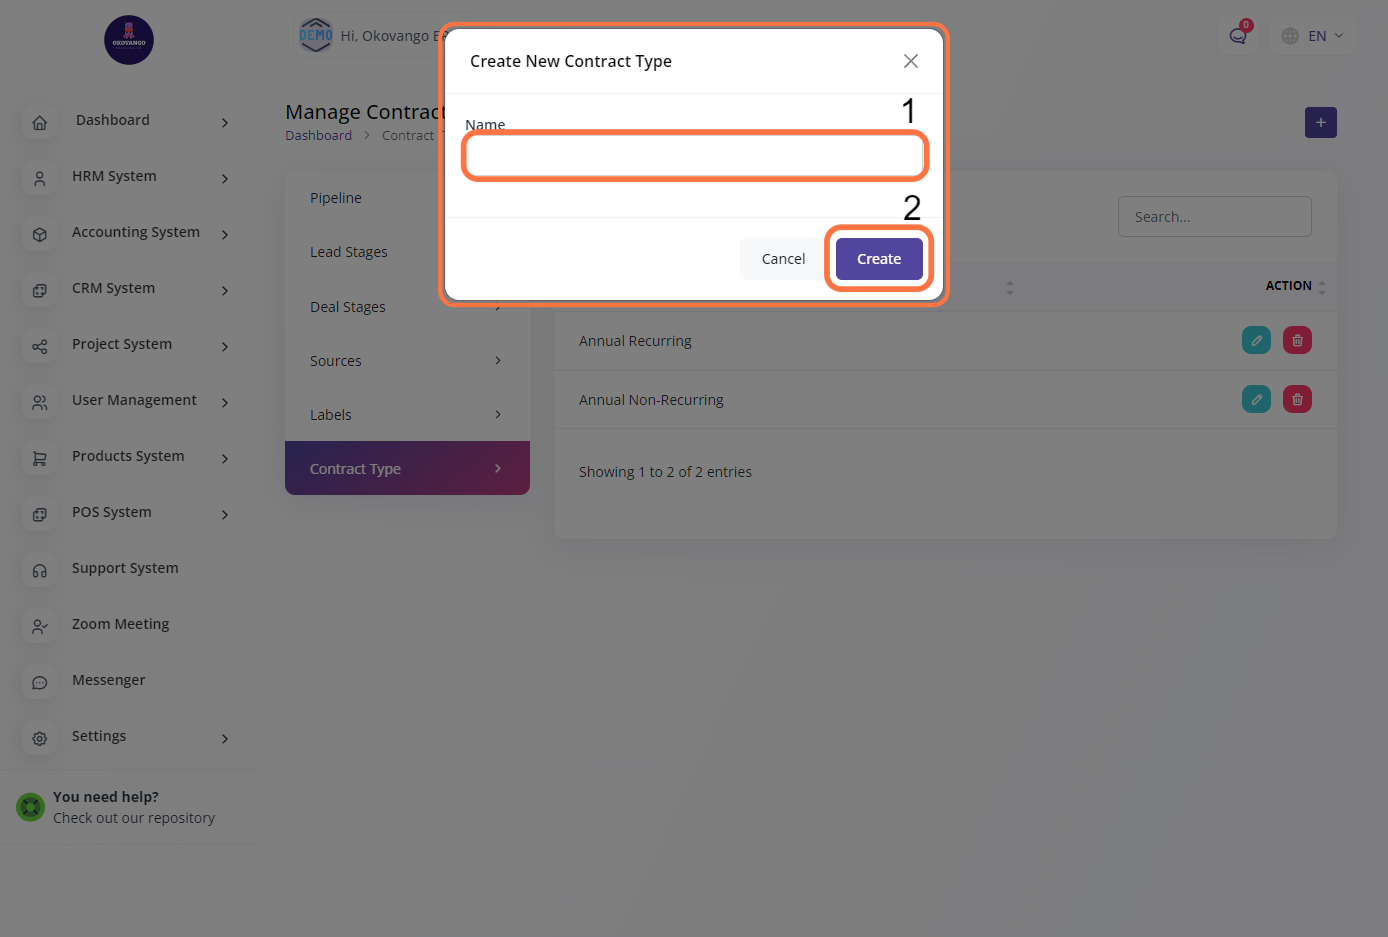
STEP 2: Create New Contract type
After clicking the create button, you can proceed to set up a contract type by following these steps:
- Enter the name of the contract type.
- Click the create button to finalize the setup.
By providing a descriptive name for the contract type, you can easily identify and differentiate it from other contract types in your CRM system. This allows for better organization and management of contracts, ensuring that they are properly classified and associated with the appropriate contract type.
STEP 3: "Edit or Delete" Button
Once you have created a contract type, you have the flexibility to edit or delete it as needed. Editing the contract type allows you to modify its name or any other relevant details. This ensures that you can update the contract type information to accurately reflect your organization's evolving needs. Deleting a contract type removes it from the system, providing a way to remove outdated or no longer applicable contract types from your CRM setup. The ability to edit and delete contract types gives you control over managing and maintaining a streamlined and relevant contract type list in your CRM system.