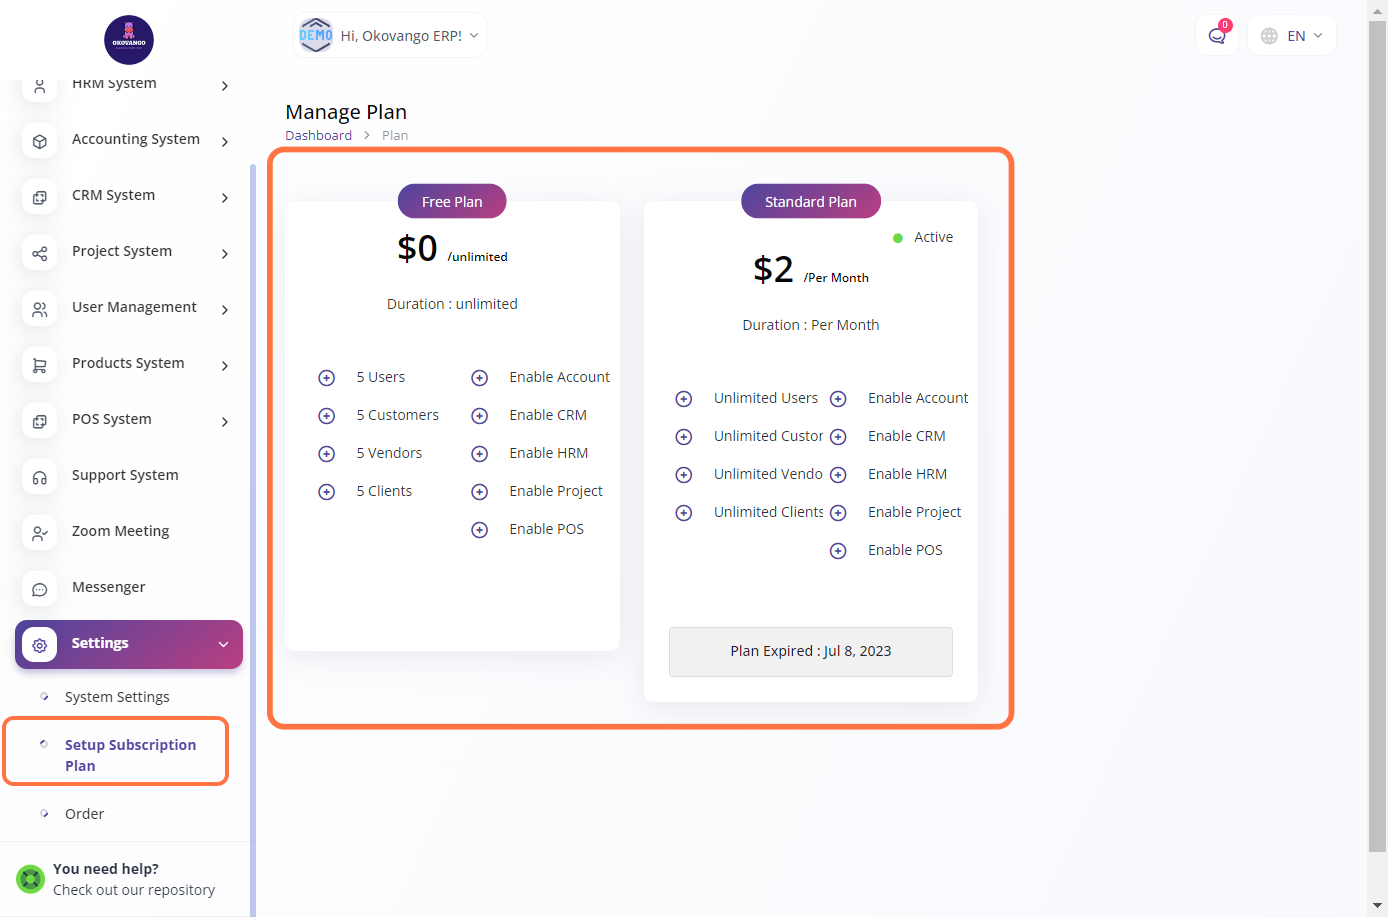
In Okovango ERP, you have the option to set up subscription plans for your users. This feature allows you to define different pricing tiers, durations, and features for your ERP system. You can customize and tailor the subscription plans according to your business needs and the requirements of your customers. By setting up subscription plans, you can effectively manage user access, billing, and recurring payments within the Okovango ERP system. This helps ensure a smooth and structured process for offering and managing subscriptions to your ERP solution.
You have the ability to print barcodes for your products. This feature allows you to generate barcode labels that can be attached to your products for easy scanning and identification during the sales process. By printing barcodes, you can streamline the checkout process, improve accuracy, and enhance inventory management. The barcode printing functionality in the POS system enables you to create professional-looking labels with unique barcodes for each product in your inventory.
Step 1: "Print Barcode" Button
To print barcodes, follow these steps:
Select the desired warehouse from the available options.
Choose the specific product for which you want to print the barcode.
Enter the quantity of barcodes you wish to generate for the selected product.
Click the "Print" button to initiate the barcode printing process.
By following these steps, you can conveniently generate and print barcodes for your products, allowing for efficient tracking and identification within your Point of Sale system.
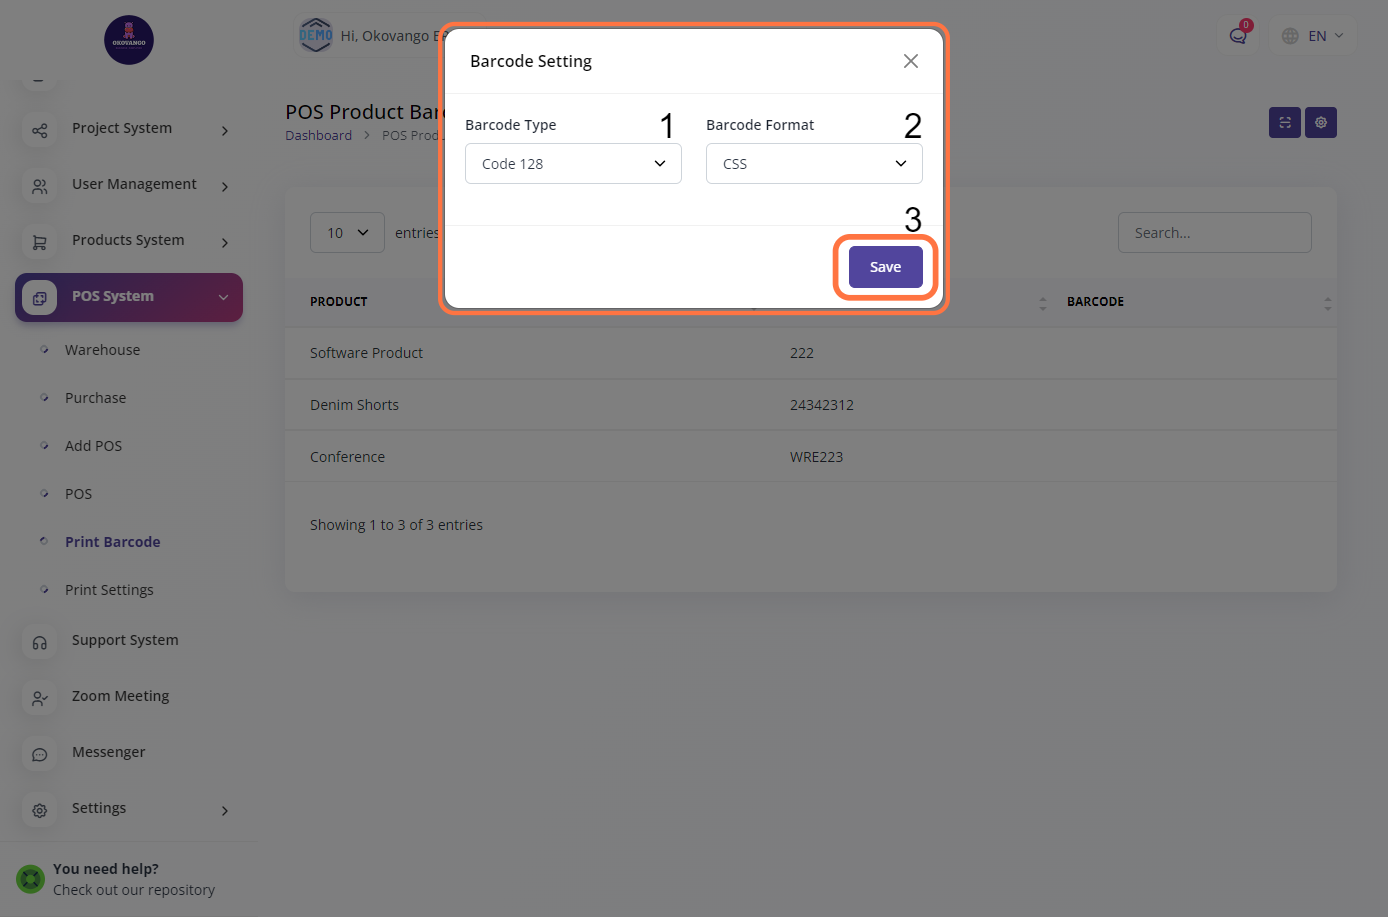
Step 2: "Barcode Setting" Button
To set up barcode settings, follow these steps:
Select the desired barcode type from the available options.
Choose the appropriate barcode format that suits your requirements.
Click the "Save" button to save the barcode settings.
By customizing the barcode type and format, you can ensure compatibility with your inventory management and Point of Sale systems, facilitating seamless scanning and tracking of products using barcodes.
In the expenses management section of the accounting system, you can handle various tasks such as creating bills for vendor invoices, making payments for expenses incurred, and managing debit notes for adjustments or refunds. This allows for efficient tracking and recording of all financial outflows related to business expenses. By properly managing bills, payments, and debit notes, businesses can maintain accurate financial records and effectively monitor their expenses.
Bill
In the bill setup section, you can create and manage bills for vendor invoices. This involves entering details such as vendor information, bill date, due date, and the corresponding expense items or services. By setting up bills, businesses can accurately track their payables and ensure timely payments to vendors. Additionally, bill setup allows for easy reference and organization of financial records related to expenses and liabilities.
Step 1: Click the "Create" Button
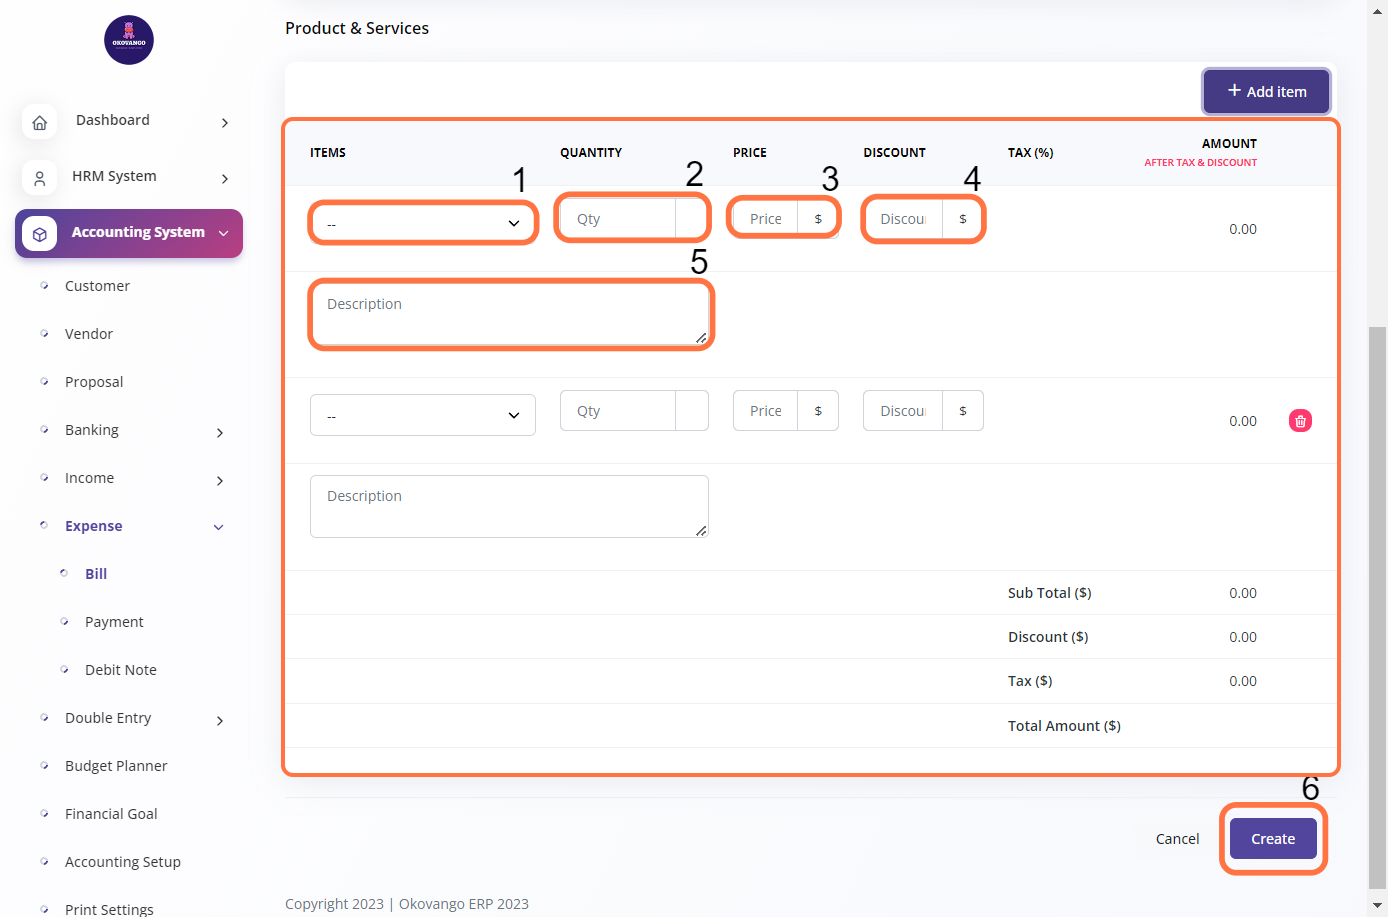
Step 2: Create new Bill
After clicking the create button, you can proceed to set up a bill by following these steps:
Add Item: Enter the name or description of the item or service associated with the bill.
Quantity: Specify the quantity of the item or service included in the bill.
Price: Enter the unit price or rate for the item or service.
Discount: If applicable, input any discount applied to the item or service.
Description: Provide additional details or notes related to the item or service.
Click Create: Finalize the bill creation by clicking the create button.
These steps allow you to accurately record and manage your expenses, ensuring proper documentation and tracking of vendor bills within your accounting system.
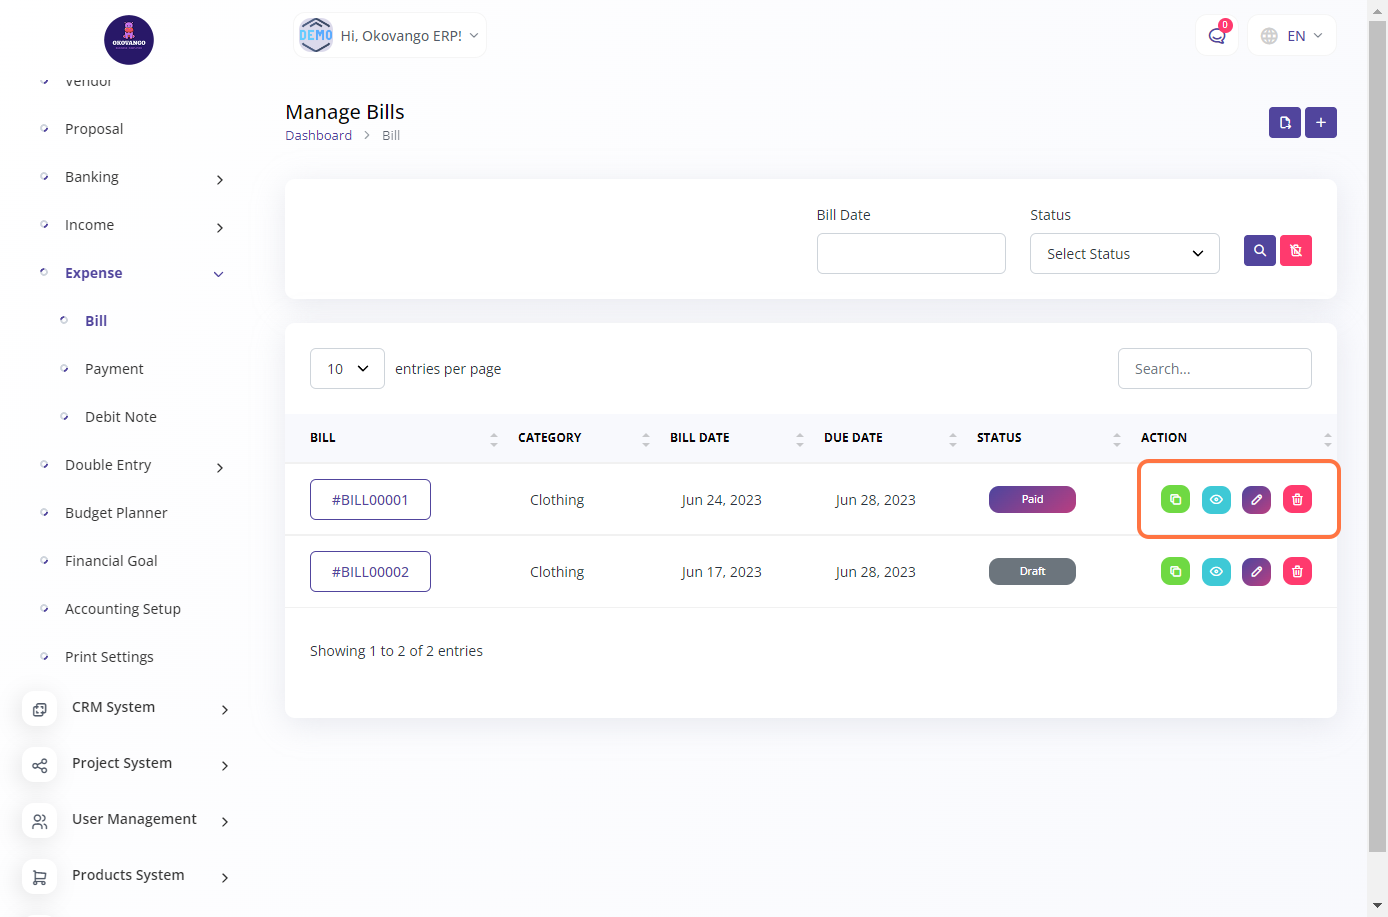
Step 3: Duplicate bill, View, edit and delete
Duplicate
You can create a duplicate copy of a bill, which is useful when you need to create similar bills or make minor adjustments to an existing bill.
Edit and Delete
You can modify the details of a bill, such as updating item quantities, prices, or descriptions, to reflect any changes or corrections. If needed, you can delete a bill from the system, removing it permanently.
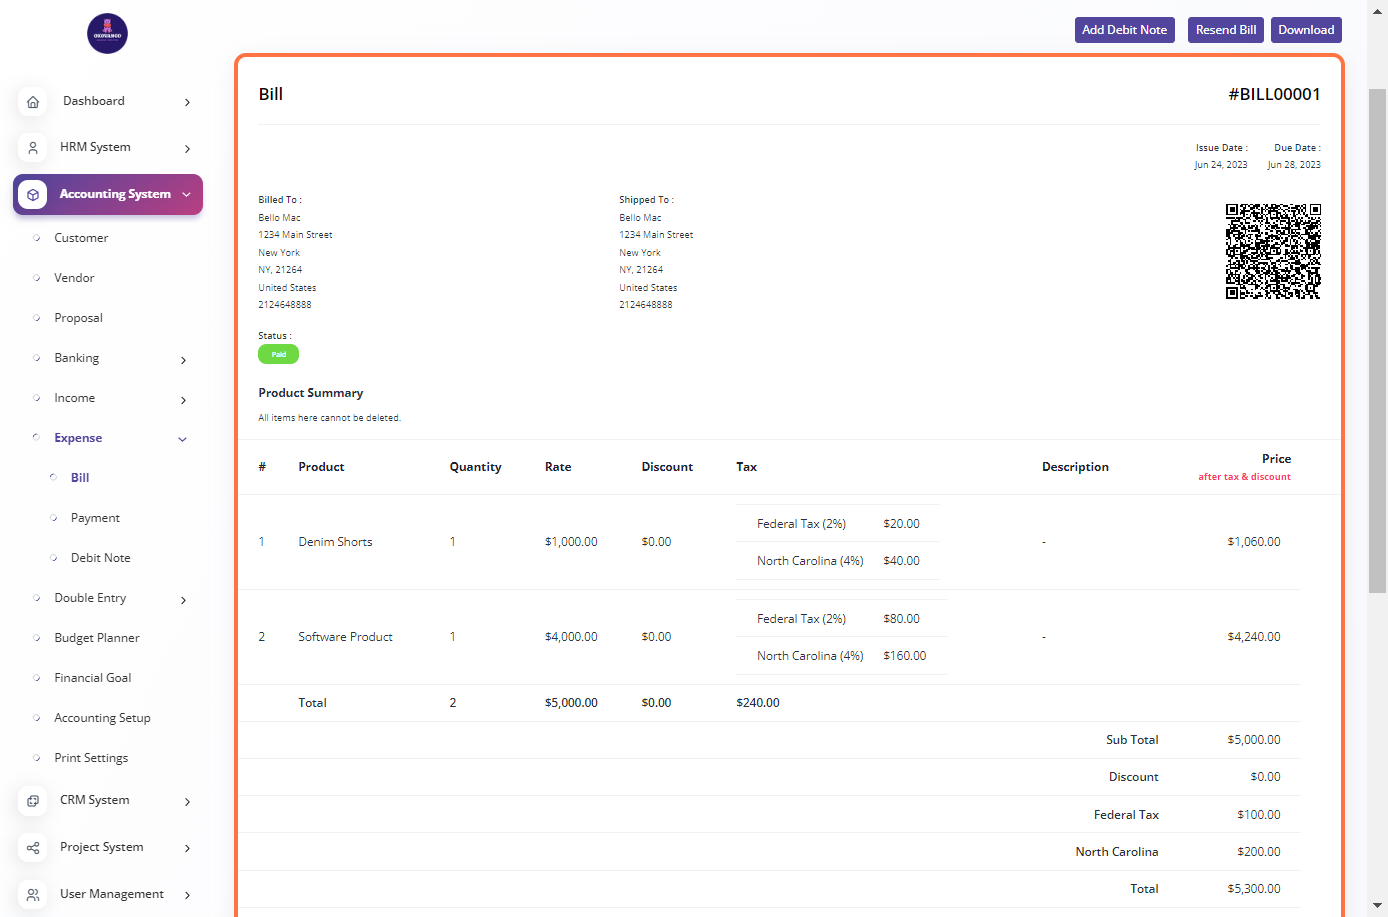
View
You can view the details and information of a bill, including the items, quantities, prices, and totals.
Debit Note: You can create a debit note to record any adjustments or deductions related to an expense. This allows you to accurately track and manage changes in your financial transactions.
Resend Bill: If necessary, you have the option to resend a bill to the recipient. This can be useful in cases where the original bill was not received or there is a need to provide a duplicate copy.
Download: You can download a copy of the bill in a printable or electronic format. This allows you to save the bill for your records, share it with others, or use it for further processing or analysis.
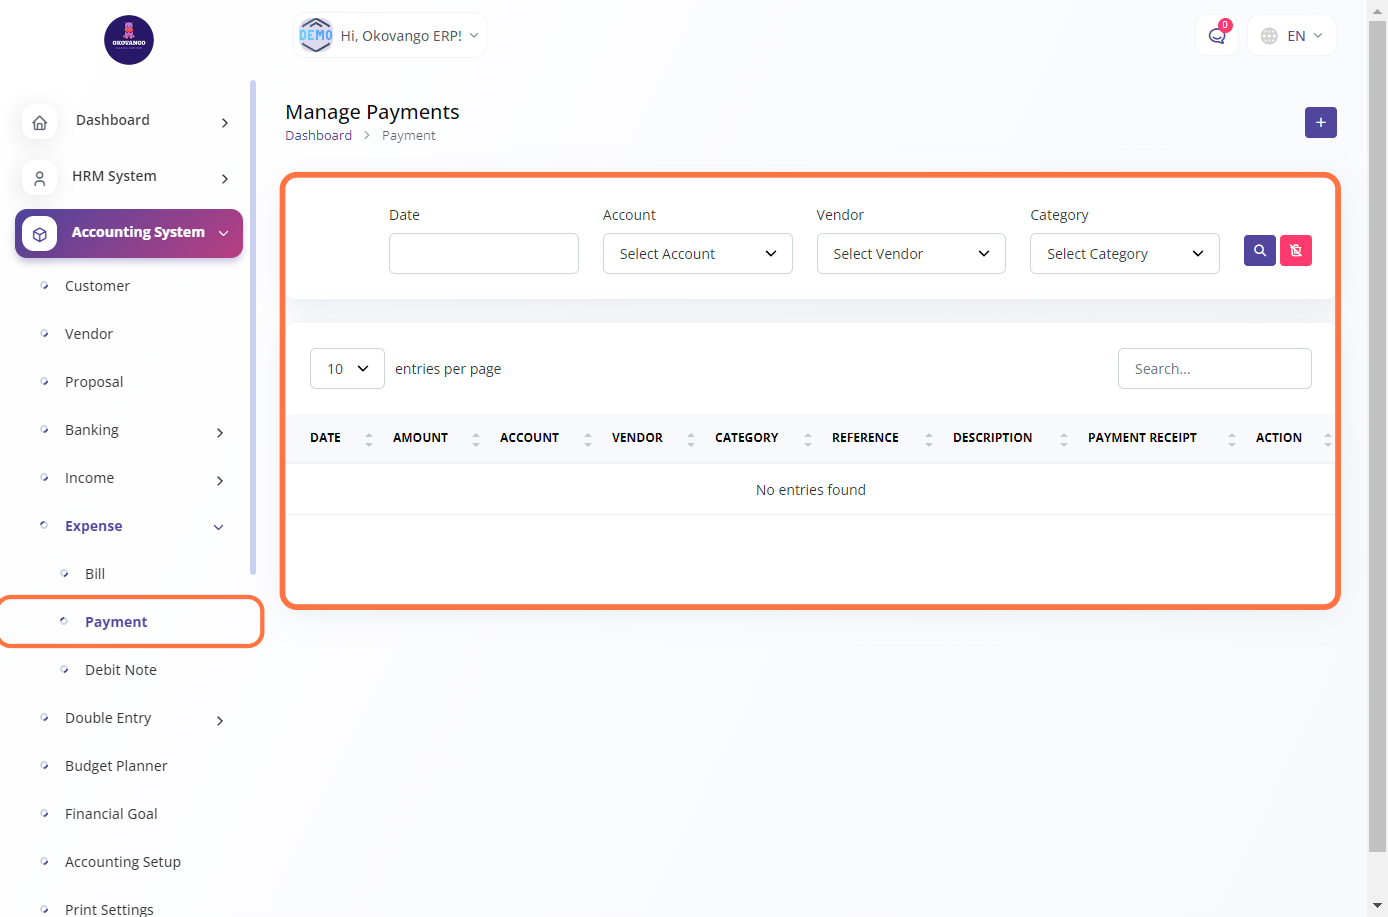
Payment
In the expense module, you have the option to add a payment to record the payment made for a specific expense or bill. This allows you to accurately track and reconcile your financial transactions. By providing the payment details such as payment amount, date, and reference, you can maintain a comprehensive record of your expenses and associated payments. Adding payments in the expense module helps you manage your cash flow, track outstanding balances, and maintain accurate financial records.
Step 1: Click the "Create" Button
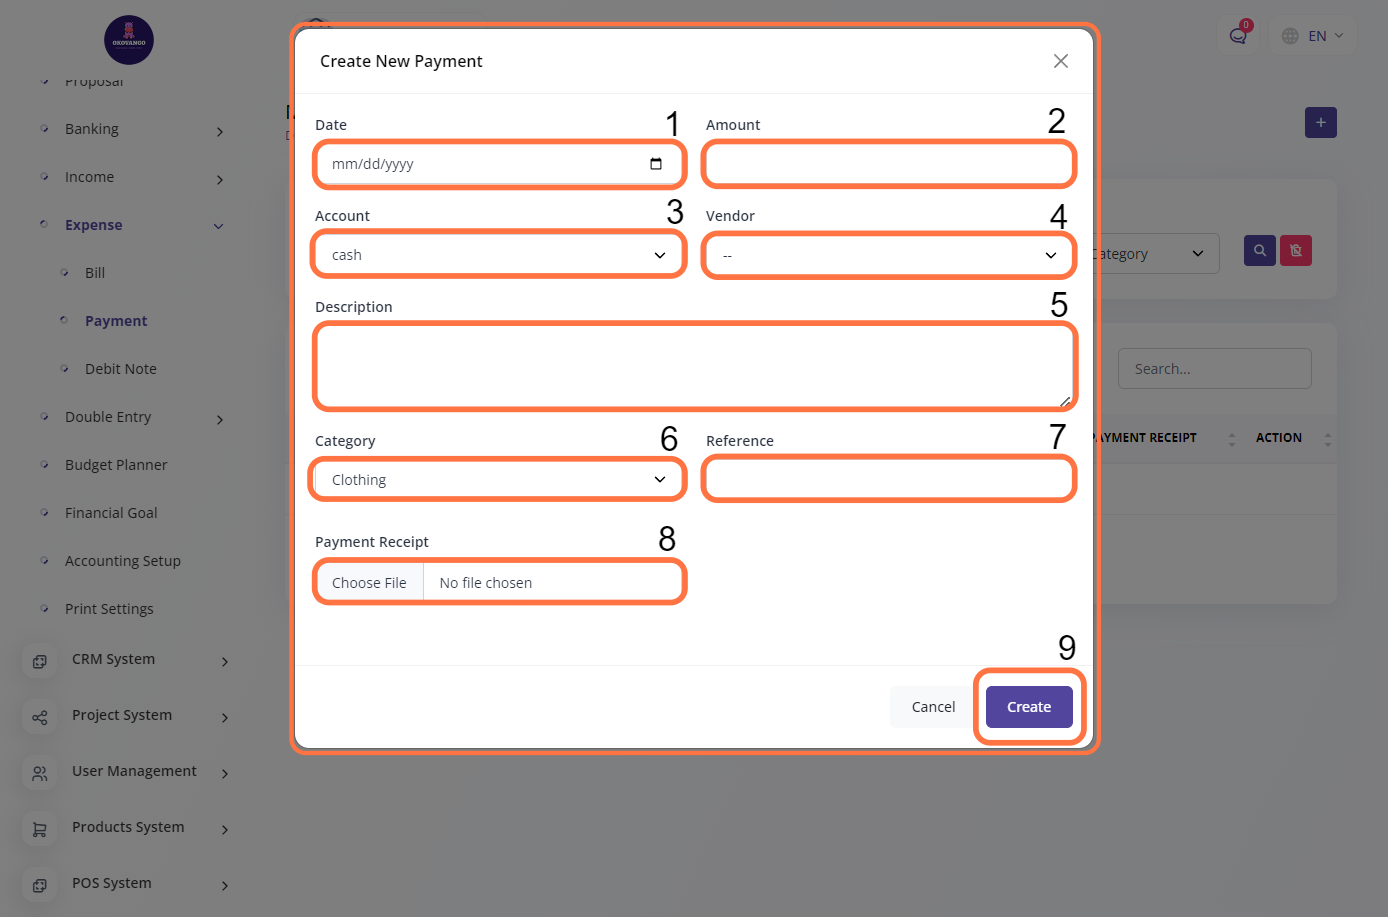
Step 2: Create new payment
To create a payment in the expense module, you can follow these steps:
Enter the payment date.
Specify the payment amount.
Select the relevant account from which the payment is made.
Choose the vendor associated with the payment.
Provide a description for the payment, if necessary.
Assign a category to classify the payment.
Enter a reference or invoice number related to the payment.
Optionally, attach a payment receipt if available.
Click the "Create" button to save the payment details.
By following these steps, you can accurately record and track your payments in the expense module of the accounting system.
Debit Note
In the expense module, you have the option to add a debit note. This allows you to record and track any debits or adjustments to vendor accounts. To add a debit note, you need to provide details such as the vendor, debit amount, description, and any relevant reference information. Once created, the debit note can be used for accounting purposes and to maintain accurate vendor records.
Step 1: Click the "Create" Button
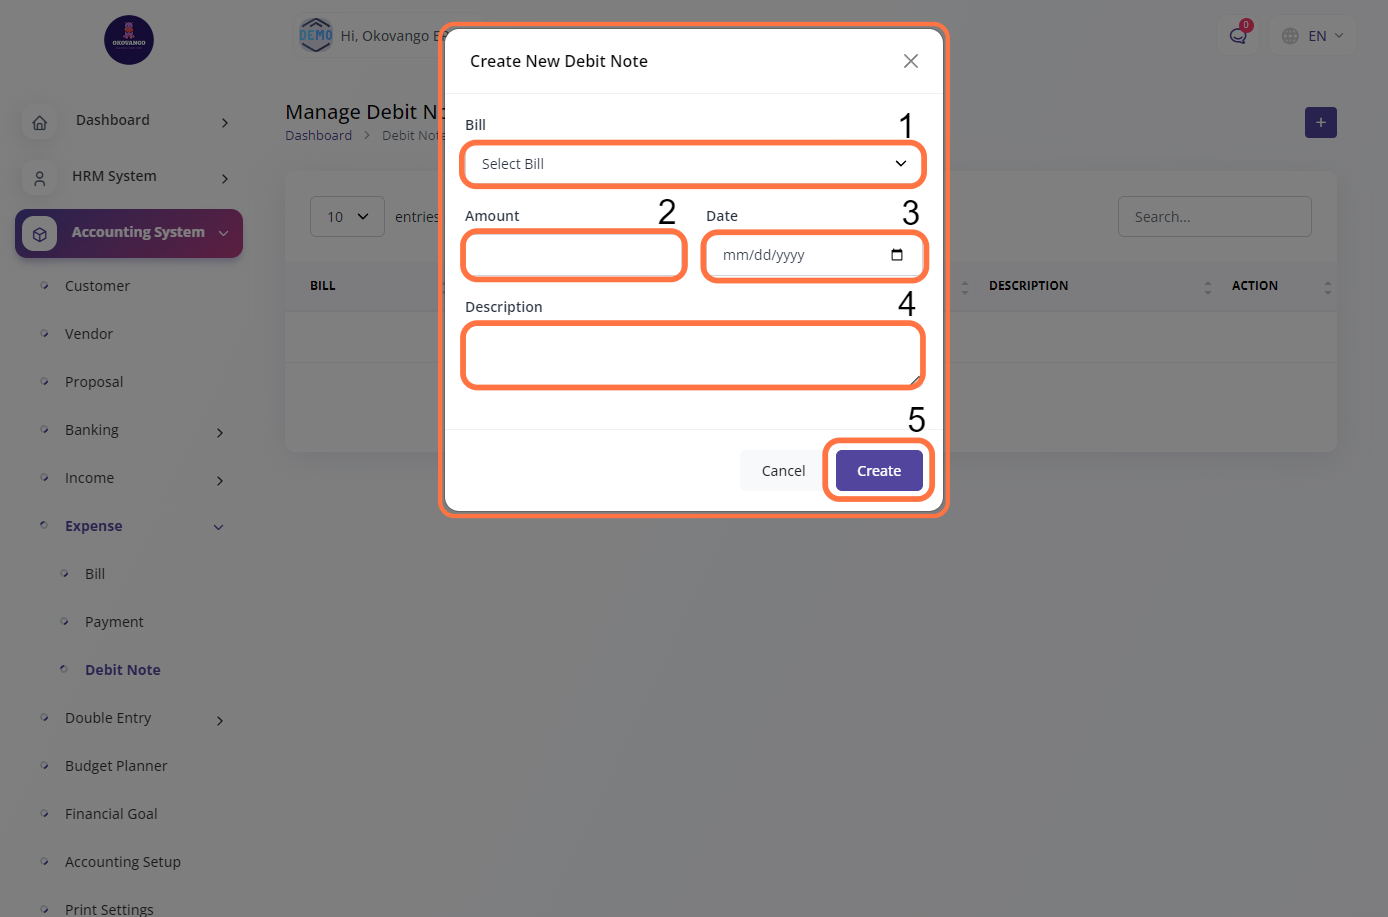
Step 2: Create new debit note
To create a debit note in the expense module, you need to follow these steps:
Select the bill for which you want to create the debit note.
Specify the debit amount, which represents the adjustment or deduction.
Enter the date of the debit note and provide a brief description of the reason for the adjustment.
Click on the "Create" button to generate the debit note.
Once created, the debit note will be associated with the respective bill and can be used for accurate financial reporting and vendor account management.
You can track and manage the revenue generated by the business. This includes recording and categorizing income from various sources such as invoice, credit note, and other revenue streams. You can view and analyze the income data to gain insights into the financial performance of your business. Additionally, you can generate reports and summaries of the income to facilitate financial analysis and decision-making.
Invoices
Create and send invoices to your customers for products sold or services rendered. The system can track the status of invoices, including pending, paid, or overdue.
Step 1: Click the "Create" Button
Step 2: Create new invoices
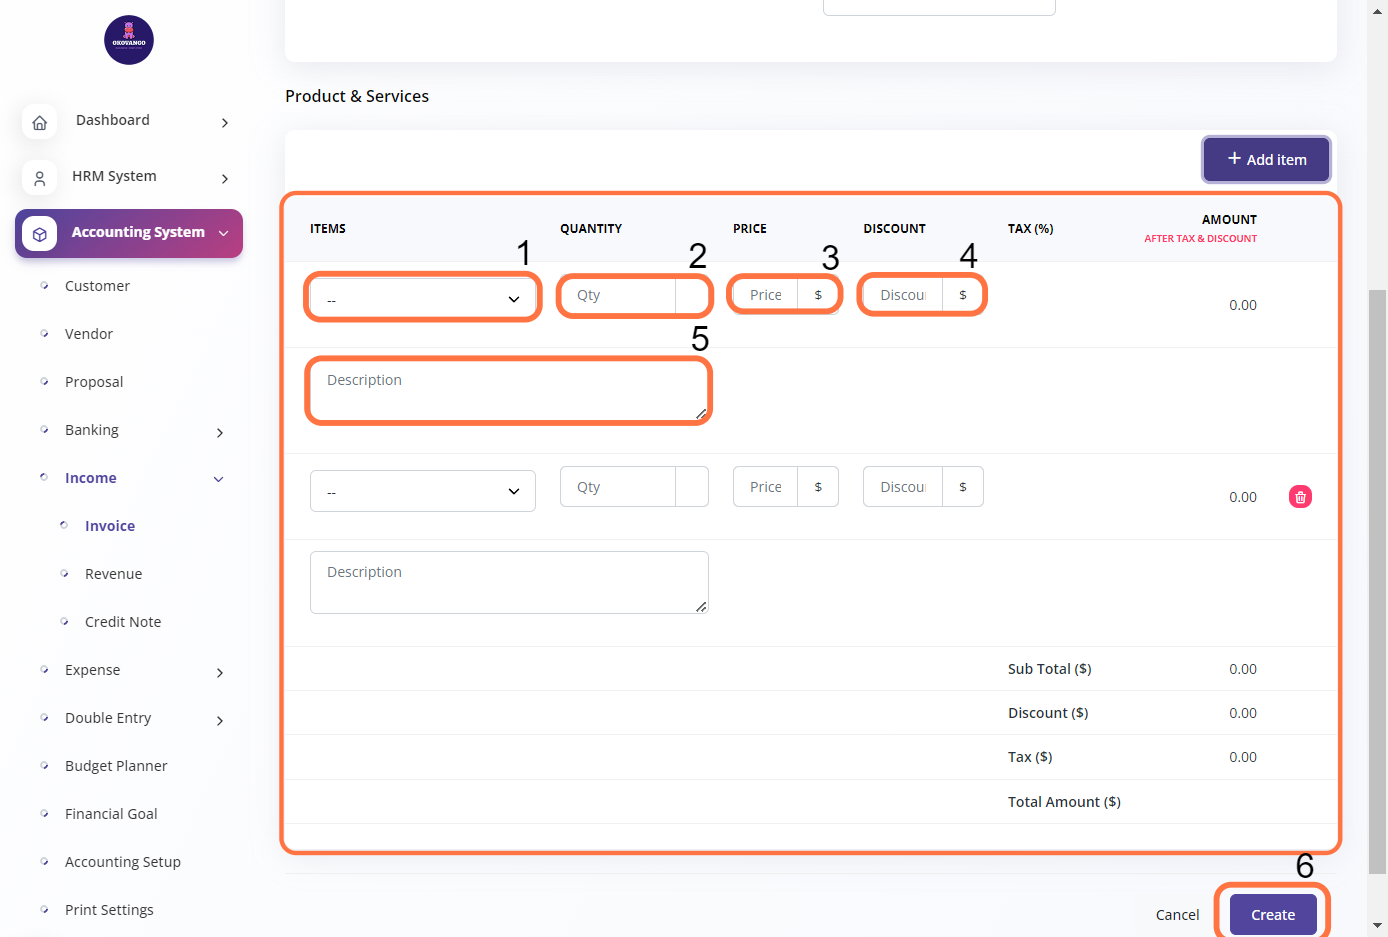
After clicking the create button, you can proceed to create invoices by following these steps:
Choose the product or service from your inventory that you want to include in the invoice.
Specify the quantity of the selected item that is being invoiced.
Set the unit price of the item.
If applicable, enter any discount or deduction to be applied to the invoice.
Specify the tax or taxes to be applied to the invoice, if applicable.
Optionally, provide additional details or description related to the invoice.
Once you have entered all the necessary information, click the create button to generate the invoice.
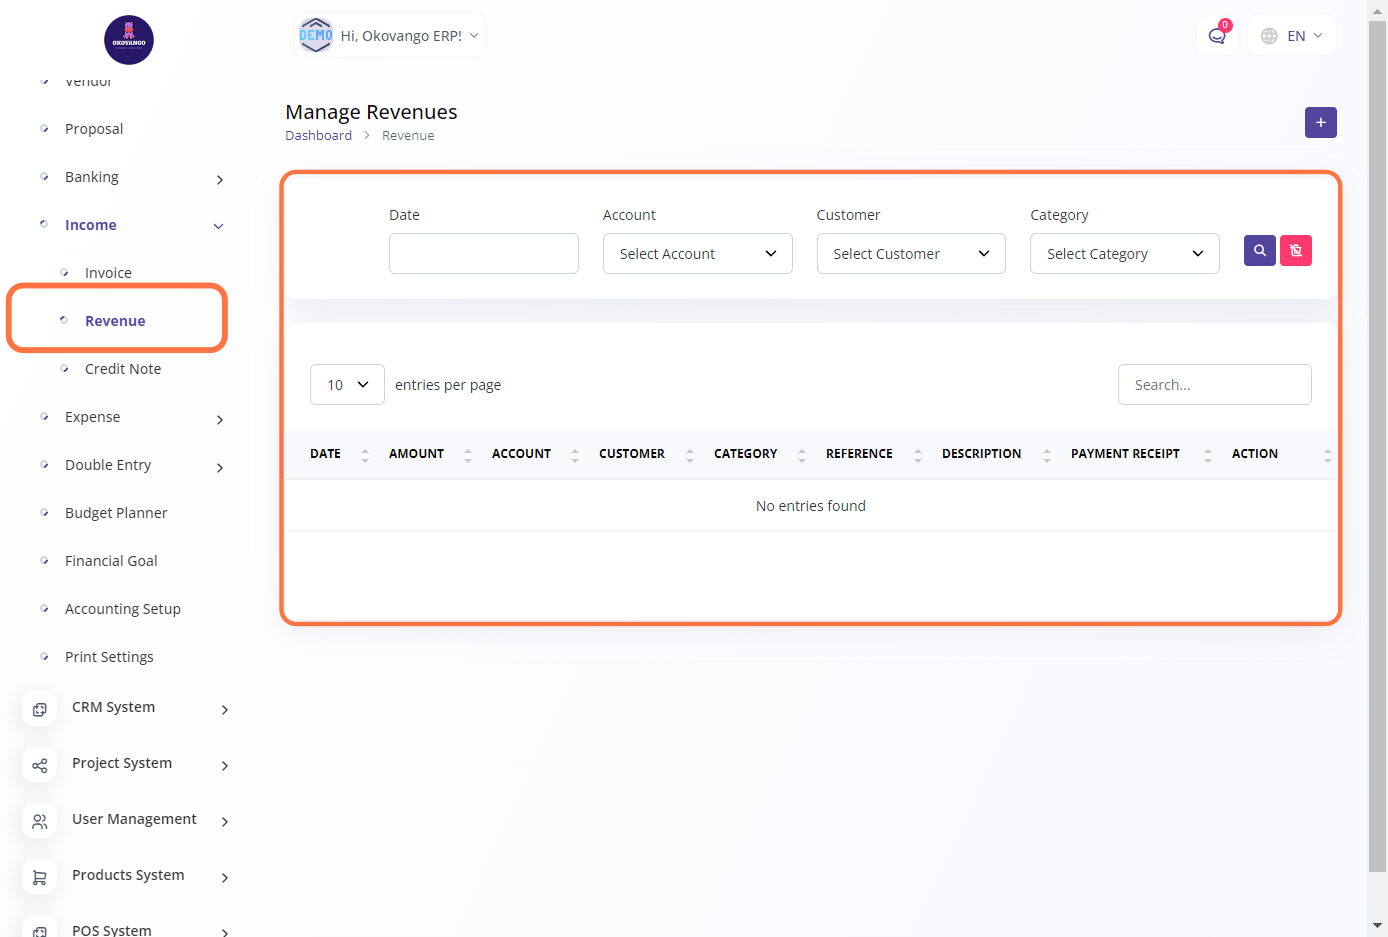
Revenue
You can set up revenue by defining the sources of income and tracking the revenue generated. This allows you to categorize and organize the different streams of revenue your business receives. By setting up revenue, you can monitor and analyze the financial performance of your business, track revenue growth, and make informed business decisions. It helps you gain insights into the sources that contribute to your revenue and allows for effective financial planning and management.
Step 1: Click the "Create" Button
Step 2: Create new revenue
In this section, you can create revenue entries by following these steps:
Select the date of the revenue entry.
Enter the amount of the revenue generated.
Choose the account associated with the revenue, which could be a specific income account or a general revenue account.
Select the customer or client from whom the revenue is generated.
Provide a description or additional details about the revenue entry.
Assign a category to the revenue for better classification and analysis.
Optionally, include a reference number or any relevant reference information.
If applicable, attach a payment receipt or supporting document.
Click the "Create" button to save the revenue entry.
By following these steps, you can accurately record and track the revenue generated by your business, ensuring proper financial documentation and analysis.
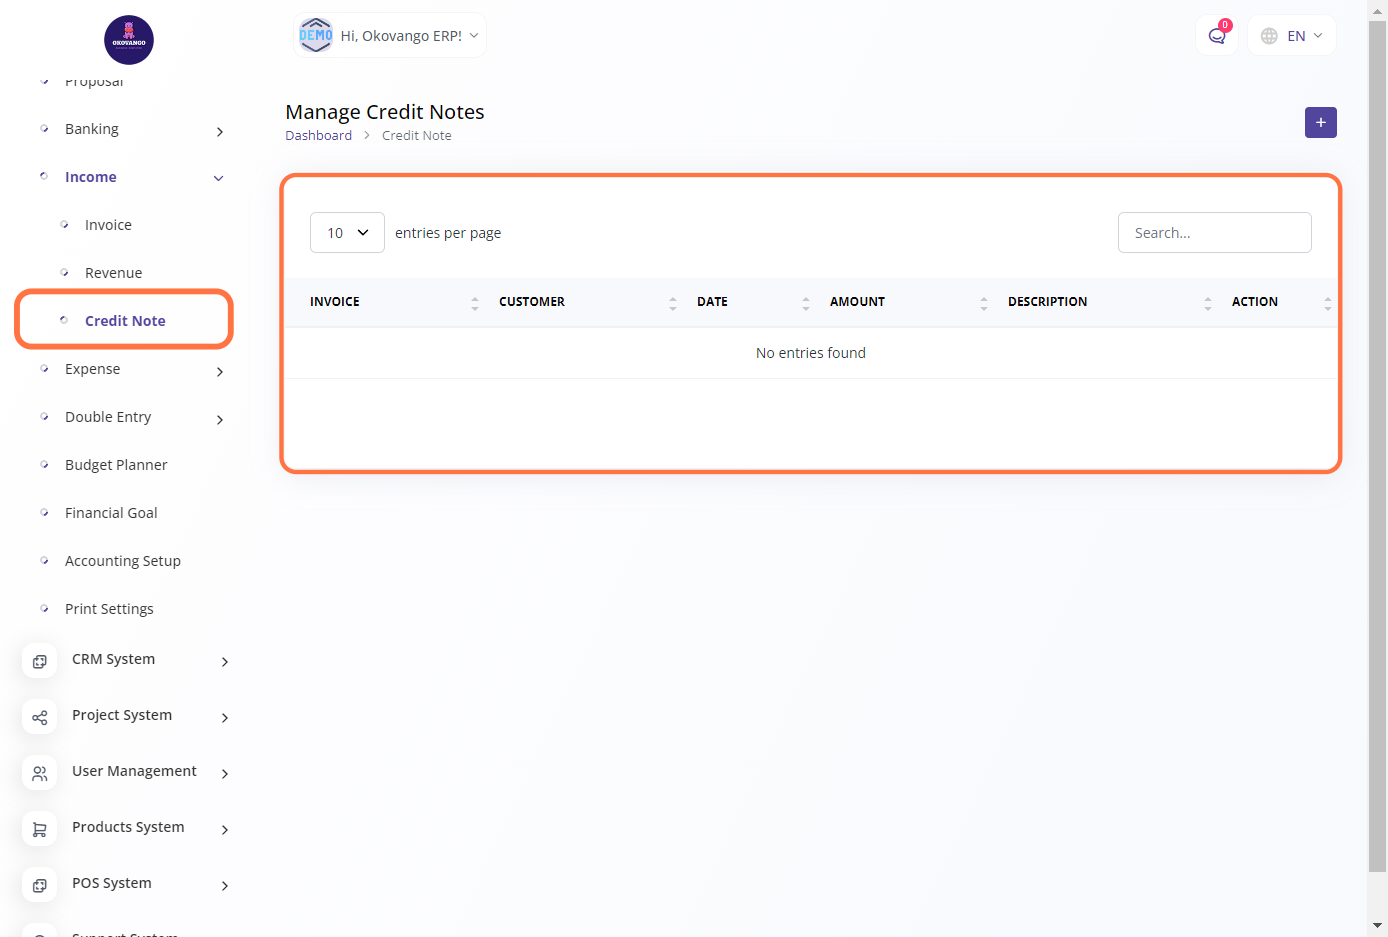
Credit Note
Credit notes enable you to issue refunds or adjustments to customers when necessary. They are used to record and manage any returns, discounts, or credits issued to clients, ensuring accurate financial records.
Step 1: Click the "Create" Button
Step 2: Create new credit note
To create a credit note in the accounting system, you can follow these steps:
Select the relevant invoice(s) for which you need to issue a credit note. This helps in associating the credit note with the specific transaction(s) it relates to.
Specify the amount of the credit note, which typically represents the refund or adjustment being provided to the customer.
Enter the date of the credit note, indicating when it is issued.
Provide a description or reason for the credit note, explaining the purpose or cause behind the refund or adjustment.
Click on the "Create" button to generate the credit note and record it in the accounting system.
By following these steps, you can accurately create and manage credit notes, ensuring proper documentation of any refunds or adjustments made to customer accounts.
In the banking section of the accounting system, you can manage accounts and transfers. These features provide you with control and management over your financial transactions within the accounting system's banking module.
Account
You have the option to create and configure different types of accounts such as bank accounts, cash accounts, or credit card accounts. This involves providing relevant information such as the account name, account number, account type, and opening balance. You can also edit or delete existing accounts as needed.
Step 1: Click the "Create" Button
Step 2: Create new account
To create an account in the banking module of the accounting system, you can follow these steps:
Provide the name of the account holder, which is typically the individual or organization associated with the bank account.
Specify the name of the bank where the account is held. This helps identify the financial institution associated with the account.
Input the account number assigned to the bank account. This unique identifier helps differentiate between different accounts.
Specify the opening balance of the account, which represents the initial amount of funds available in the account.
Provide a contact number associated with the bank account holder, such as a phone number for communication purposes.
Specify the address of the bank where the account is held. This includes details such as street address, city, state, and postal code.
Once you have entered all the necessary information, click the "Create" button to finalize the creation of the account.
By following these steps, you can successfully create a new account within the banking module of the accounting system, allowing you to track and manage your financial transactions effectively.
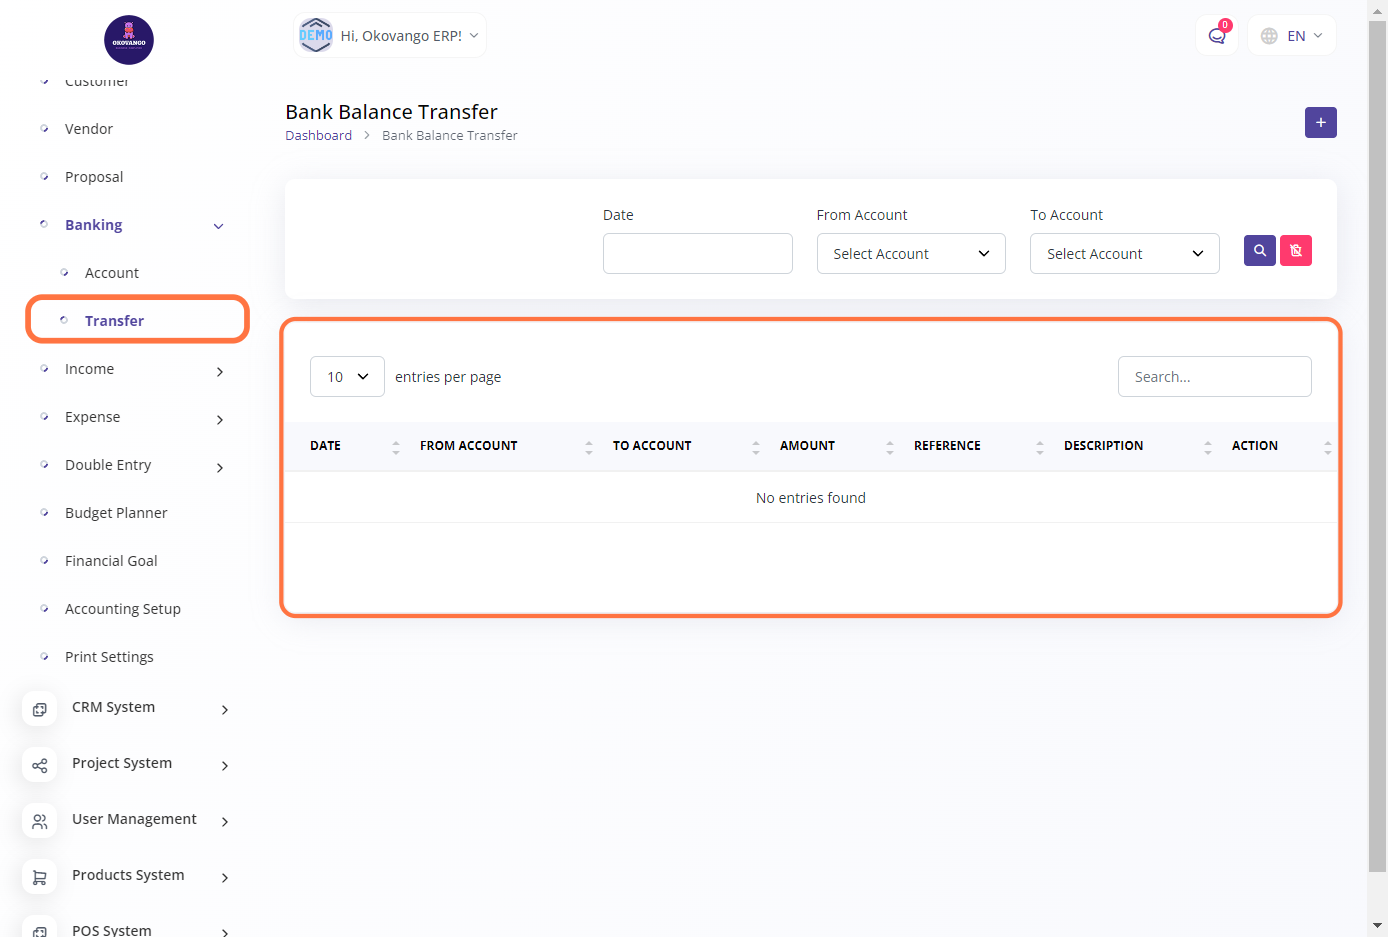
Transfer
Within the banking section, you can initiate transfers between different accounts. This allows you to move funds from one account to another. You would typically specify the source account, destination account, transfer amount, and any additional details or remarks. After confirming the transfer, the funds will be debited from the source account and credited to the destination account.
Step 1: Click the "Create" Button
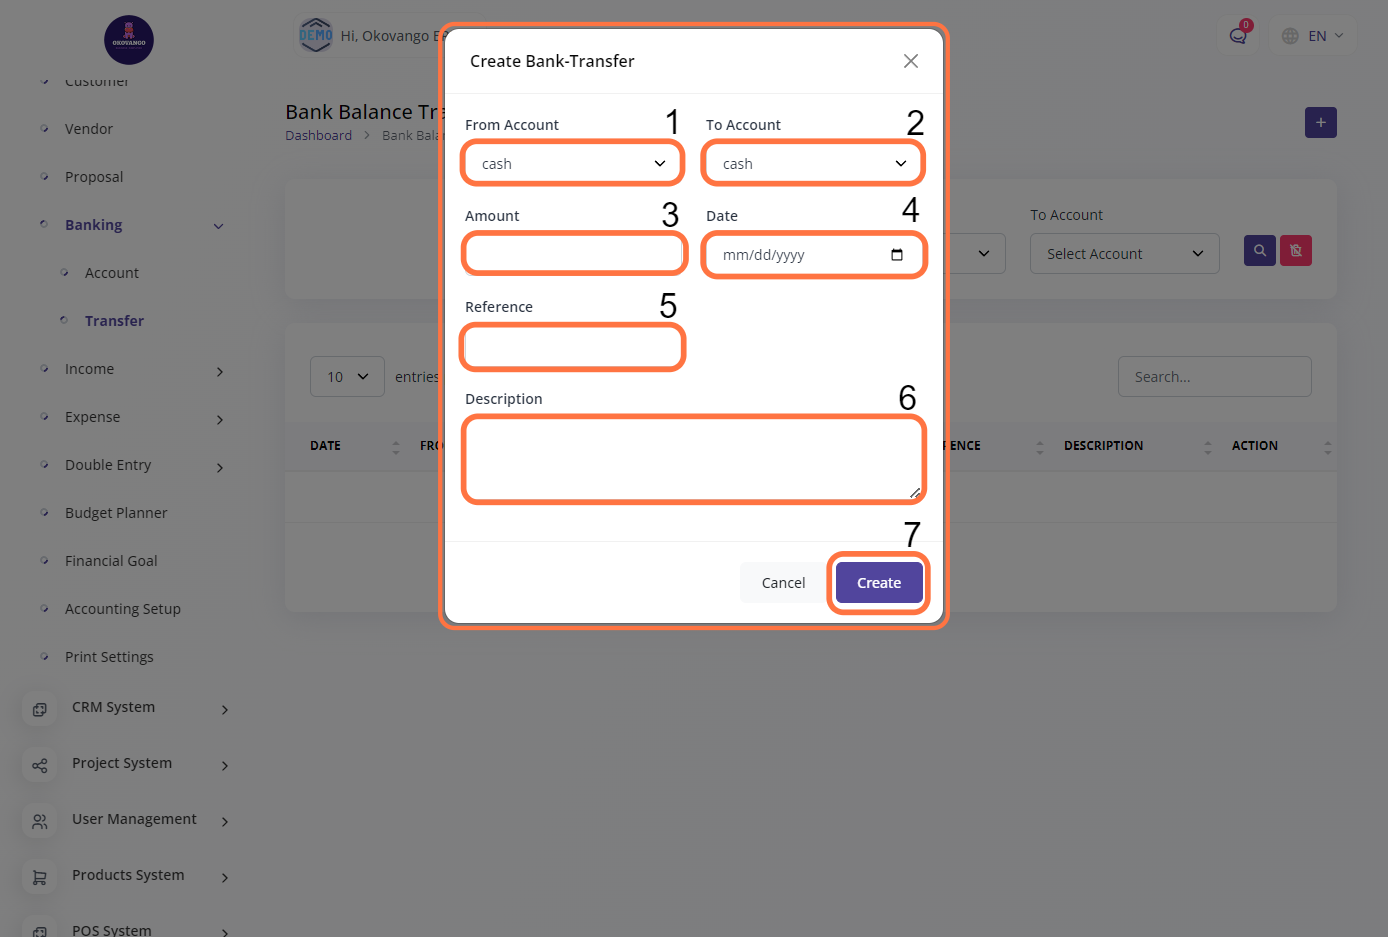
Step 2: Create new Transfer
To create a new transfer in the banking module of the accounting system, you can follow these steps:
Choose the account from which you want to transfer funds. This is the account where the money will be deducted.
Choose the account to which you want to transfer funds. This is the account where the money will be credited.
Specify the amount of money you wish to transfer between the accounts.
Input the date of the transfer, indicating when the transaction took place.
Provide a reference or identifier for the transfer, such as a transaction number or any other relevant information.
Optionally, you can provide a description or additional notes related to the transfer.
Once you have entered all the necessary details, click the "Create" button to initiate the transfer.
Following these steps will allow you to create a new transfer, facilitating the movement of funds between different accounts within the accounting system's banking module.